Install, Enable, and Configure Skills
A Skill adds a specialized capability to an Agent, such as processing PDFs, generating office documents, or connecting to a particular service. Installing adds the Skill to PlugClaw, while enabling allows an Agent to use it. If an installed Skill is not working, first check whether it is enabled.
Choose the entry point that matches what you need to do:
| What you want to do | Where to start |
|---|---|
| Find and install a ready-made Skill without a specific name in mind | Featured Skills |
| View, enable, or configure a Skill already available in PlugClaw | Skills |
| Install a Skill whose exact name and trusted source are already known | Install through a conversation |
| Save your own workflow because no ready-made Skill fits | Create a Skill |
Featured Skills is PlugClaw's marketplace for discovering and installing ready-made Skills. If you need a new capability but do not yet know which Skill to use, search by keyword or browse categories such as development tools, data analysis, and content creation. The page includes both installed and uninstalled Skills, so appearing in Featured Skills does not mean a Skill has already been installed.
Each Skill card explains what the Skill does and shows its category, install count, publisher, and current installation state. Once you find a suitable Skill, you can install it and try it in a conversation. For this reason, Featured Skills is the recommended starting point when finding and installing a Skill for the first time.
Skills serves a different purpose. It is mainly used to view, enable, and configure Skills that are already available in PlugClaw. Use conversation-based installation only when you know the exact Skill name and trust its source.
Some Skills require additional dependencies, API keys, or environment variables. An API key is an access credential. Do not enter keys from unknown sources or expose them in conversations or screenshots. Before installing a third-party Skill, confirm its source and purpose, and keep only the Skills you actually need.
Install from Featured Skills
Featured Skills supports both direct searches by name and browsing by purpose when you have not chosen a specific Skill yet.
- Open Featured Skills from the conversation page.
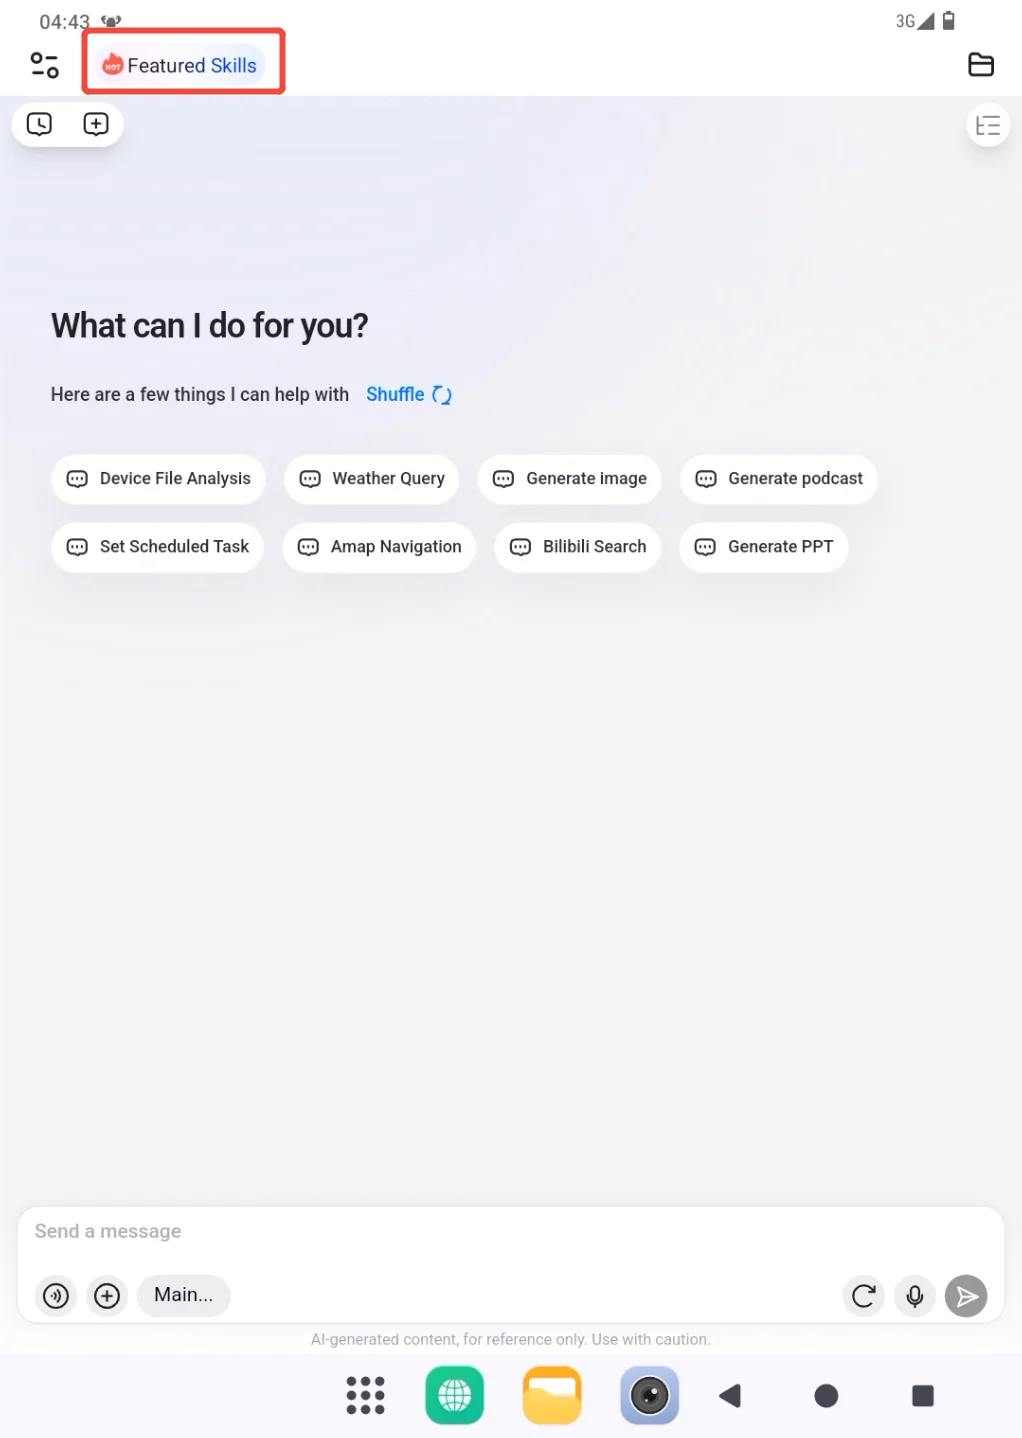
- On the Featured Skills page, find a Skill in the way that best matches your situation:
- If you know its name or tag, enter a keyword in the search box at the top.
- To see only Skills that can still be installed, select Not Installed. To find a Skill that is already installed, select Installed. All displays both states.
- To browse by purpose, choose a category such as Development Tools, Data Analysis, Business Operations, Education & Learning, Information, or Content Creation.
- Skills are sorted by Latest by default. To prioritize widely used Skills, change the sort order to Install Count.
These filters can be combined. If the expected Skill does not appear, clear the search, return the state filter to All, and then choose the category again.
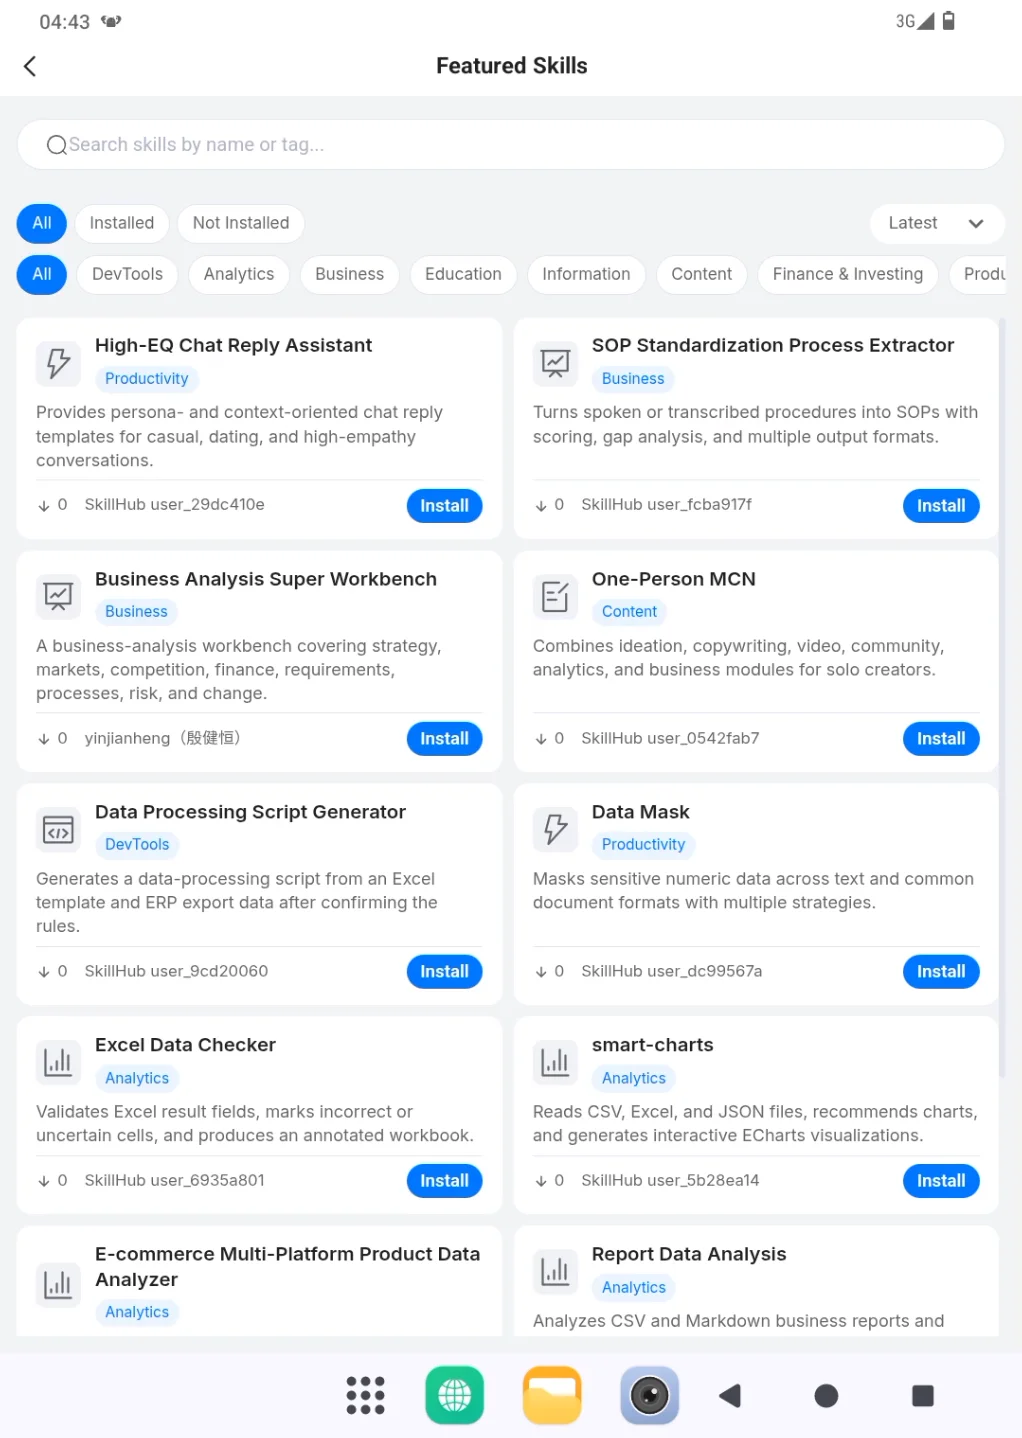
Review the Skill name, category, description, install count, and publisher on its card. Confirm that the description matches the task and that the publisher is recognizable. Skills with similar names may serve different purposes, so rely on the description rather than the name alone.
When the details look correct, choose Install on the Skill card and wait for its state to change. Do not select Install repeatedly while the request is being processed.
After a successful installation, Install changes to Try in Chat, and an Uninstall action appears. You can also switch to Installed to confirm the result. If the card still shows Install or displays an error, the installation has not completed successfully.
- Choose Try in Chat and use a simple, low-risk task to confirm that the Skill works. The Skill is ready only when it can complete an appropriate task in a conversation.
When a Skill is no longer needed, choose Uninstall from its card. This removes the associated capability, so first make sure that no conversation or scheduled task still depends on it.
Enable and Configure a Skill in Skills
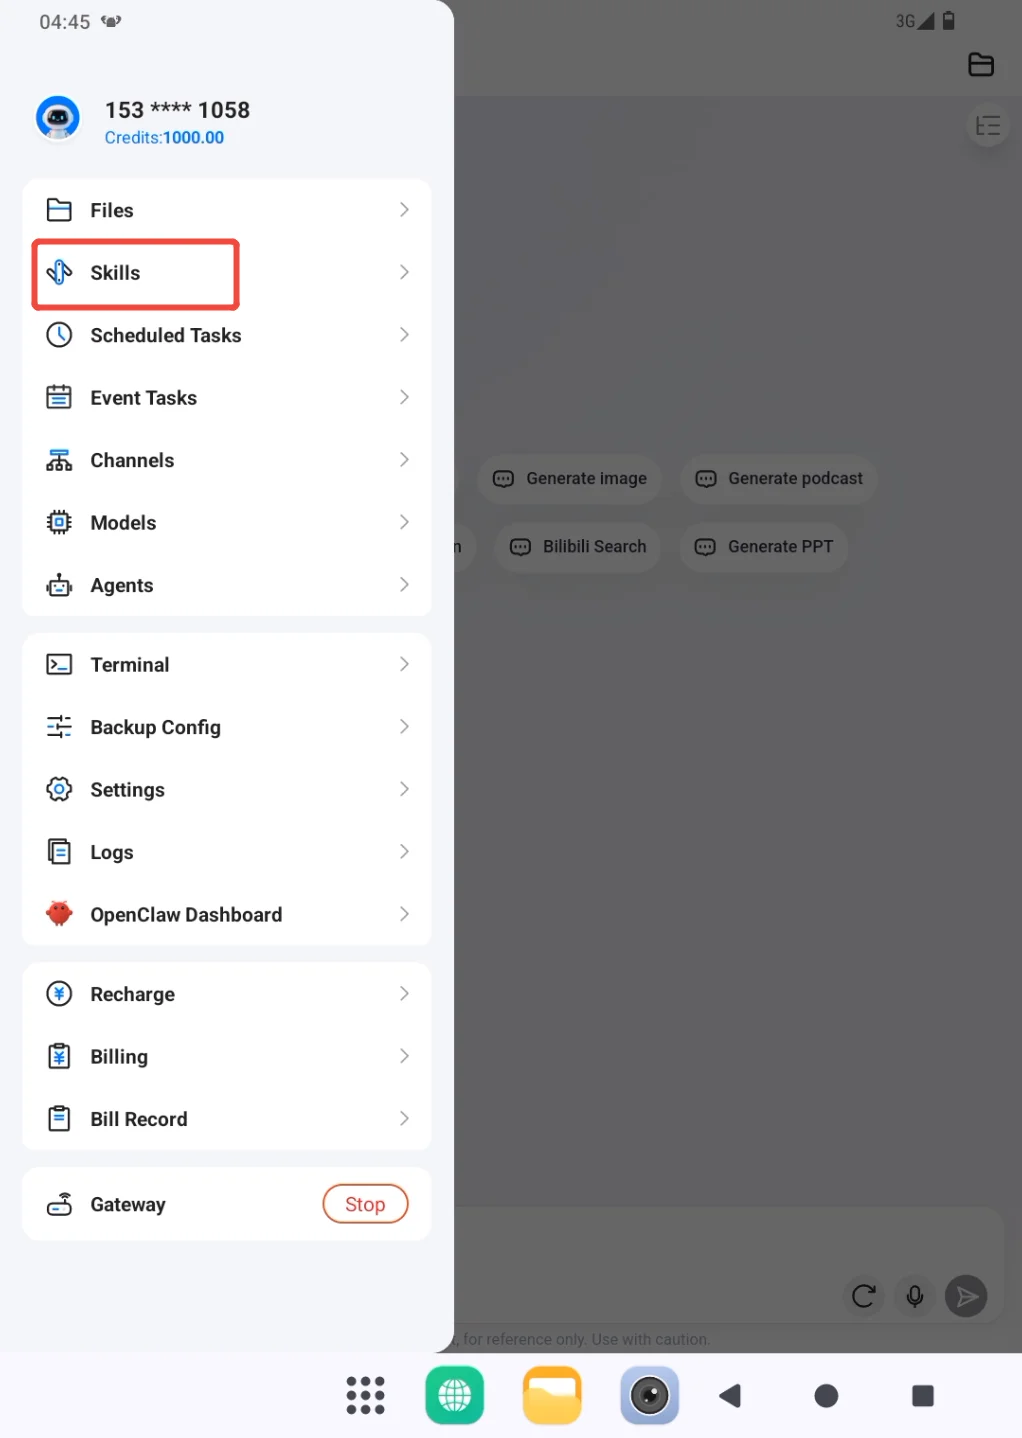
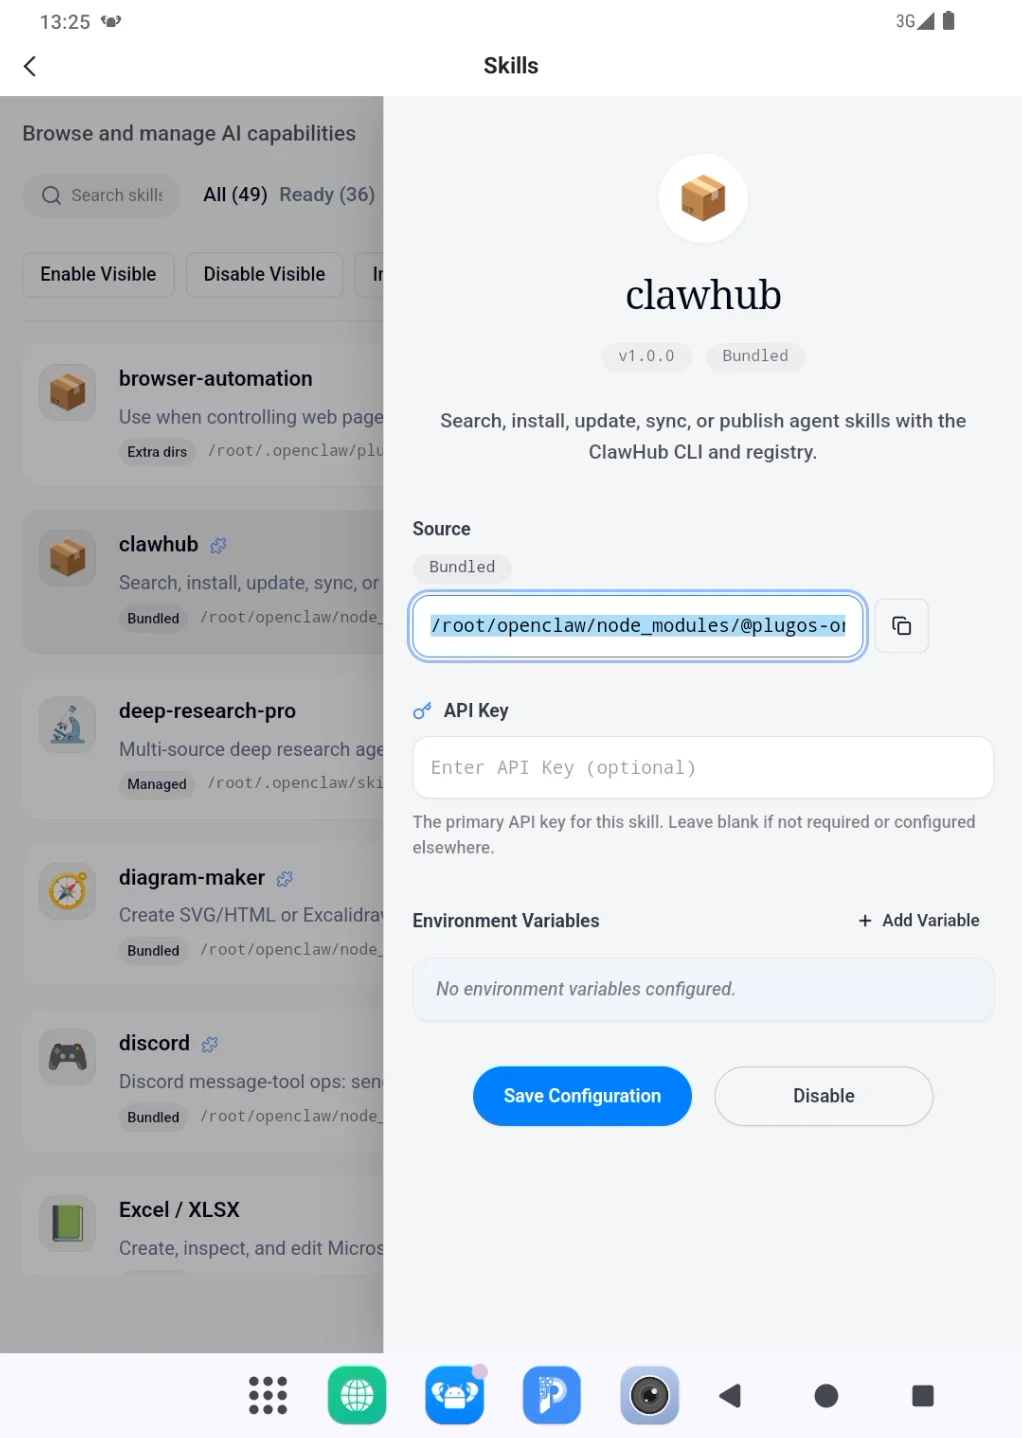
- Open the sidebar from the profile area in the upper-left corner, then open Skills.
All displays every available Skill, while Ready shows Skills whose runtime requirements are already satisfied. Built-in and Marketplace indicate where a Skill comes from. The switch beside a Skill only enables or disables it; it does not install a new marketplace Skill.
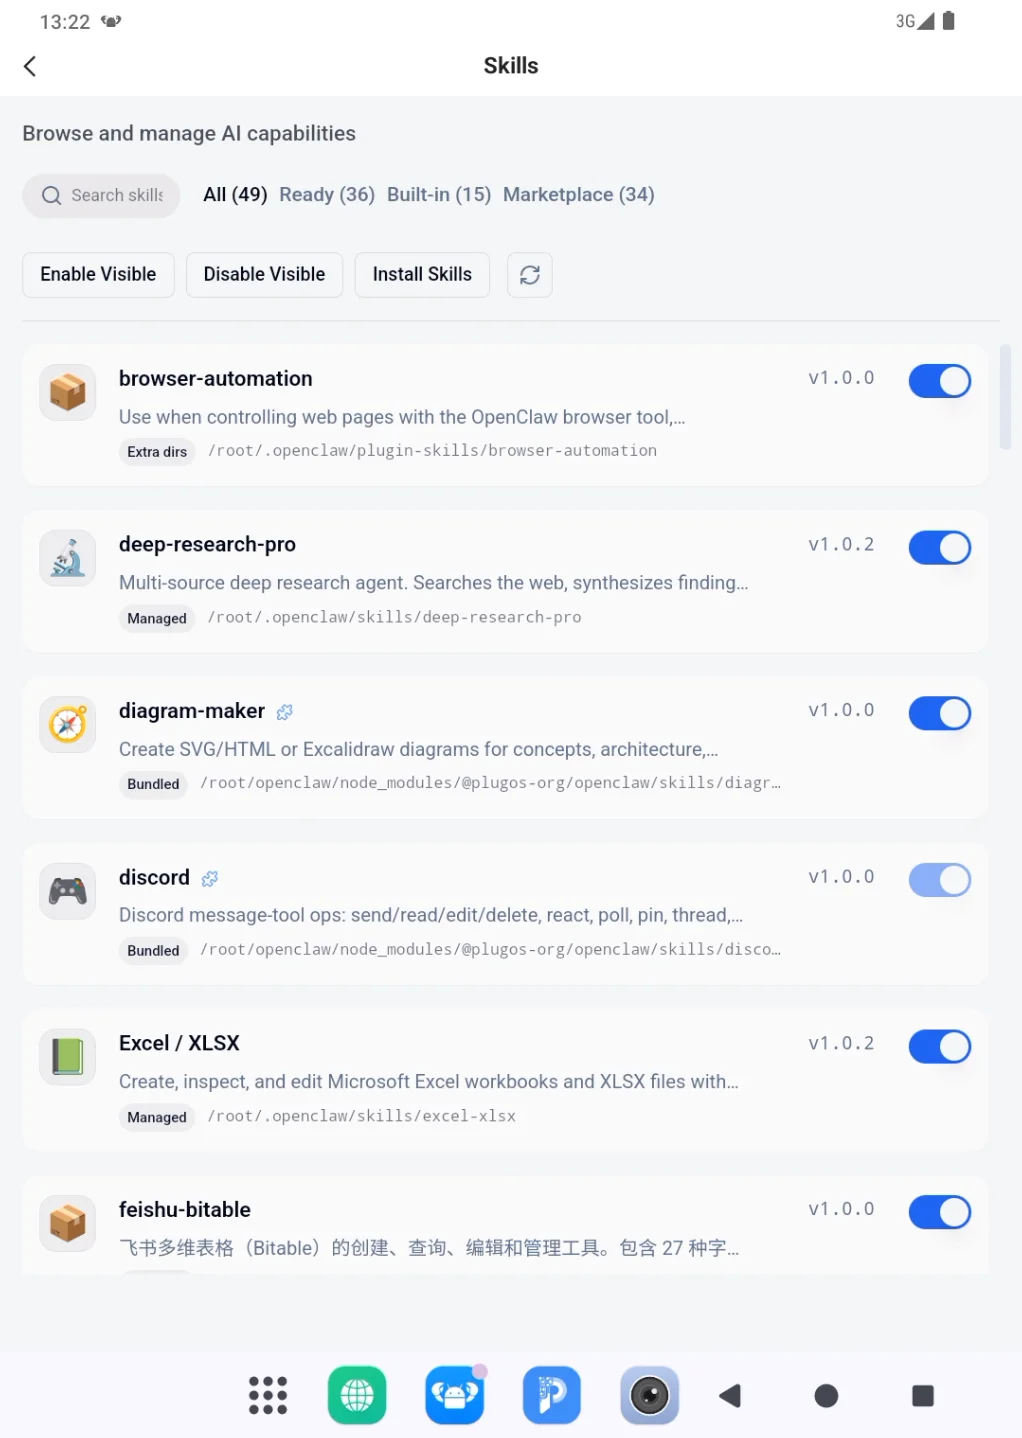
- Enter the Skill name in the search box to find the one you want to use.
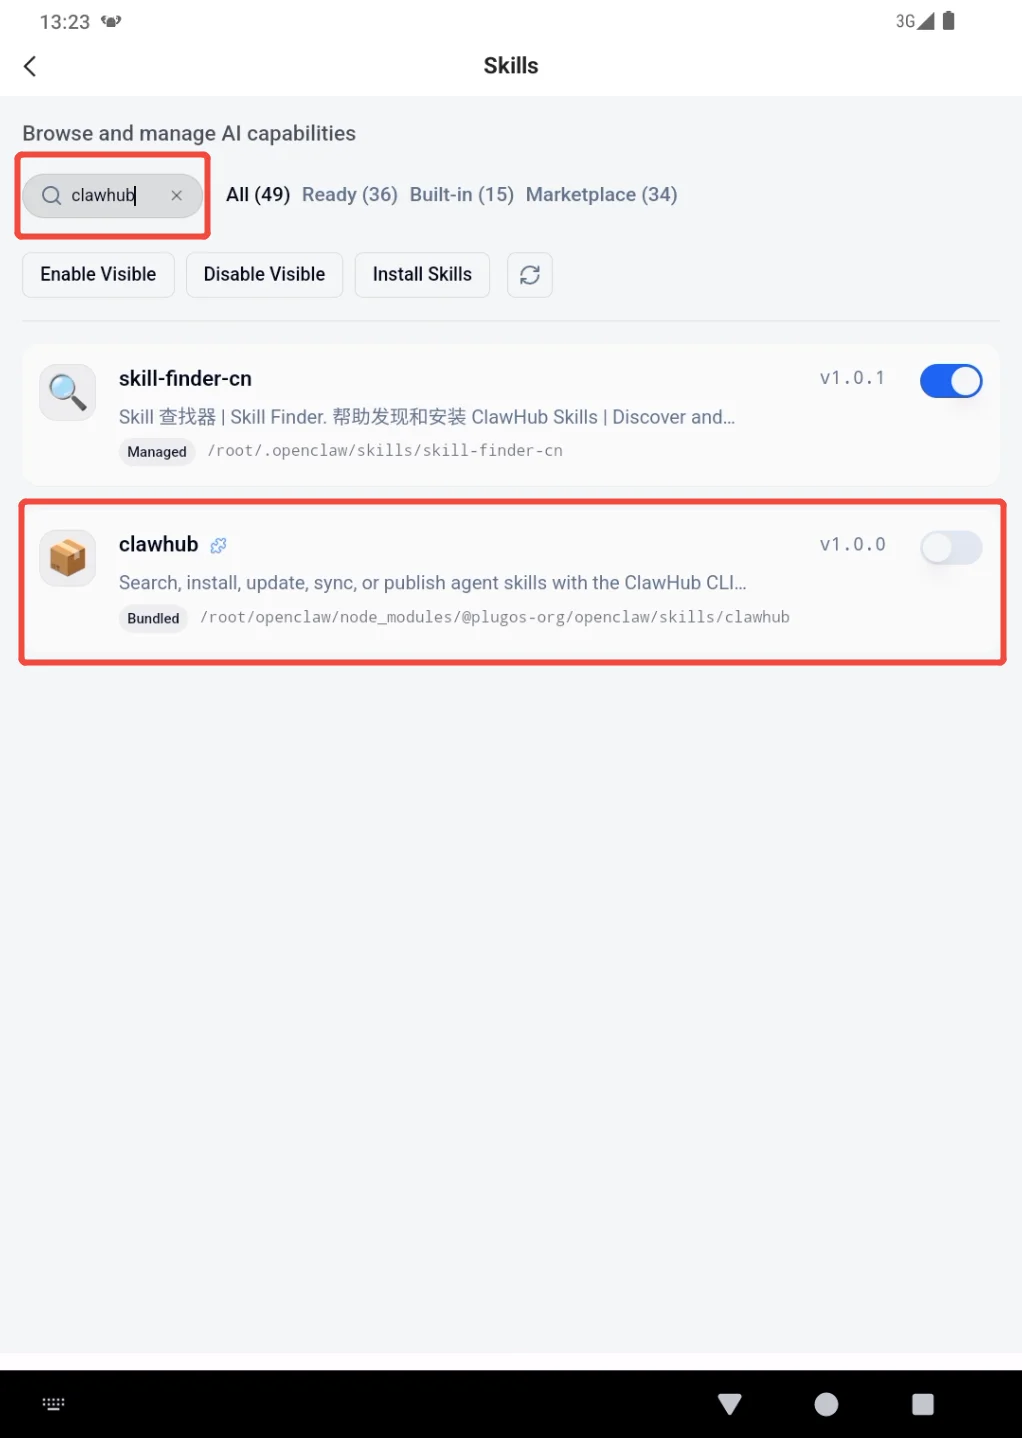
- Turn on the switch beside the Skill. A blue switch together with the Skill enabled confirmation means that it is enabled successfully.
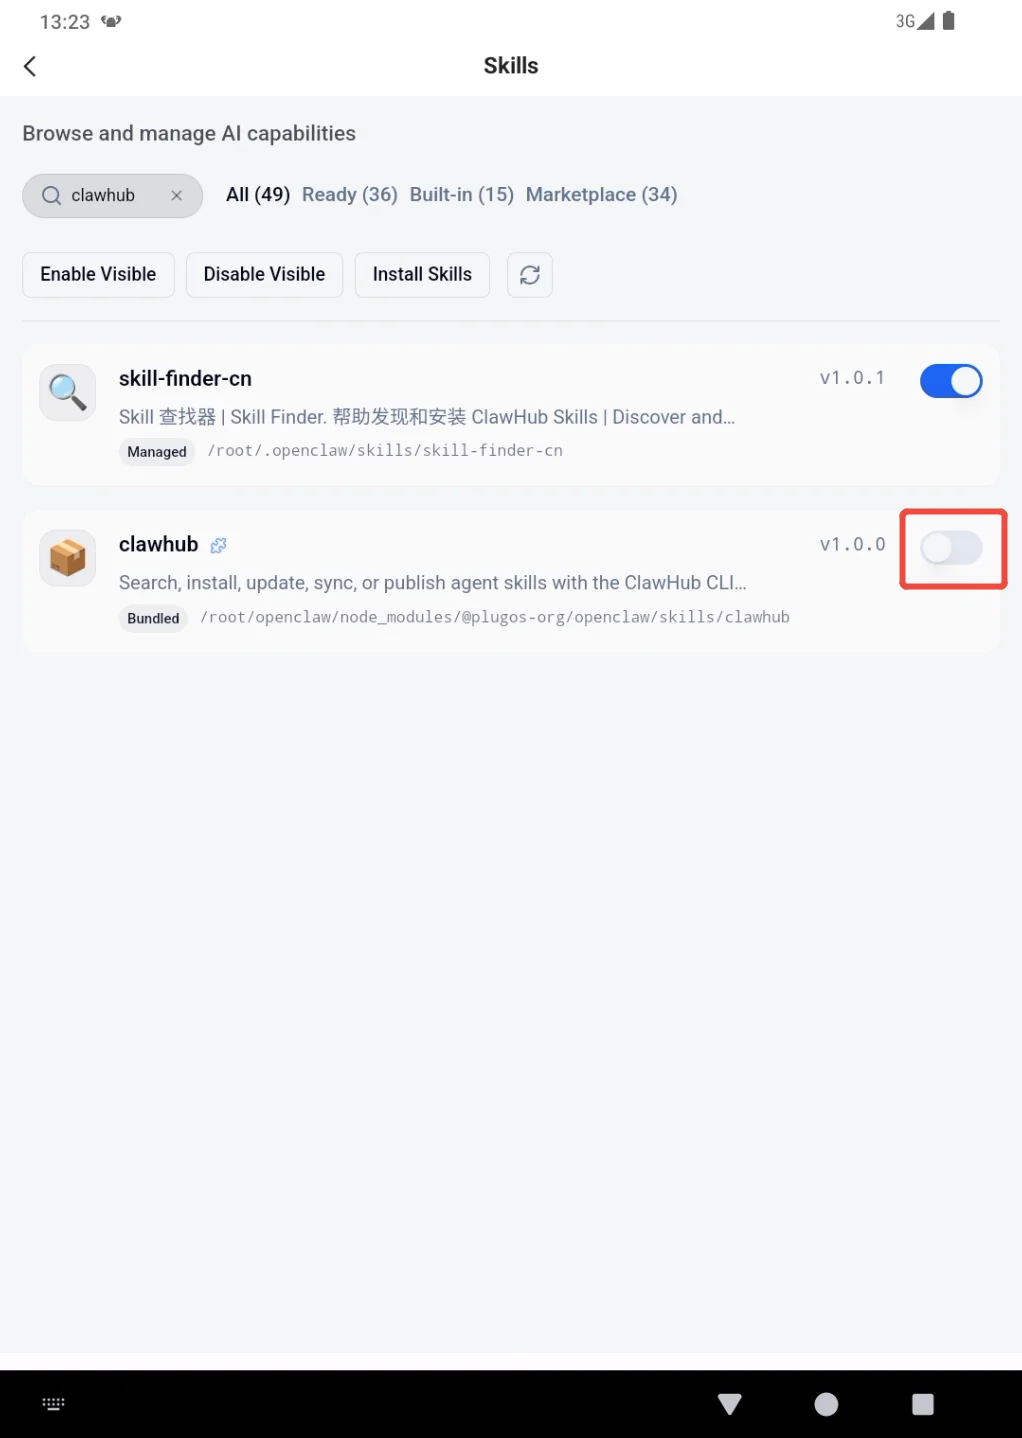
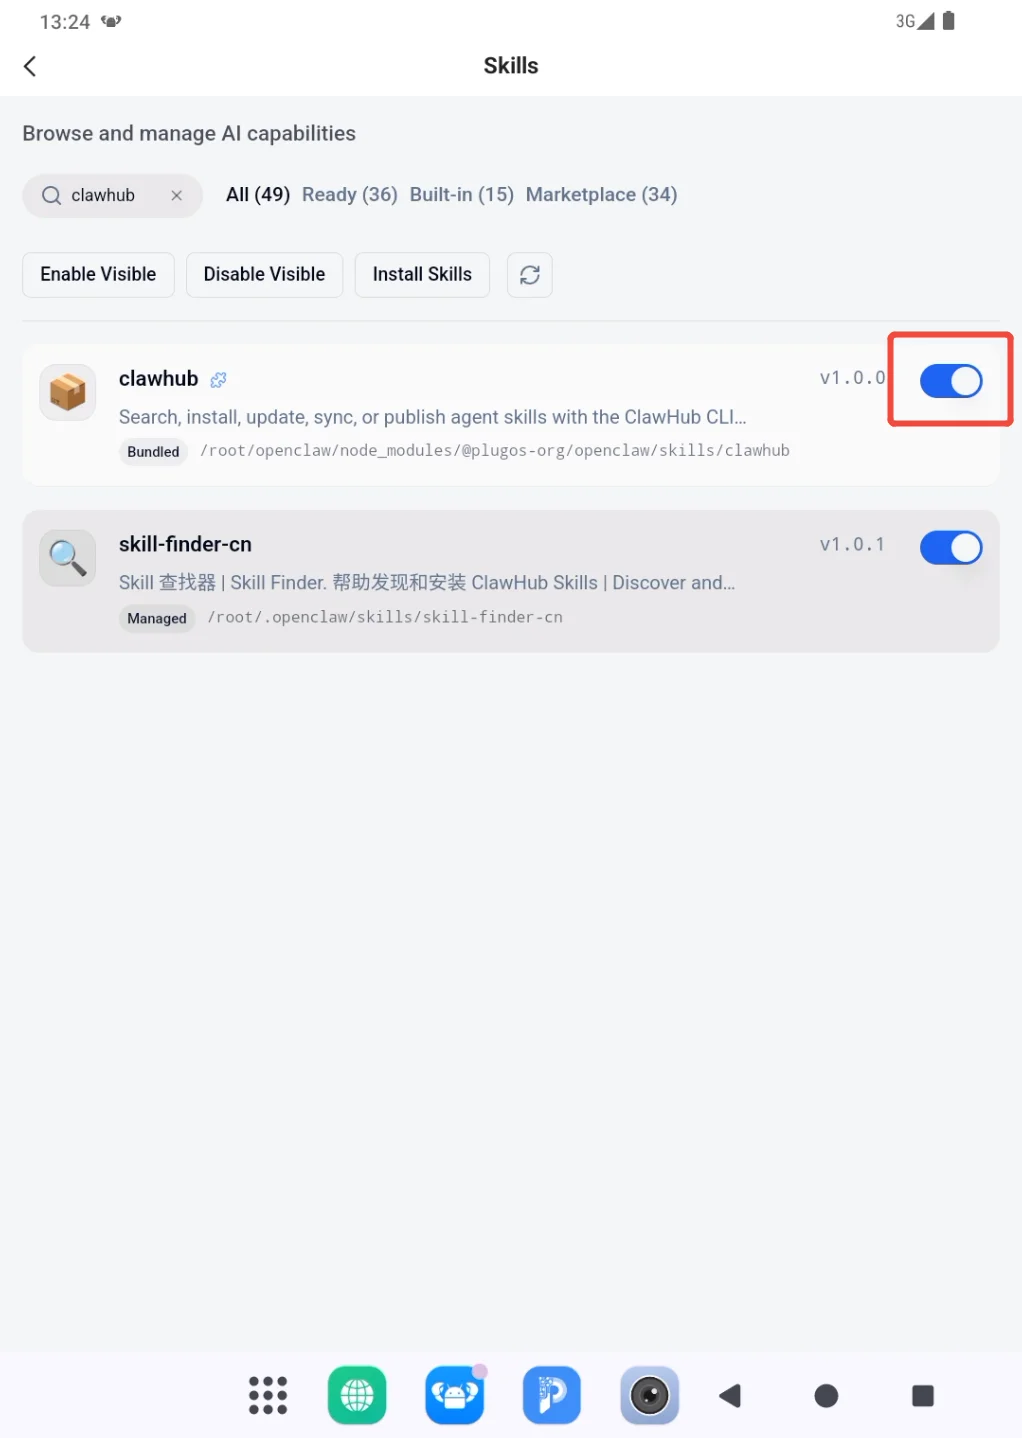
Wait for the page to finish after changing the switch instead of toggling it repeatedly. When enabling succeeds, the switch remains blue and the confirmation appears at the bottom of the page.
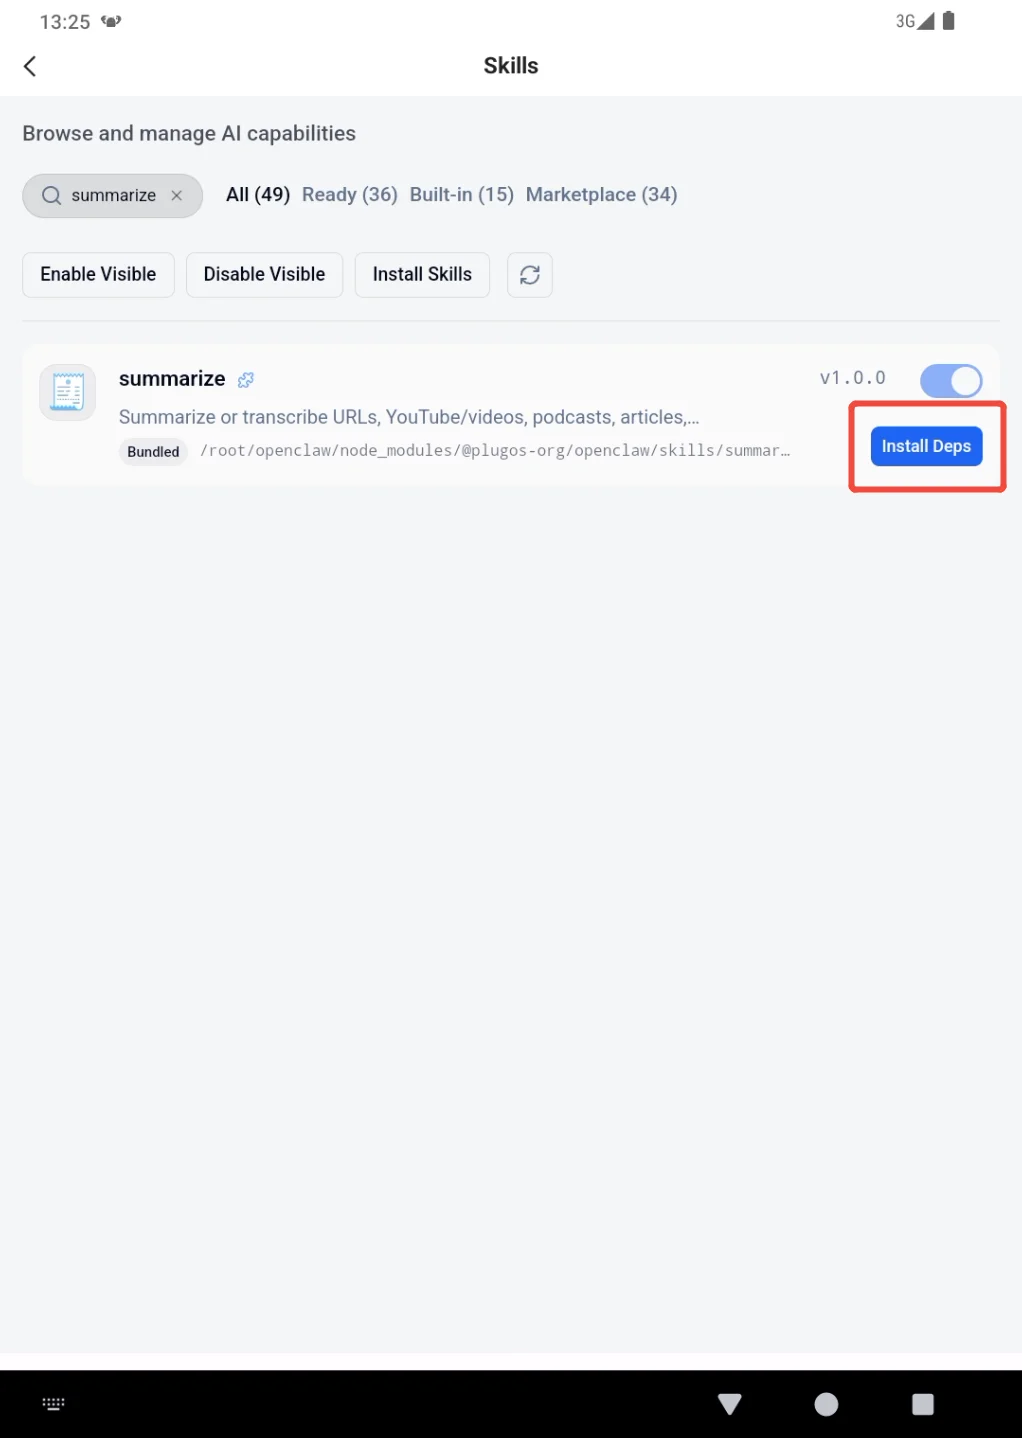
If Install Deps appears beside the Skill, the additional components it needs are not ready. Choose Install Deps, wait for the installation to finish, and then enable the Skill. Keep the network connected during installation and do not start the same request repeatedly.
Open the Skill name to view its details. Add an API key or environment variable only when the Skill explicitly requires one, then choose Save Configuration. If the source, purpose, or requested credential is unclear, do not configure or enable the Skill.
Install Through a Conversation
Conversation-based installation is intended for cases where the exact Skill name and a trusted source are already known. If you have not chosen a specific Skill, start with Featured Skills instead.
- State the exact Skill name in the conversation and ask PlugClaw to report the source and version before installing. For example: "Find and install the
grill-meSkill. Tell me its source before installation." If several results have the same name, confirm which one should be used before continuing.
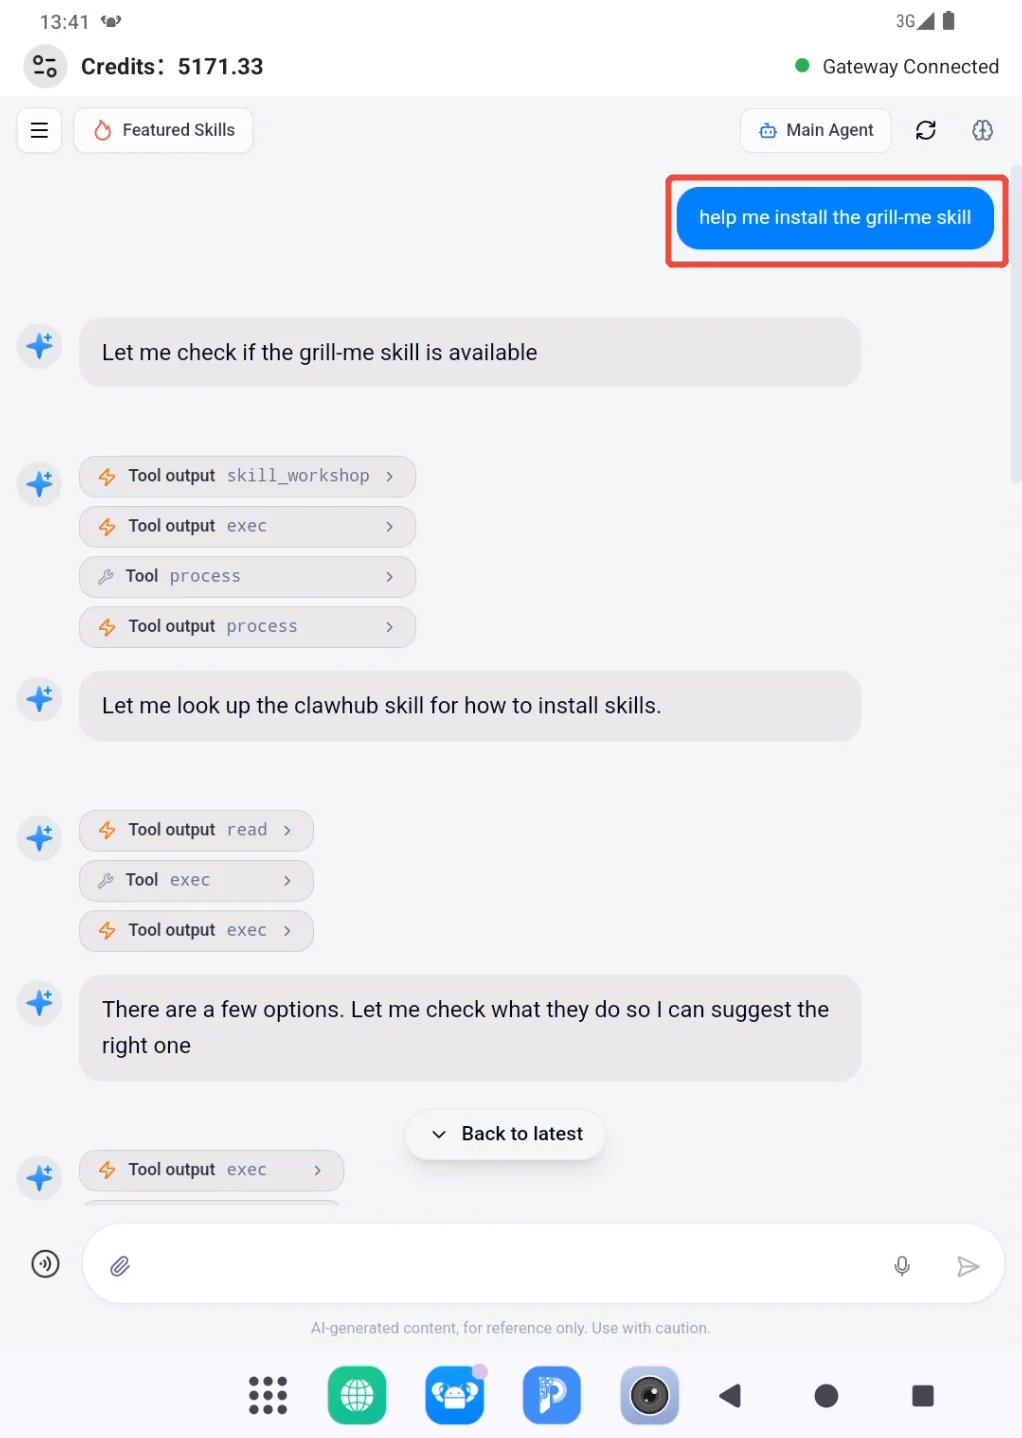
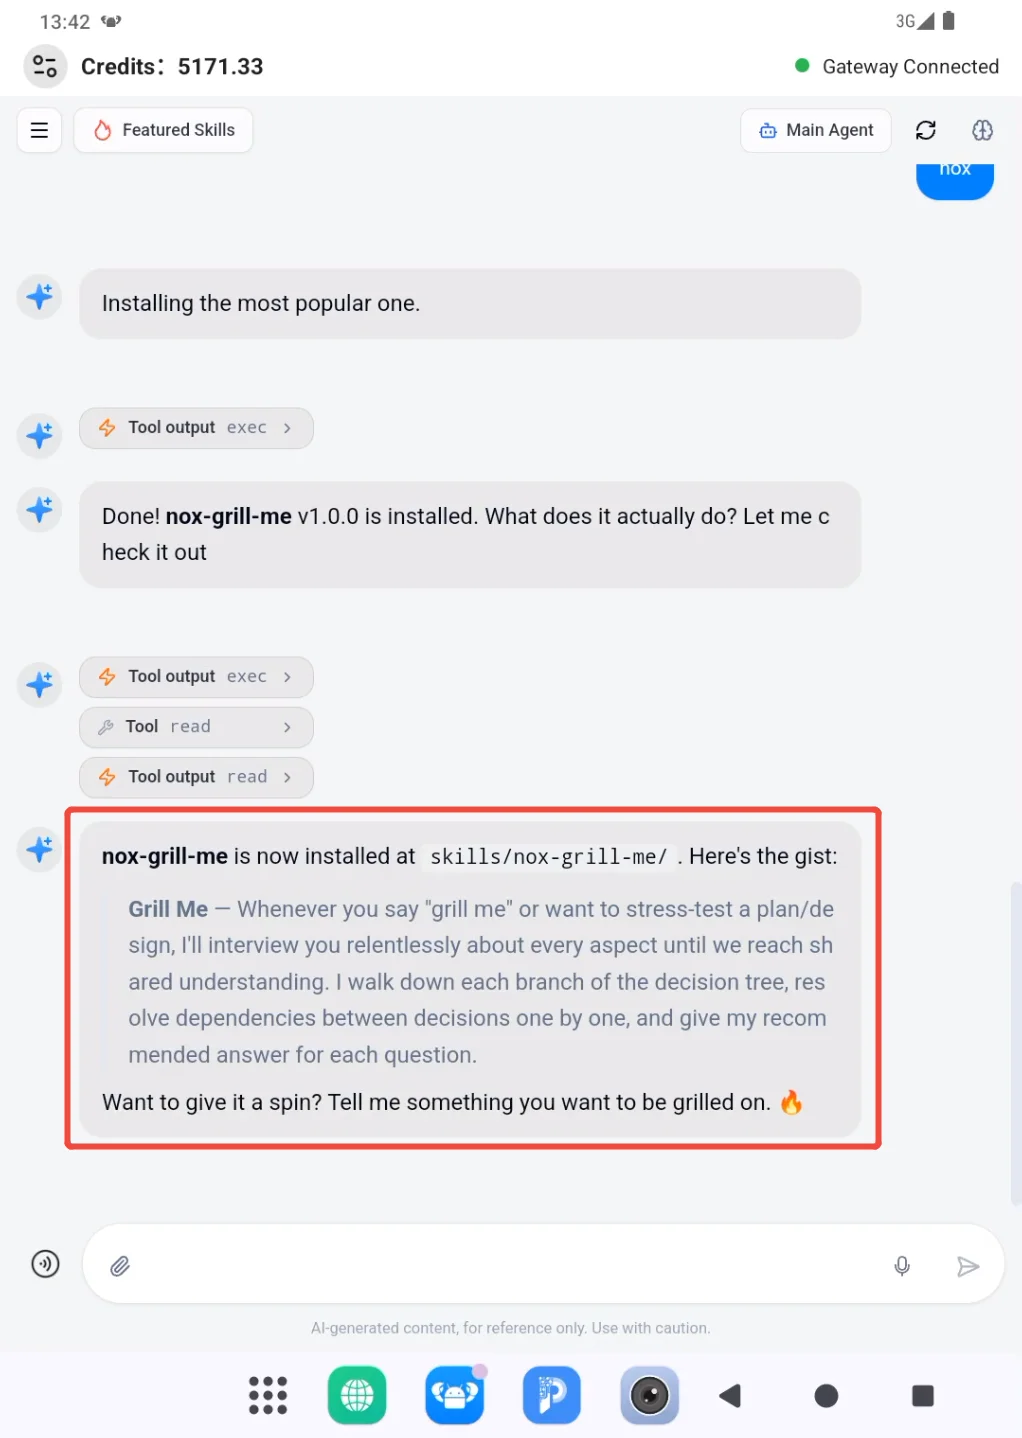
- Wait while the Agent searches for and installs the Skill, and do not send the same installation request repeatedly. Even if a tool error appears during the process, continue to the final response. Treat the installation as complete only when the Agent clearly reports installed successfully or installation failed.
Continue to verification only after seeing an explicit success message.
- Open Skills and search for the Skill. If it appears in the list and its switch is on, it has been installed and enabled.
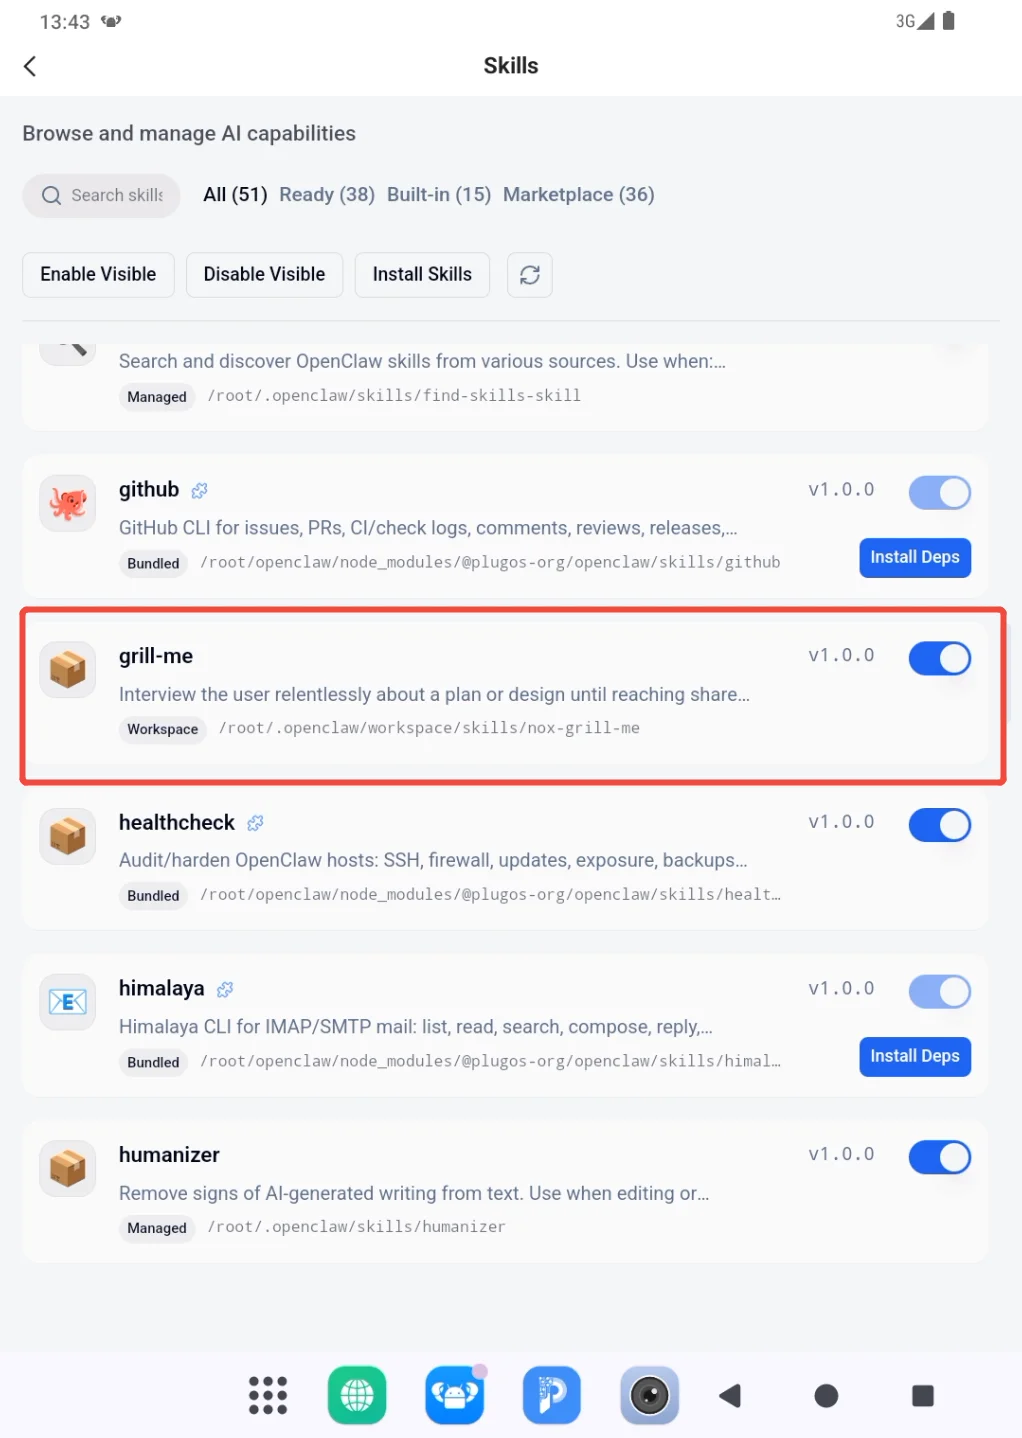
Finally, start a new conversation and send a simple task that matches the Skill's purpose. If the Skill appears but cannot be used, return to Skills and check whether it is enabled.
Create a Skill
Creating a Skill turns a repeatable way of completing a task into a capability that can be used again. A normal conversation handles the current request only. A Skill preserves the workflow, decision rules, output format, and limits so that the same type of work does not have to be explained from the beginning each time.
A Skill is different from an Agent. The Agent determines who handles the work, while the Skill gives that Agent a method for how to complete a particular kind of task. For example, a document-organizing Agent could use a meeting-notes Skill to consistently extract decisions, action items, owners, and deadlines. It could also use a weekly-report Skill to summarize progress in a fixed format. Creating a Skill does not create another Agent.
Create your own Skill when Featured Skills does not contain a suitable option, or when an existing Skill's rules or output format do not fit the requirement. You do not need to write Skill files manually. In a PlugClaw conversation, explain when the Skill should be used, what input it receives, what rules it follows, what it should produce, and what it must not do.
The Agent uses these requirements to generate a proposal in Skill Workshop. A proposal is a draft awaiting review and records the Skill's purpose and operating rules. Seeing a proposal generated in the conversation does not mean the Skill is ready to use. You must still open Skill Workshop and review its contents.
The complete process is Describe the Skill > Generate a proposal > Review the proposal > Apply and test it. Choose Apply when the content is correct, Revise when it needs changes, or Reject when it is no longer needed or cannot be verified. After applying it, confirm that the Skill appears and is enabled under Skills, then test it with a simple task.
Explain the Requirement First
Tell the Agent what kind of Skill you want to create. Explain when it should be used, what it should do, and what result you expect. The more specific the requirement is, the easier it will be to decide whether the proposal is correct and describe any necessary revisions.
To reduce repeated revisions, you can describe the requirement in this form:
Create a Skill for [use case]. When [trigger], follow [processing rules] and produce [expected output]. Do not [restriction or prohibited behavior].
For example:
Create a Skill for organizing meeting notes. When I provide meeting notes and ask you to organize them, extract decisions, action items, owners, and deadlines. Mark missing details as "To confirm" and do not invent them.
Include the following details whenever possible:
- Use case: the problem the Skill should solve.
- Trigger: how a request indicates that the Skill should be used.
- Processing rules: the order and standards the Skill should follow.
- Output: the required content and format.
- Restrictions: actions that are not allowed and information the Skill must not infer.
After sending the requirement, answer any follow-up questions from the Agent. Open Skill Workshop only after the response clearly states that a Skill proposal has been generated.
If the Agent only gives a normal answer and does not generate a proposal, add: "Create a Skill from the requirements above and generate a proposal for review." Do not treat a normal text response as a completed Skill.
Open and Review the Proposal
After the Agent confirms that it has generated a proposal for review, open the sidebar from the profile area in the upper-left corner and enter OpenClaw Dashboard. When OpenClaw Control opens, expand its menu and enter Skill Workshop. If you only need to install or enable an existing Skill, use Featured Skills or Skills instead; Skill Workshop is not required.
In Skill Workshop, open Pending. The number beside it shows how many proposals still need a decision. Find the proposal that was just generated, open it, and read the complete content.
Create before a proposal name means that it will create a new Skill. If the label indicates a modification, the proposal will update an existing Skill. Before deciding, check at least the following:
- The proposal name and description match the actual requirement.
- The rules are clear and will not affect unrelated tasks.
- The displayed version and number of supporting files are expected.
- The proposal contains no unfamiliar external source, sensitive information, unsafe command, or unnecessary permission.
A proposal may be long, so scroll through the entire content before making a decision. If the purpose of a rule is unclear, choose Revise and ask for an explanation or correction rather than applying it immediately.
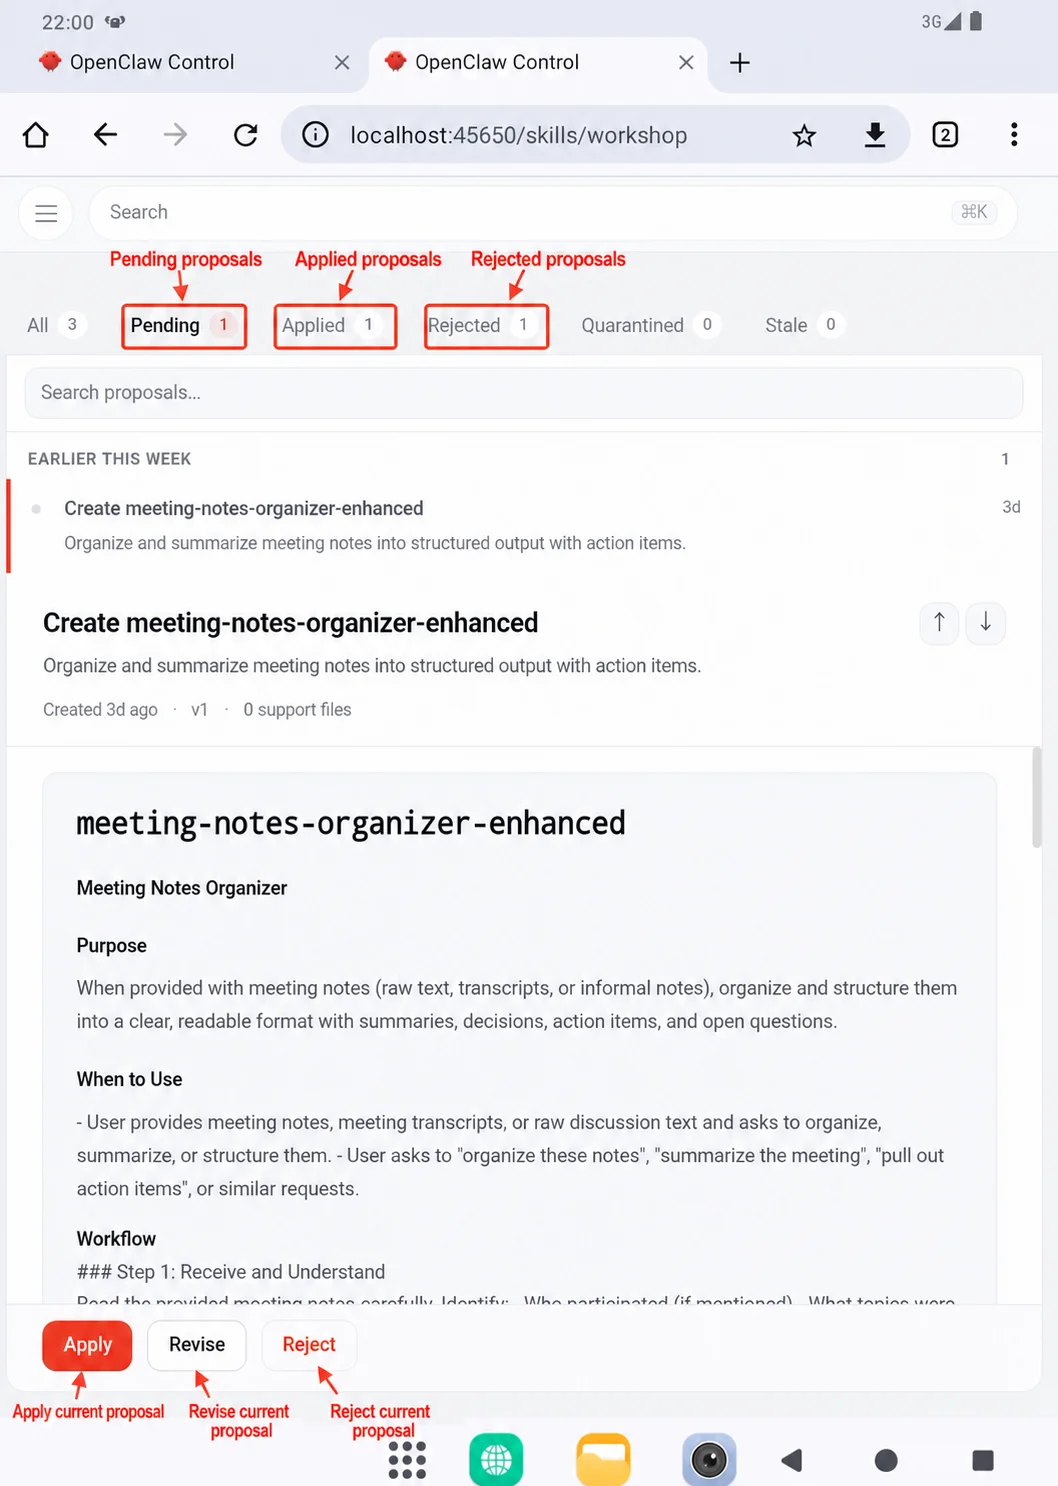
Decide What to Do with the Proposal
After reading the complete proposal, choose an action based on the review result:
| Review result | Action | What happens |
|---|---|---|
| The content is complete, and its rules and scope match the requirement | Apply | The proposed creation or modification enters the current workspace |
| The goal is correct, but the rules are incomplete, too broad, or unclear | Revise | Your revision request is submitted and a new version is generated for review |
| The content is unrelated, takes the wrong direction, comes from an uncertain source, or is no longer needed | Reject | The proposal is rejected and does not create or modify a Skill |
Apply the proposal when the content is correct. Before choosing Apply, confirm the proposal name and full content once more. After it is applied, the proposal appears under Applied, and the number shown under Pending decreases accordingly.
Then return to PlugClaw's Skills page, confirm that the new or updated Skill appears, and test it with a simple, low-risk task. If the Skill is present but disabled, turn on its switch. The earlier section of this guide explains how to enable and configure a Skill.
If the applied Skill behaves unexpectedly, stop using it, record the proposal name and the unexpected behavior, and ask the Agent to generate a revision proposal. Do not attempt to fix it by applying several unchecked proposals in succession.
Revise the proposal when the content needs adjustment. After choosing Revise, state what must remain, what should change, and how the revised Skill should behave. For example: "Keep the rule for recognizing task cancellation, but apply it only to mobile automation. When the user says 'wait,' ask for confirmation instead of ending the task immediately." When the request is specific and unambiguous, choose Send revision.
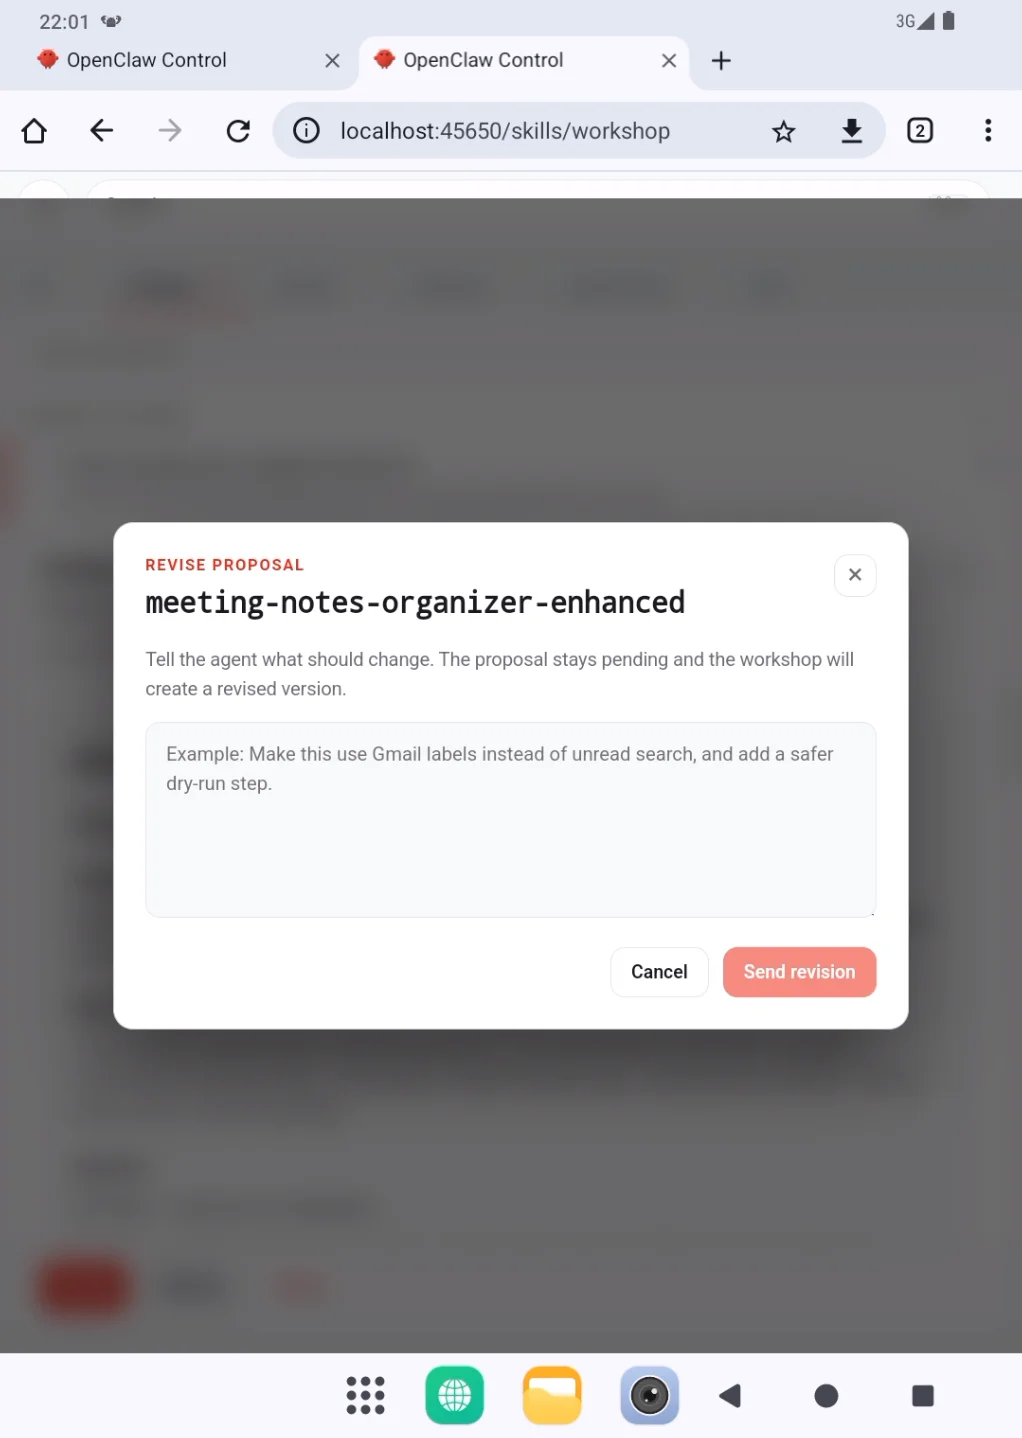
Submitting a revision does not update the Skill immediately. The system generates a new version, and the proposal remains under Pending for another review. Return to the pending list, confirm that the version has changed, and read the complete content again. Choose Apply only when the new version is correct.
Reject the proposal when it should not be used. After choosing Reject, the proposal moves to Rejected and does not create a new Skill or modify an existing one. If a proposal was rejected by mistake, ask the Agent to generate a new one from the original requirements and review it again.
Rejected only means that this proposal was not adopted. It does not mean that an existing Skill has been deleted. Check the Skills page to confirm whether the existing Skill is still available.
 PlugOS — Privacy isn't an option. It's the foundation
Secure, Ad-free, Tracking-free, No Telemetry