-
Android
-
Add Device

-
Automatic Discovery and Addition
-
Manual Addition
-
Access the Device
-
Configure Shared Folder
-
Customize Floating Kit
-
Select Audio Output Mode
-
Clipboard Settings
-
Disable Screenshot
-
Delete Device
-
Restore Device to Factory Settings
-
Enable Auto-Access Function
-
Set APP Language
-
Submit Suggestions or Feedback
-
APP Update
-
Use the Exploration Feature to Discover More App Tips
-
APP Permission Settings
-
Background Activity Settings Guide
-
Add Device
Document Catalog
-
Android
-
Add Device
-
Automatic Discovery and Addition
-
Manual Addition
-
Access the Device
-
Configure Shared Folder
-
Customize Floating Kit
-
Select Audio Output Mode
-
Clipboard Settings
-
Disable Screenshot
-
Delete Device
-
Restore Device to Factory Settings
-
Enable Auto-Access Function
-
Set APP Language
-
Submit Suggestions or Feedback
-
APP Update
-
Use the Exploration Feature to Discover More App Tips
-
APP Permission Settings
-
Background Activity Settings Guide
-
Add Device
Add Device
Establish a binding relationship between the host device and the PlugOS hardware device through the “Add New Device” function.
Usage Method:
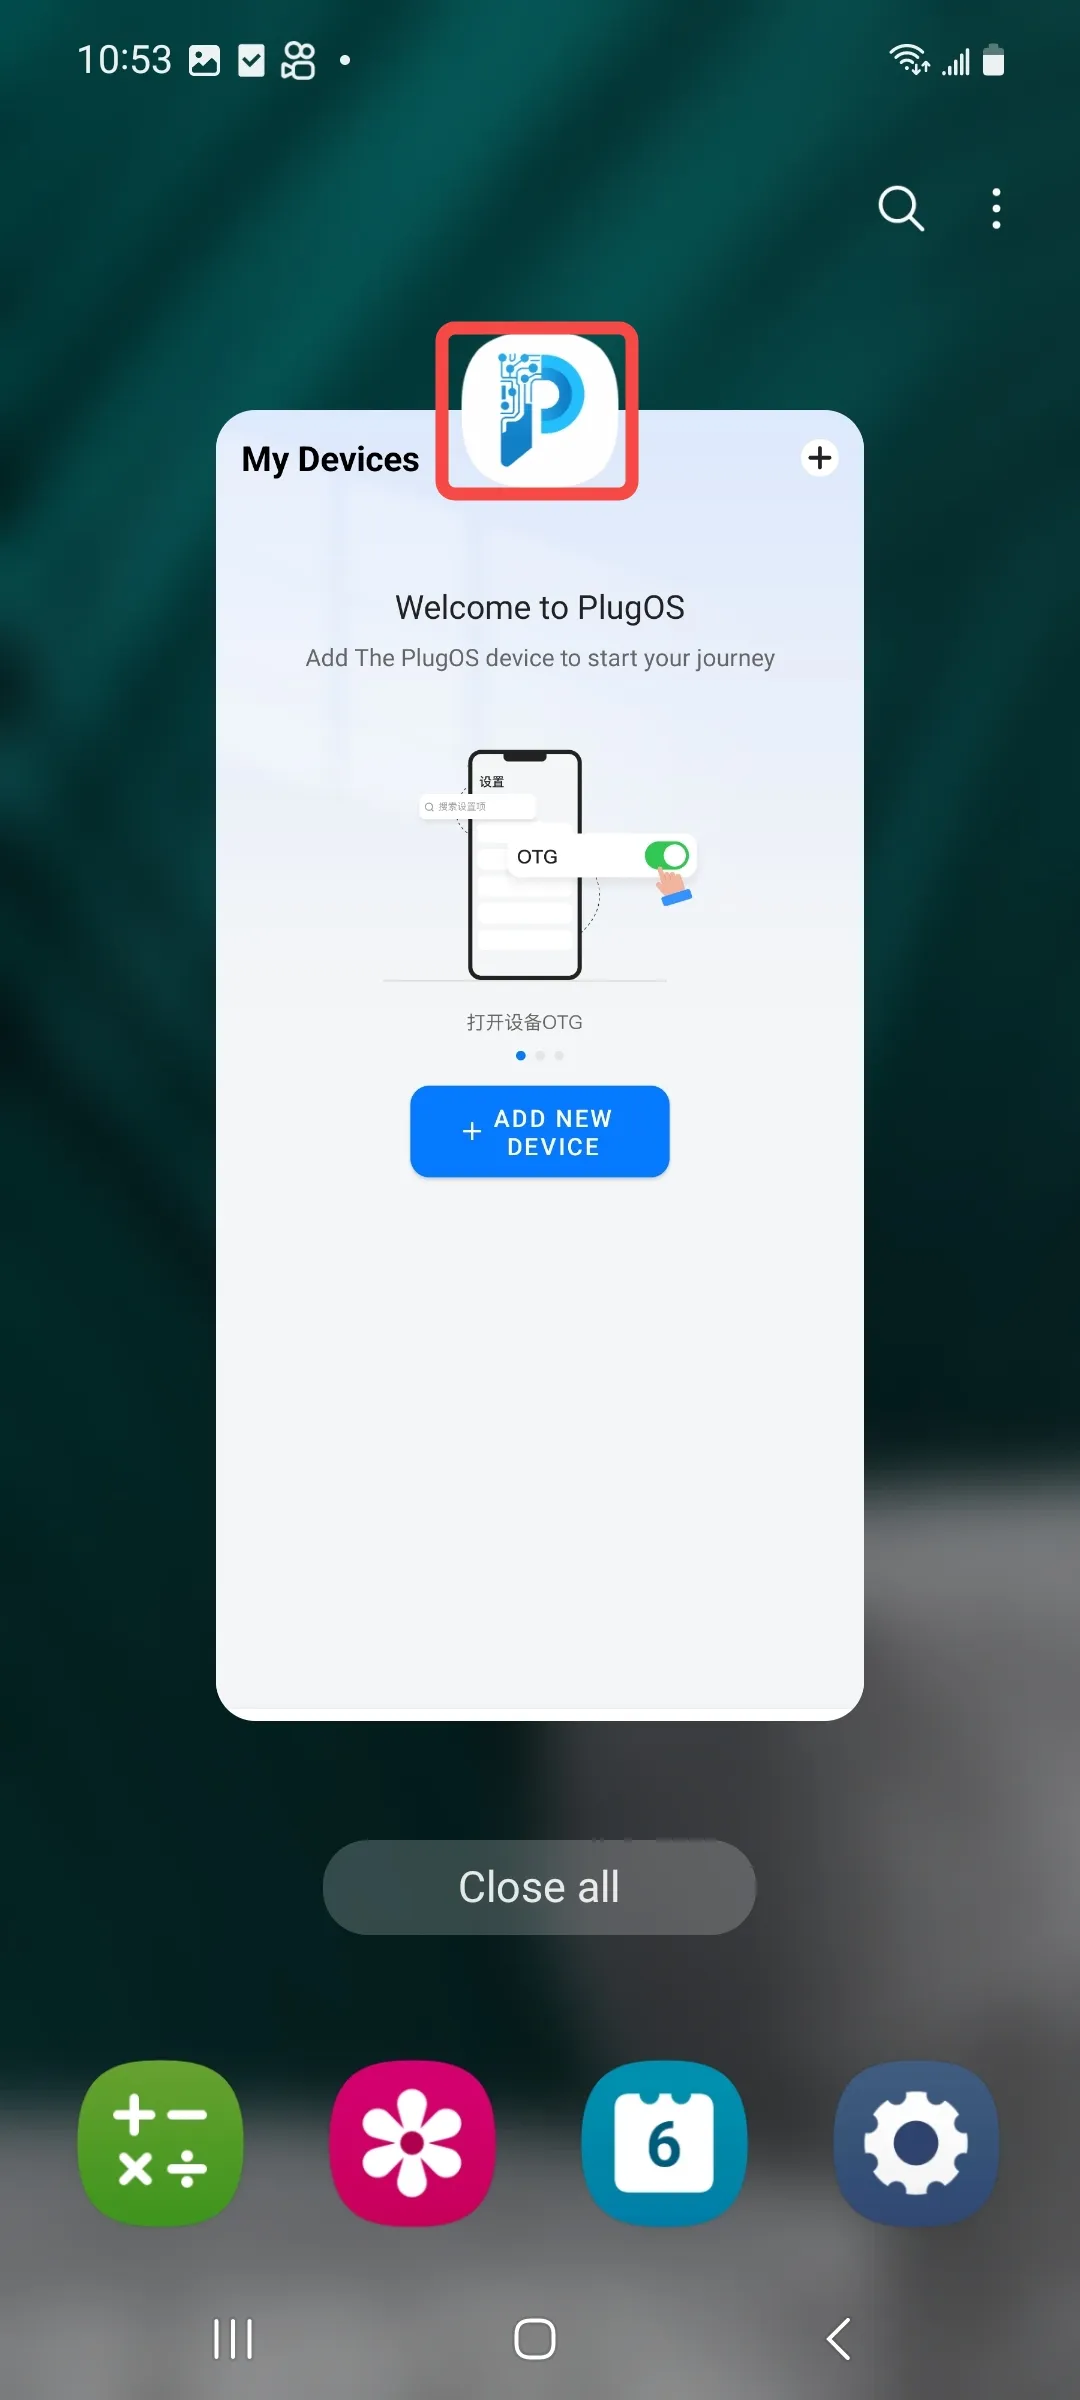
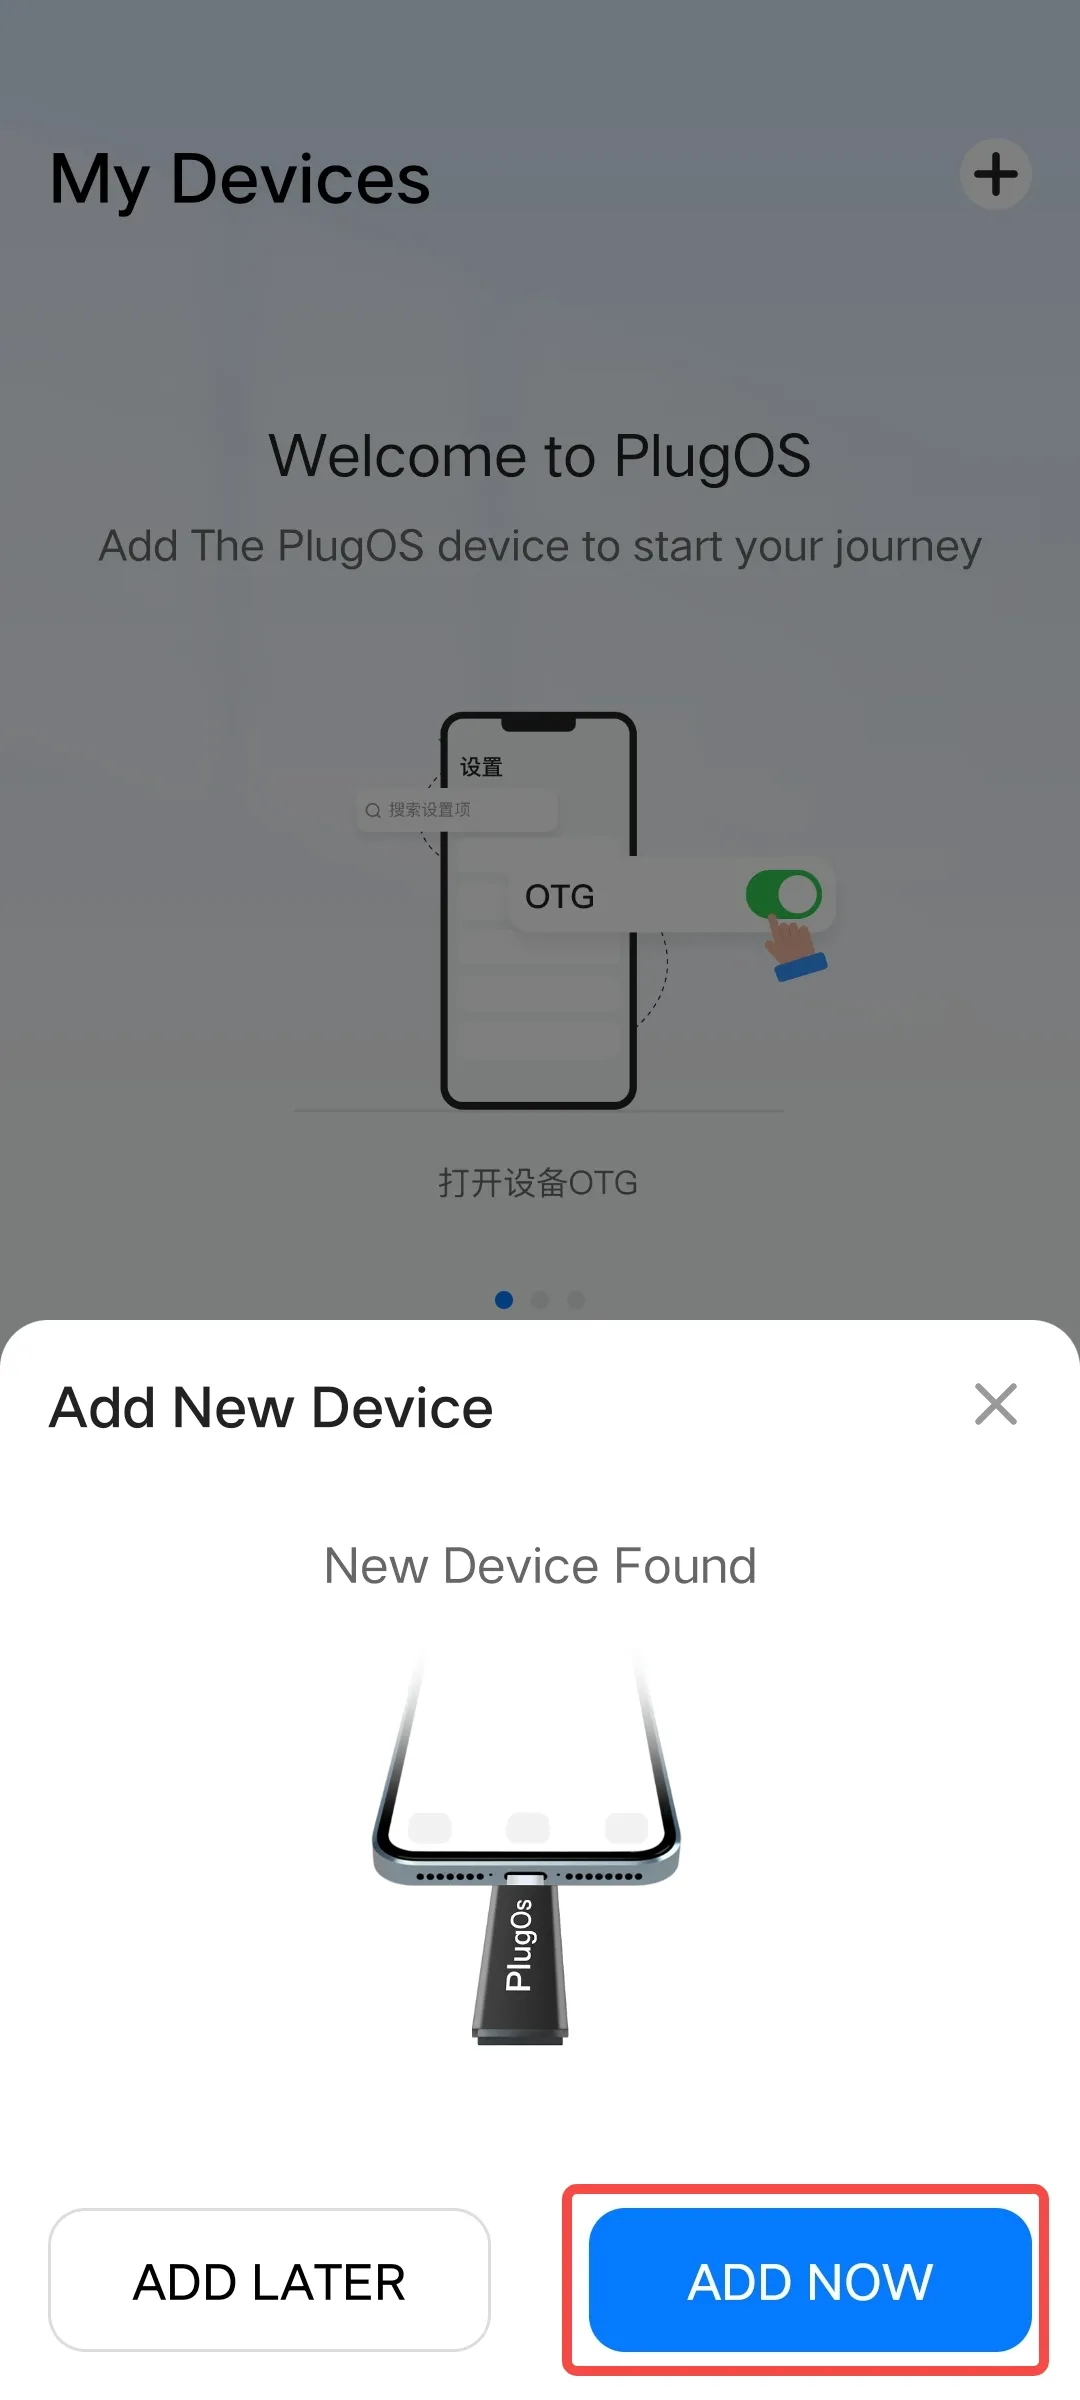
Automatic Discovery and Addition
- Open the PlugOS APP → Navigate to the homepage.
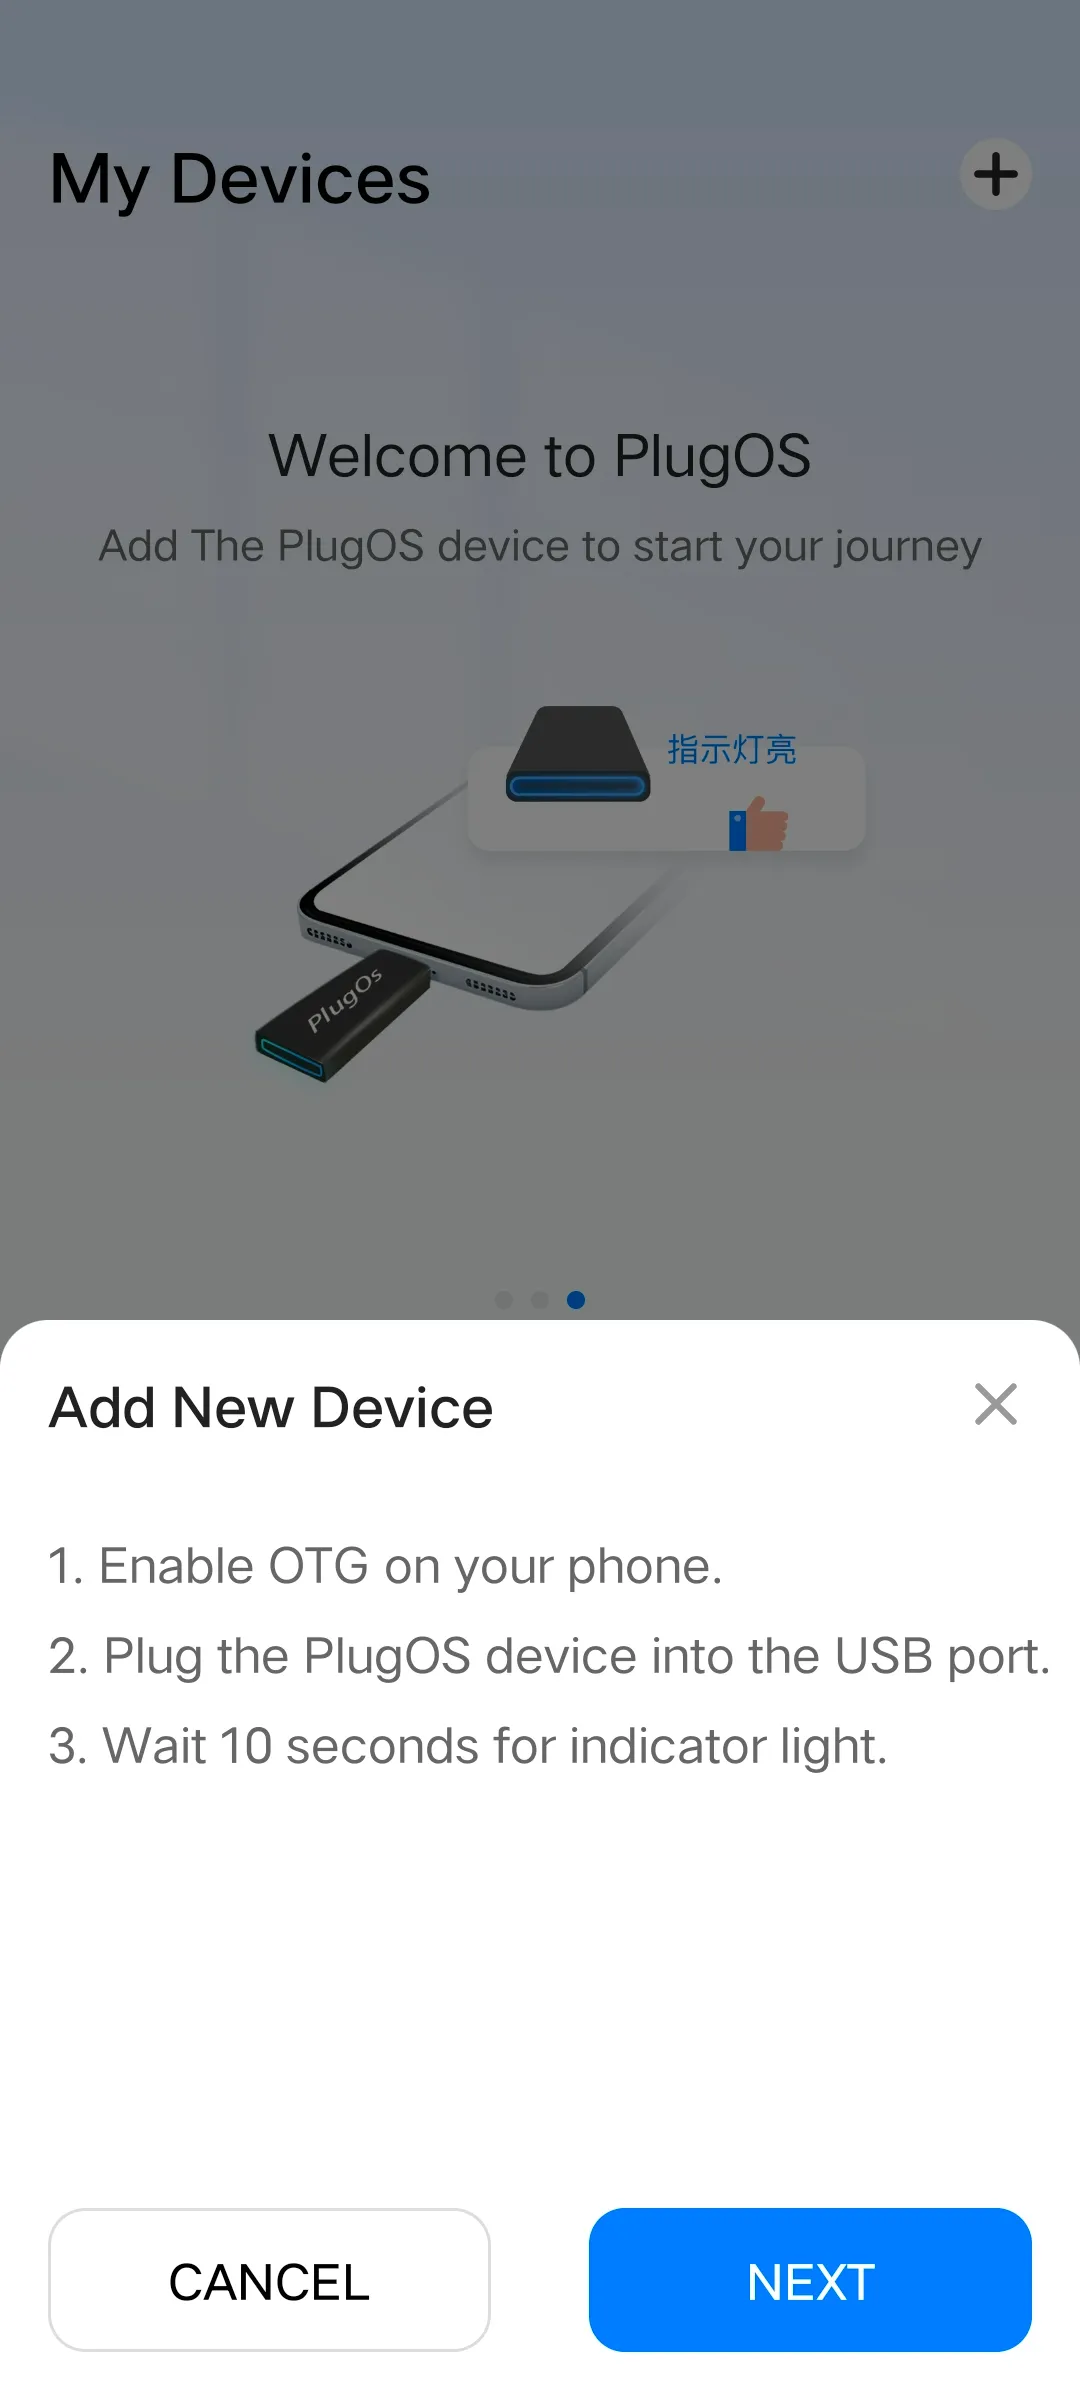
- Enable the OTG function on your mobile phone.
- Insert the PlugOS hardware device into the USB port of the host device; check the box in the system pop-up window and click “OK”.
- In the pop-up “Add New Device” window, click “Add Now” and follow the guide to complete the addition.
Manual Addition
- Open the PlugOS APP → Navigate to the homepage.
- Enable the OTG function on your mobile phone.
- Insert the PlugOS hardware device into the USB port of the host device.
- Click the “+” or “Add New Device” button and follow the guide prompts to complete the addition.
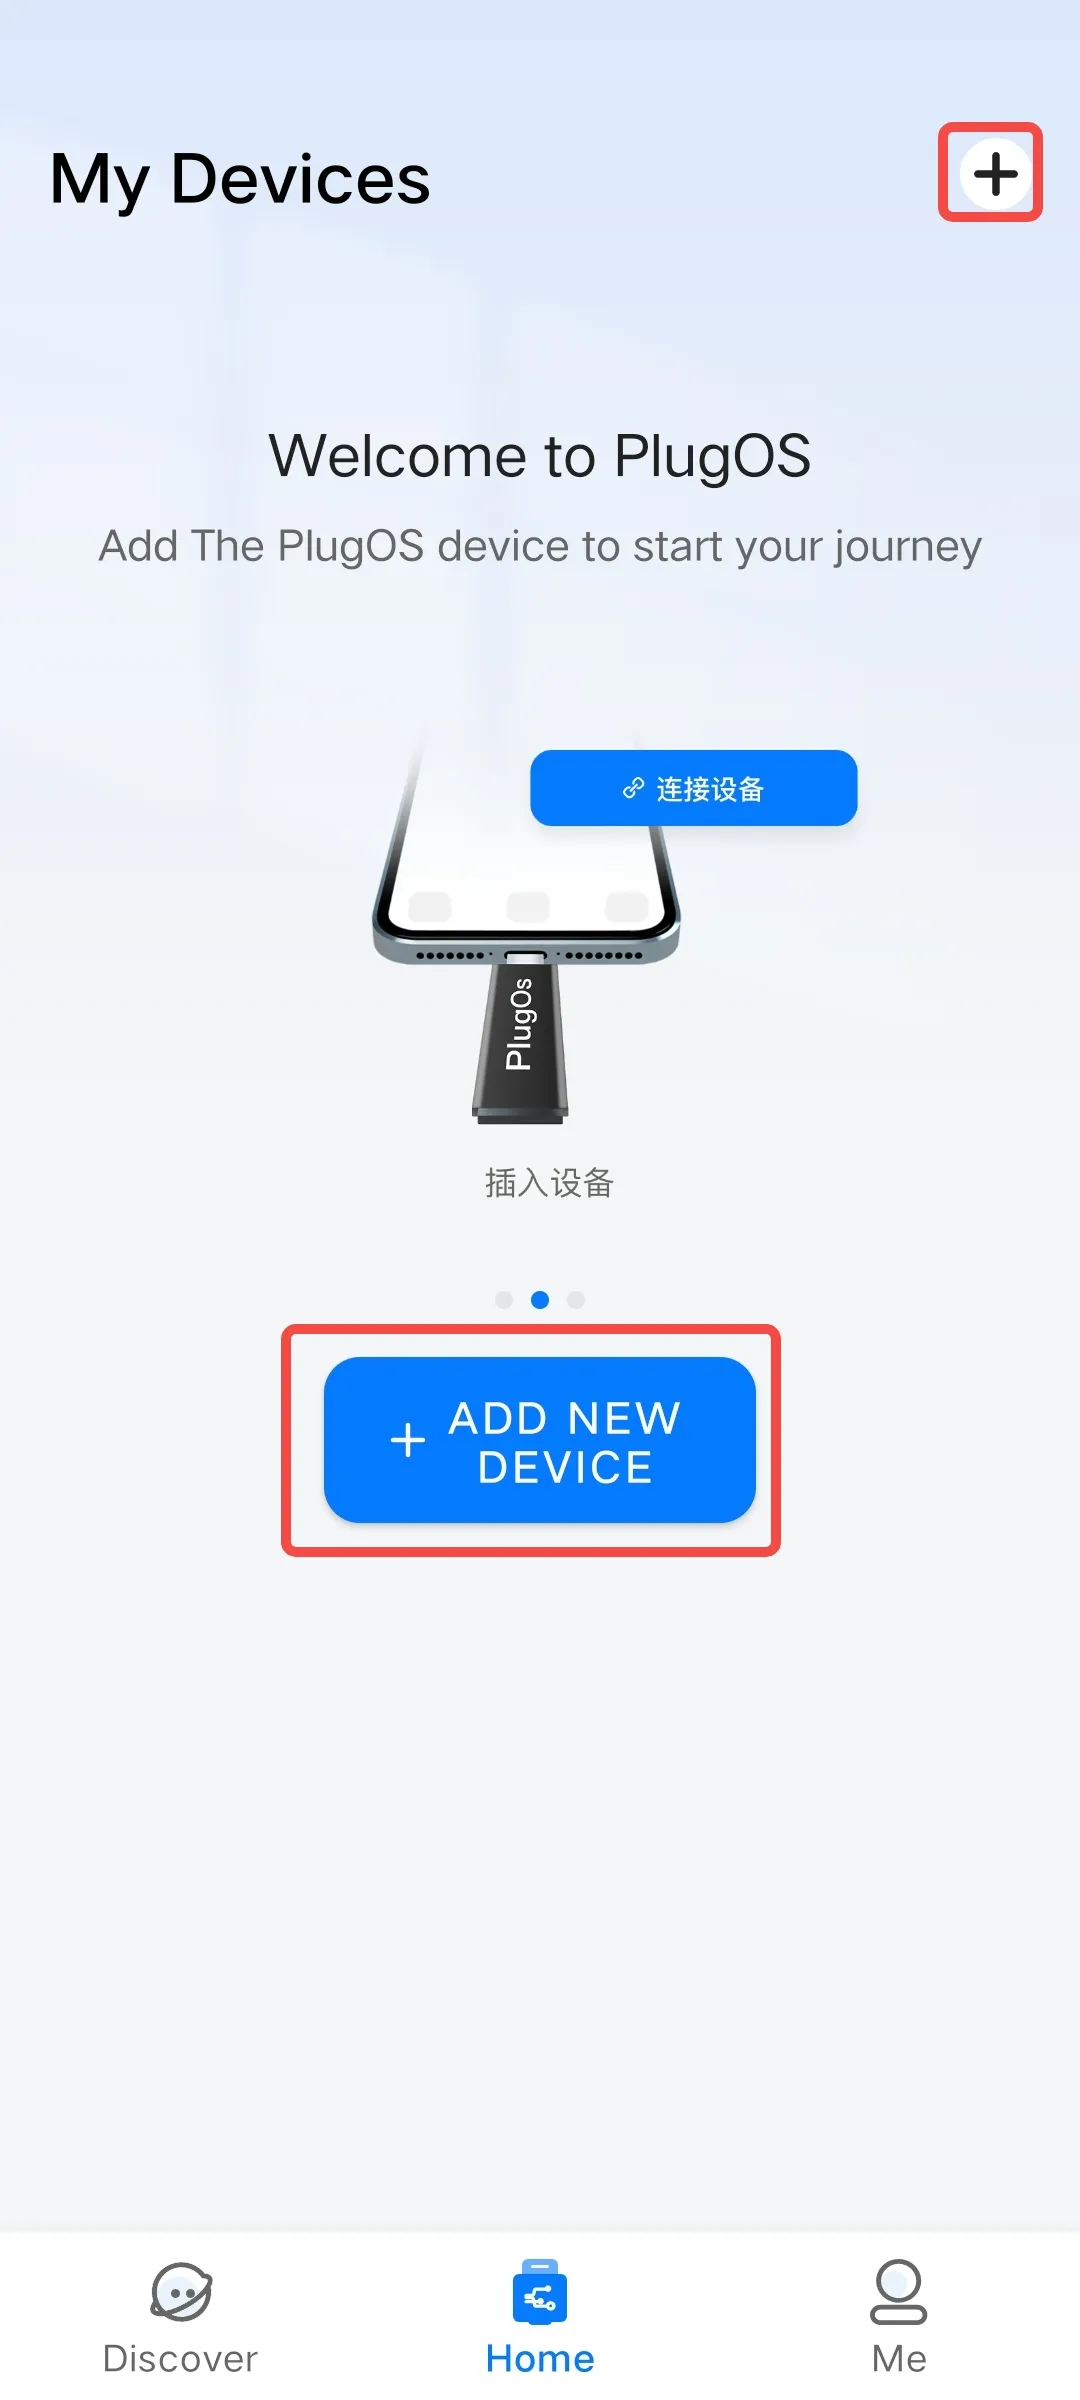
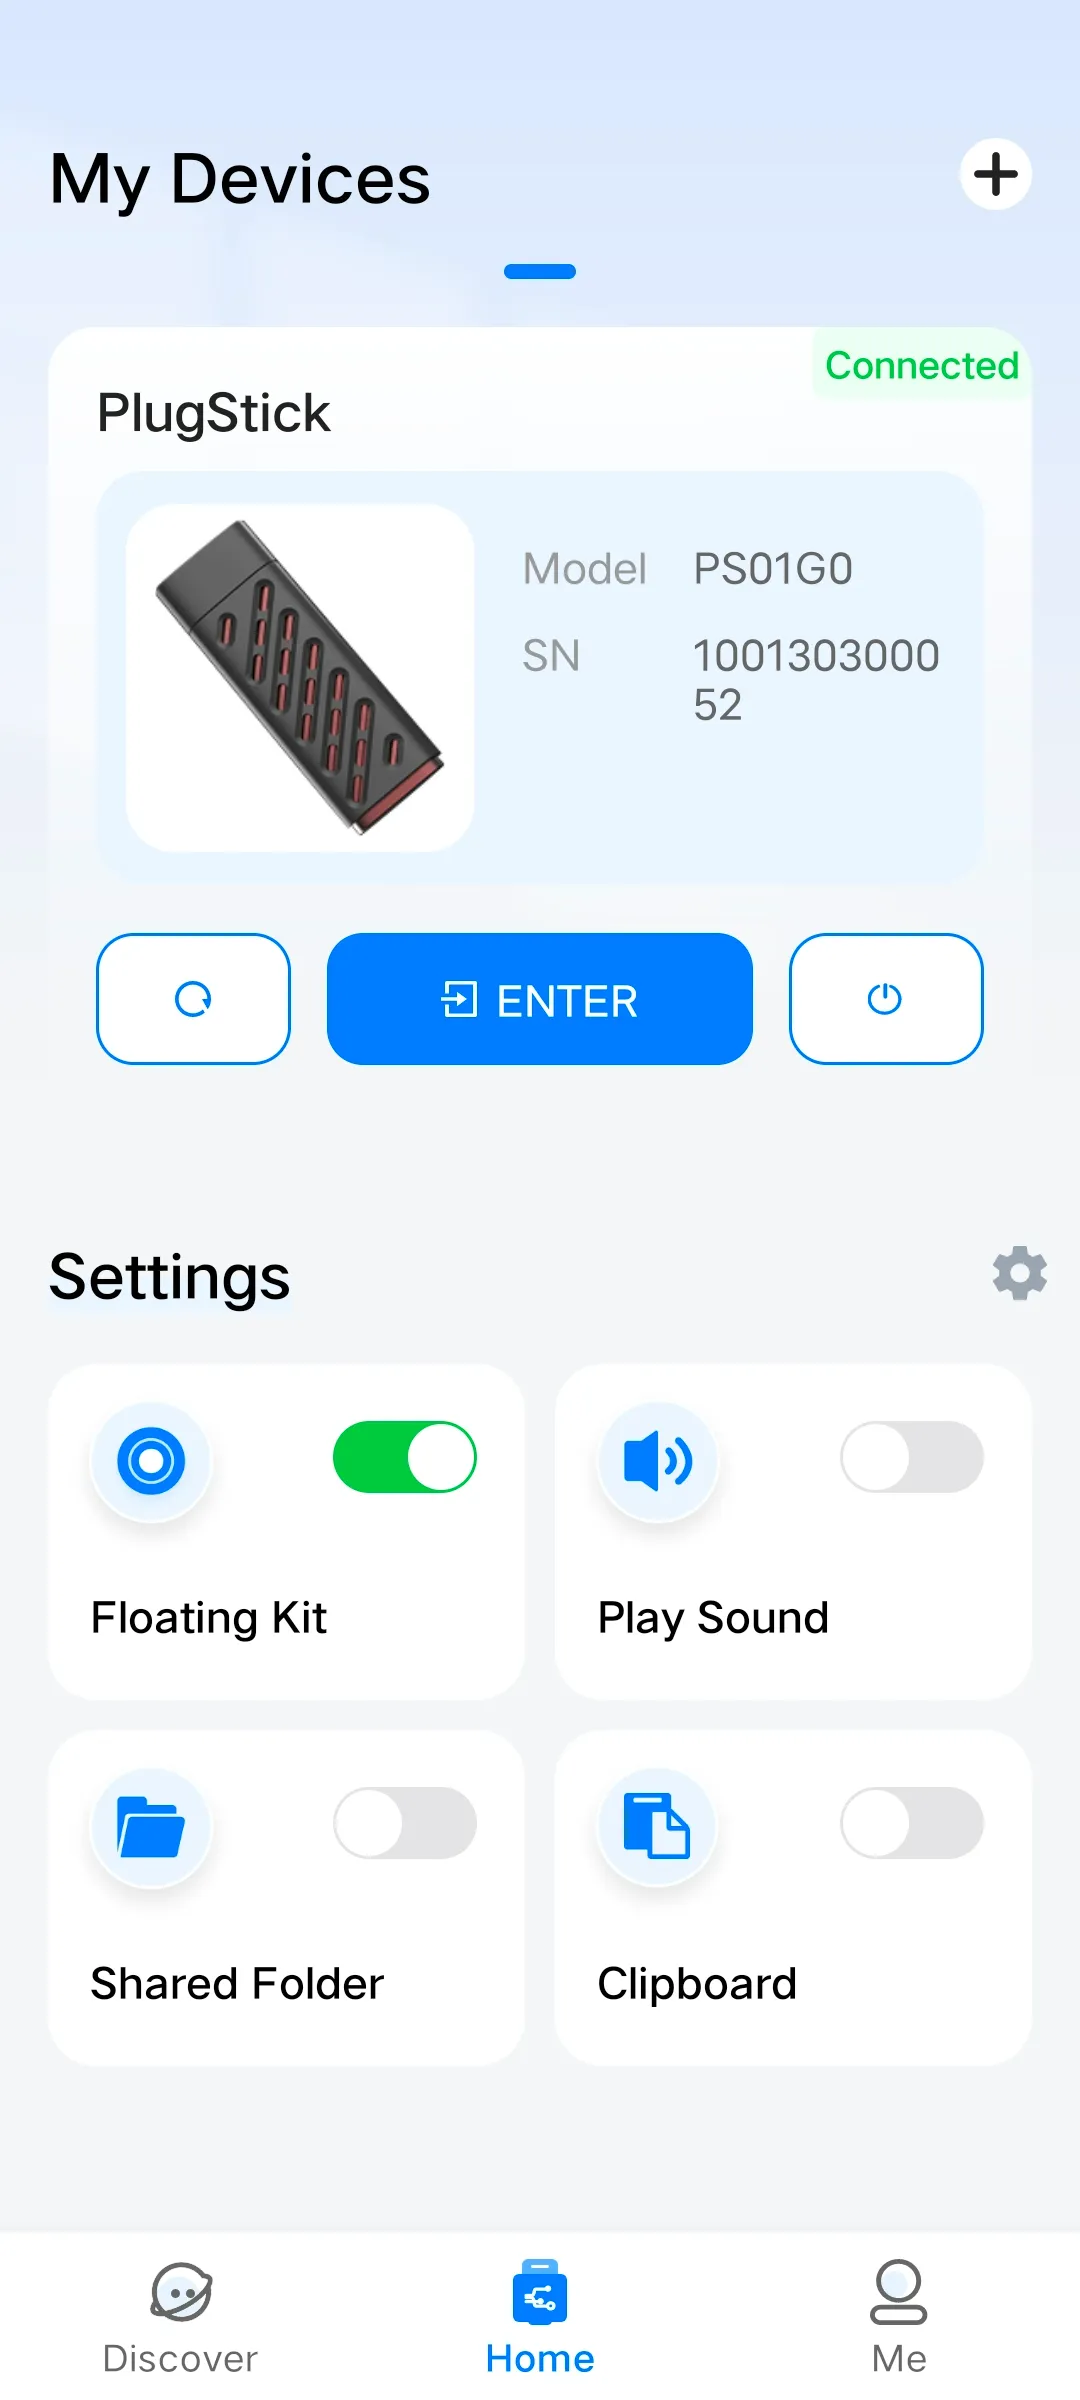
Access the Device
For added devices, you can access the device desktop through the homepage of the PlugOS APP.
Usage Method:
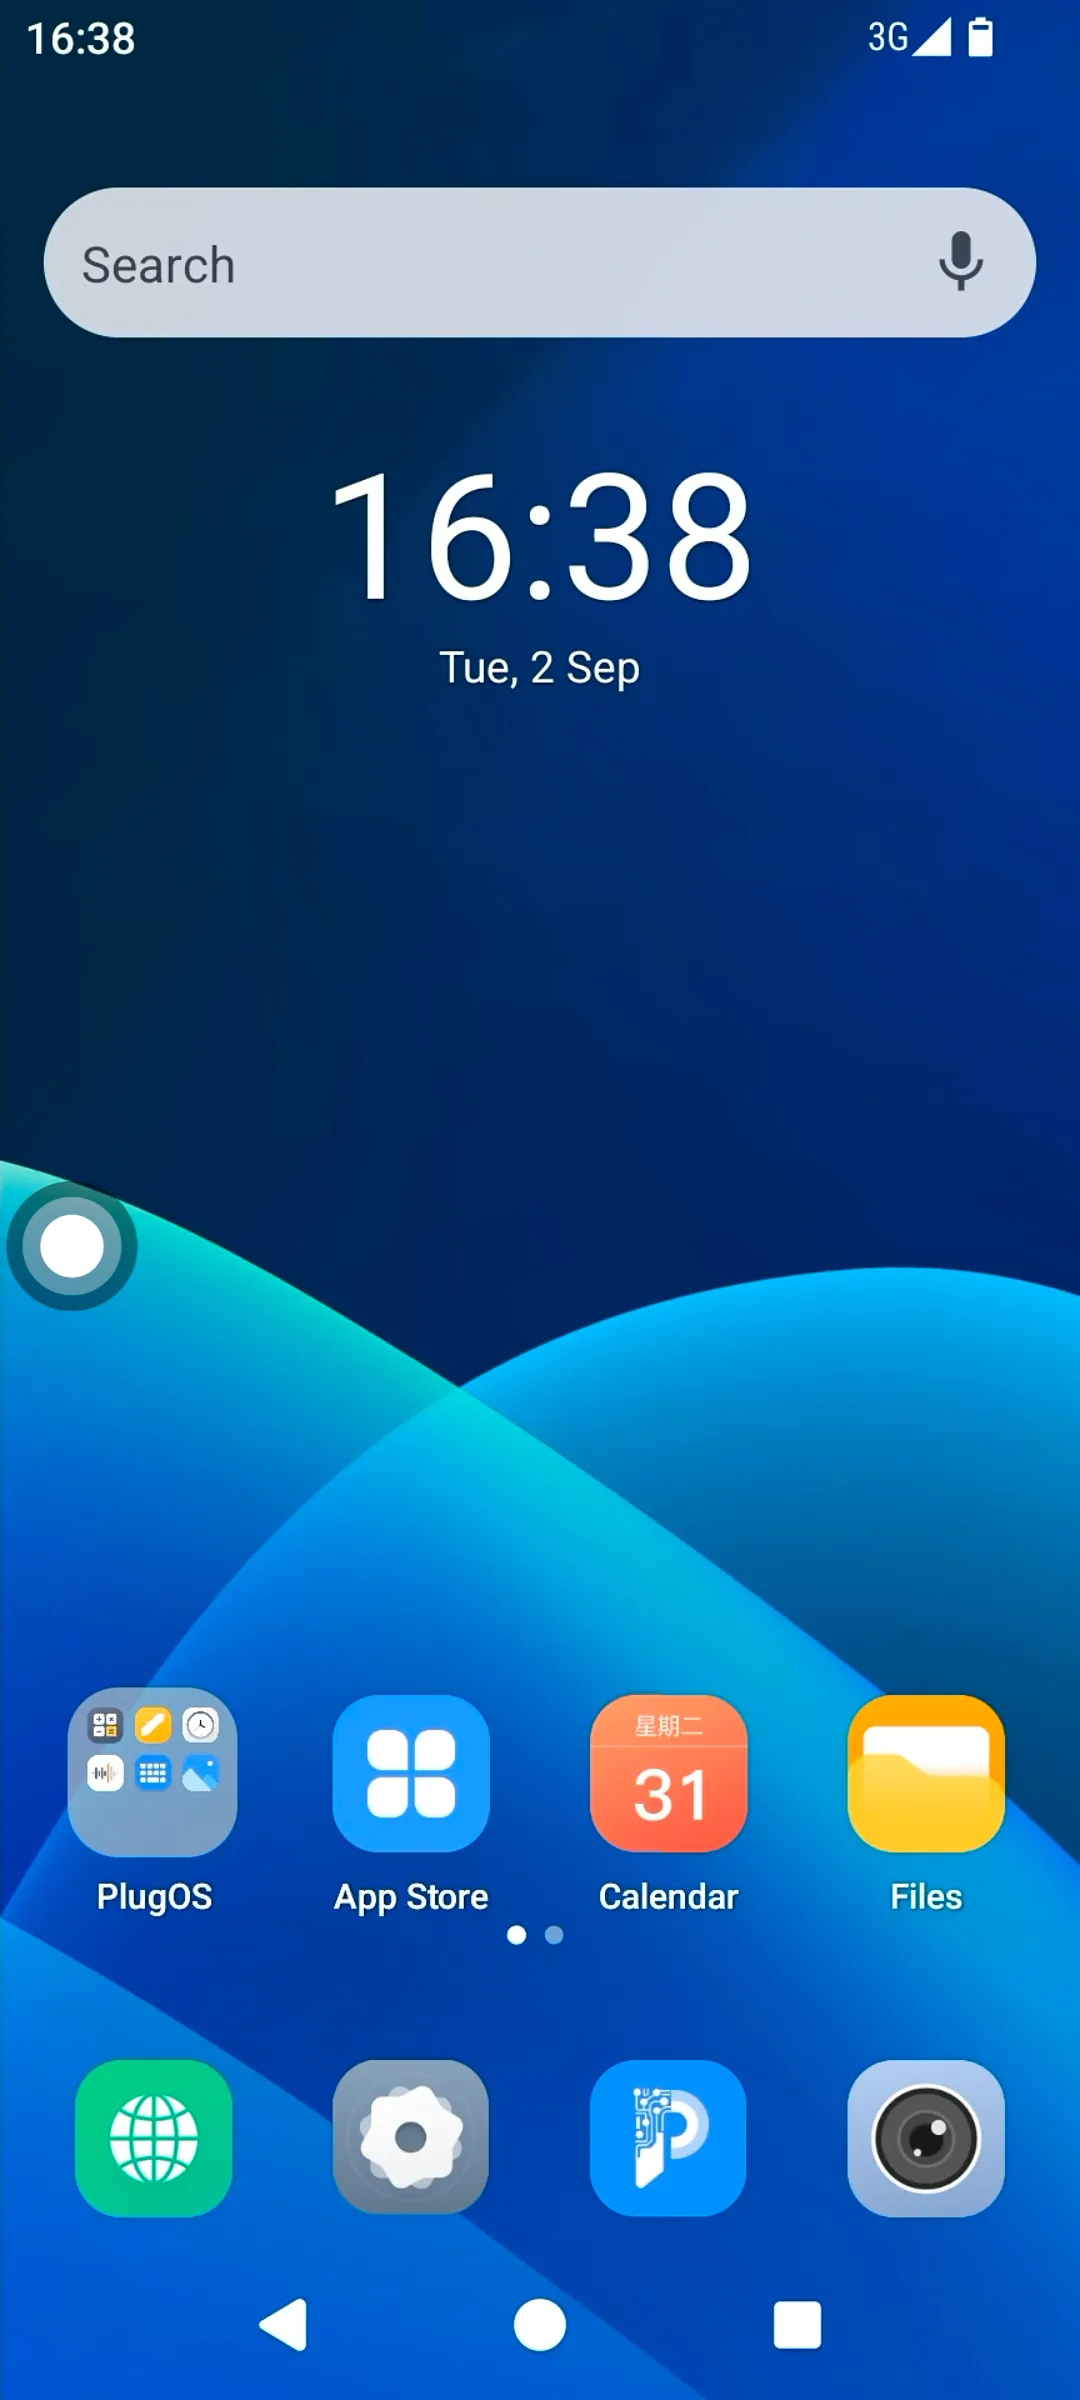
Open the PlugOS APP → Navigate to the homepage → Connect the device → Click to access the system.
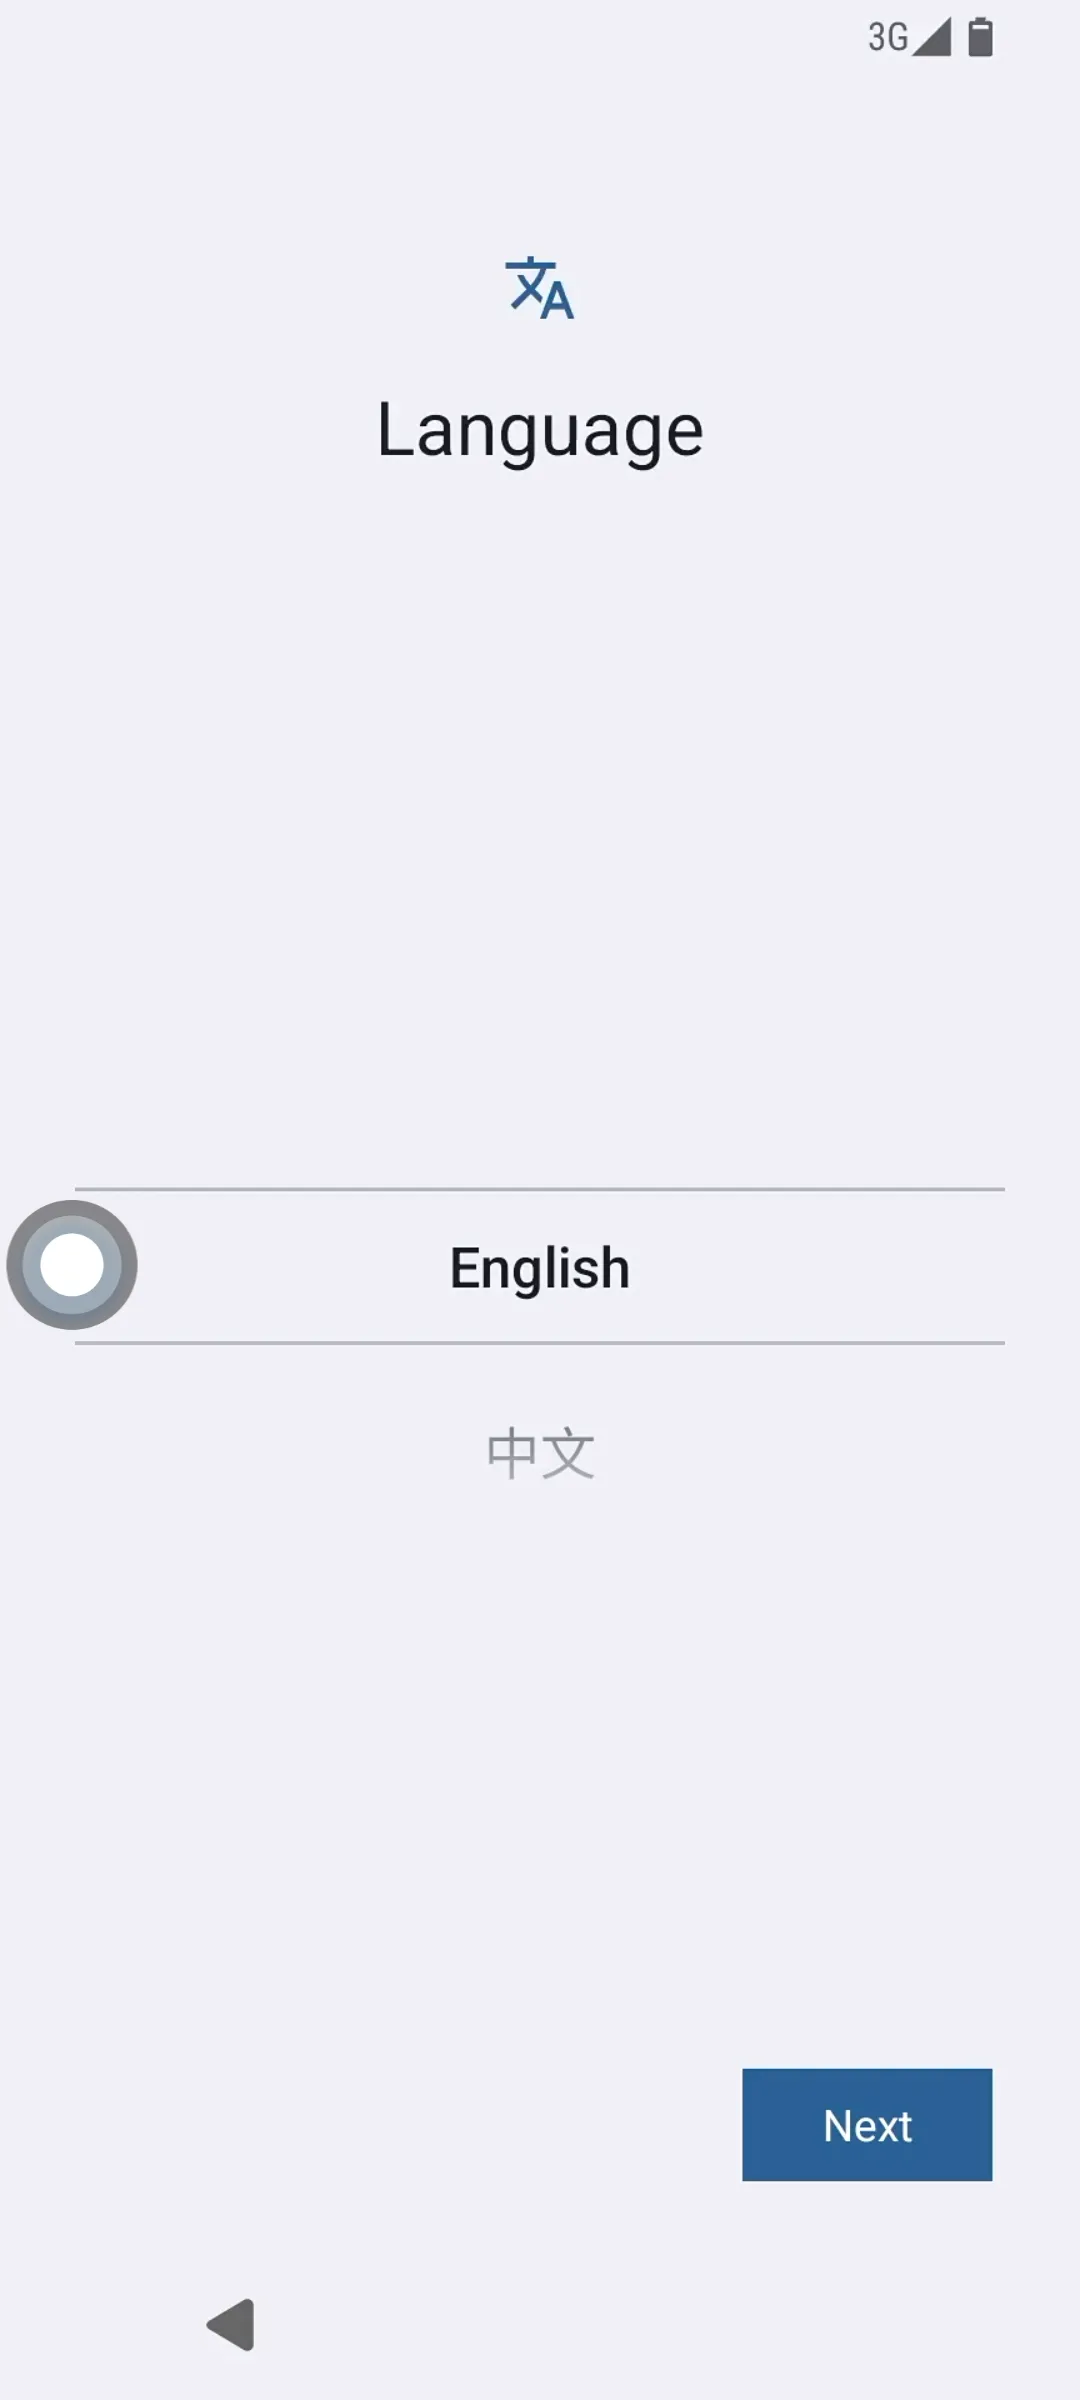
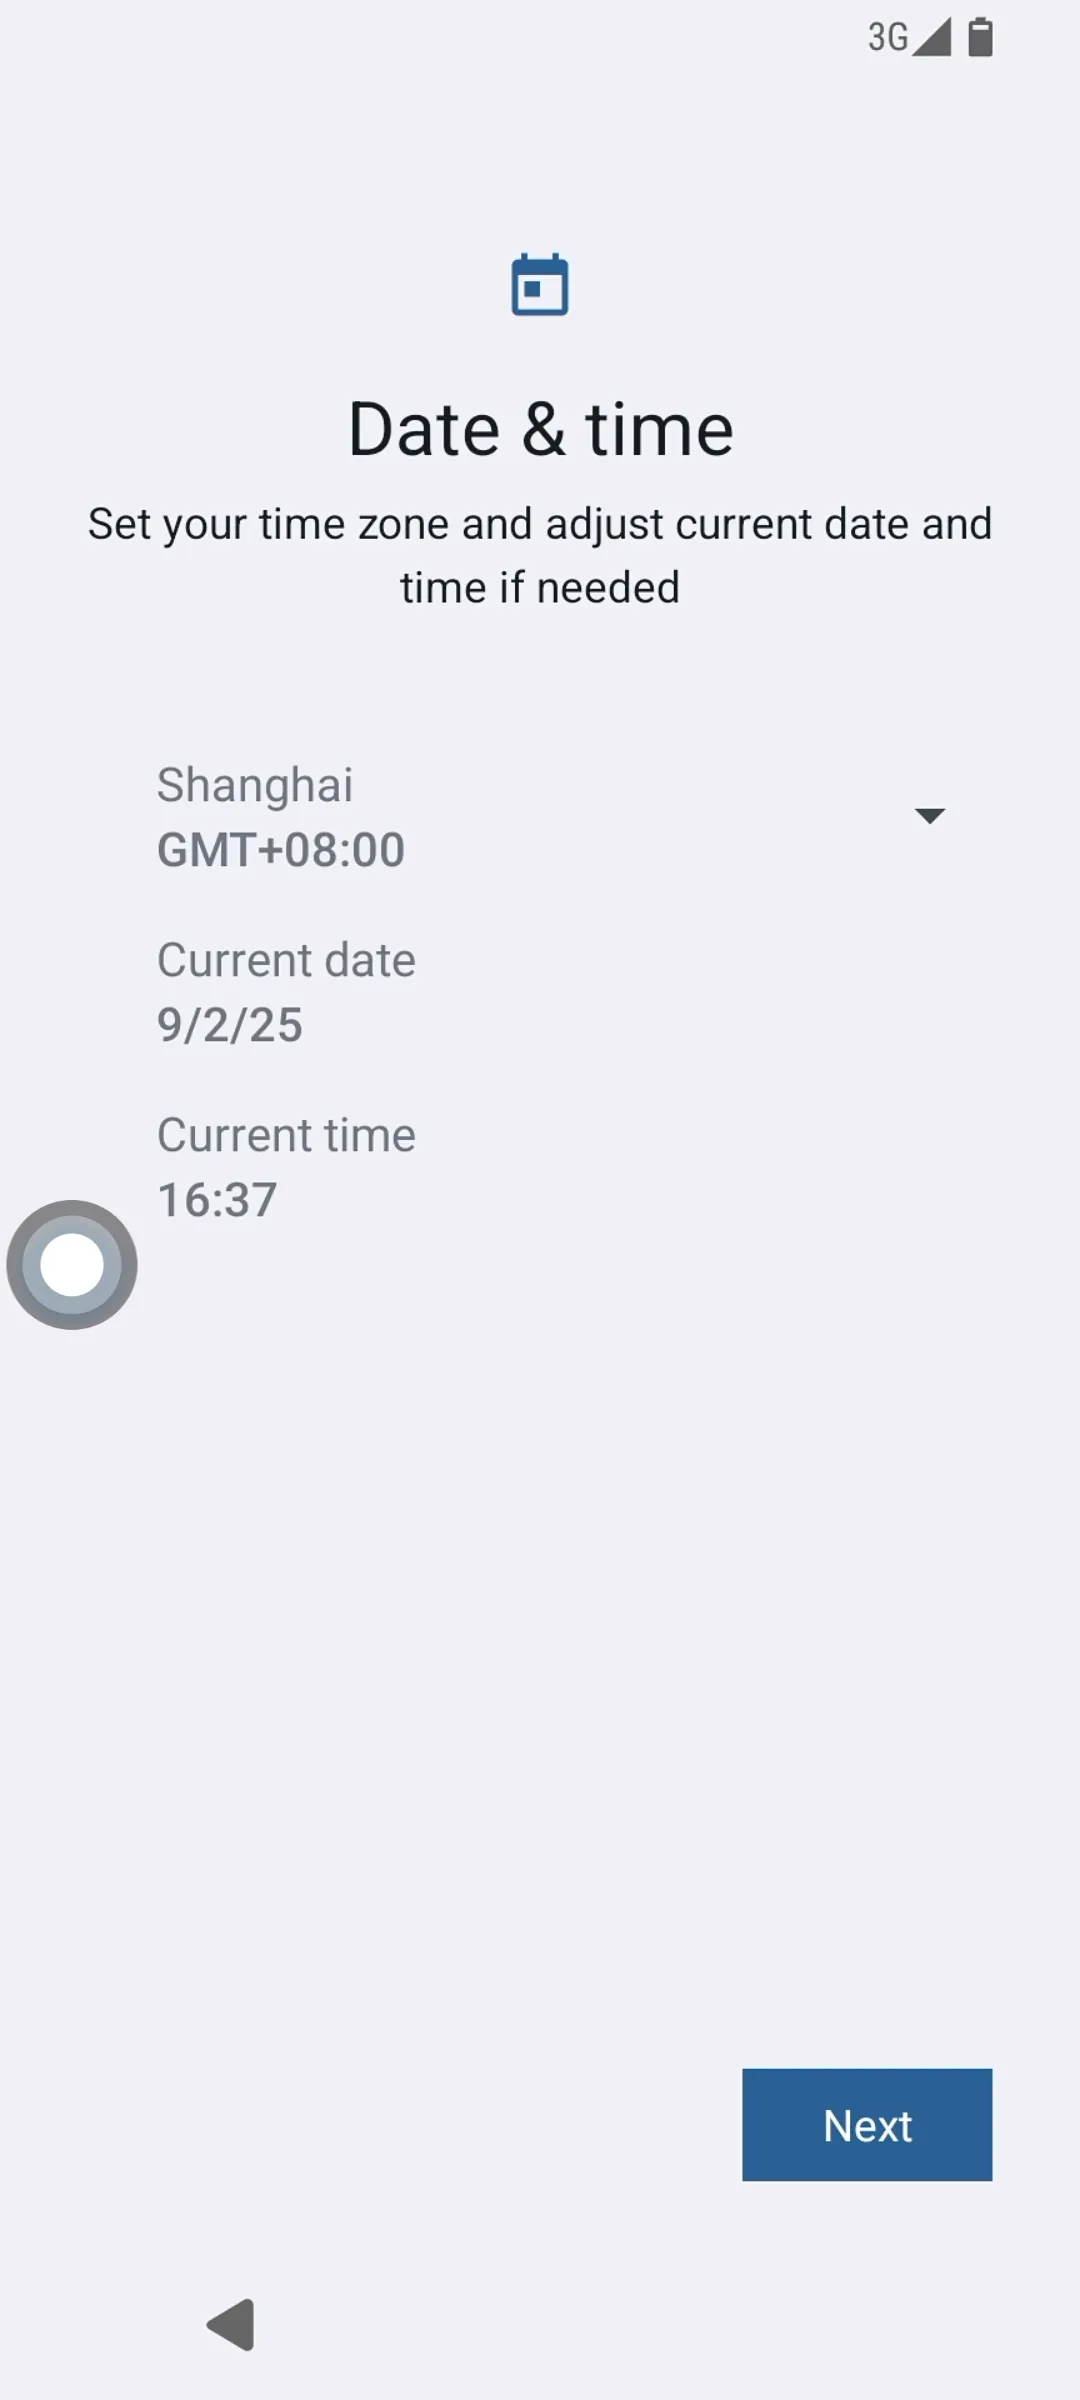
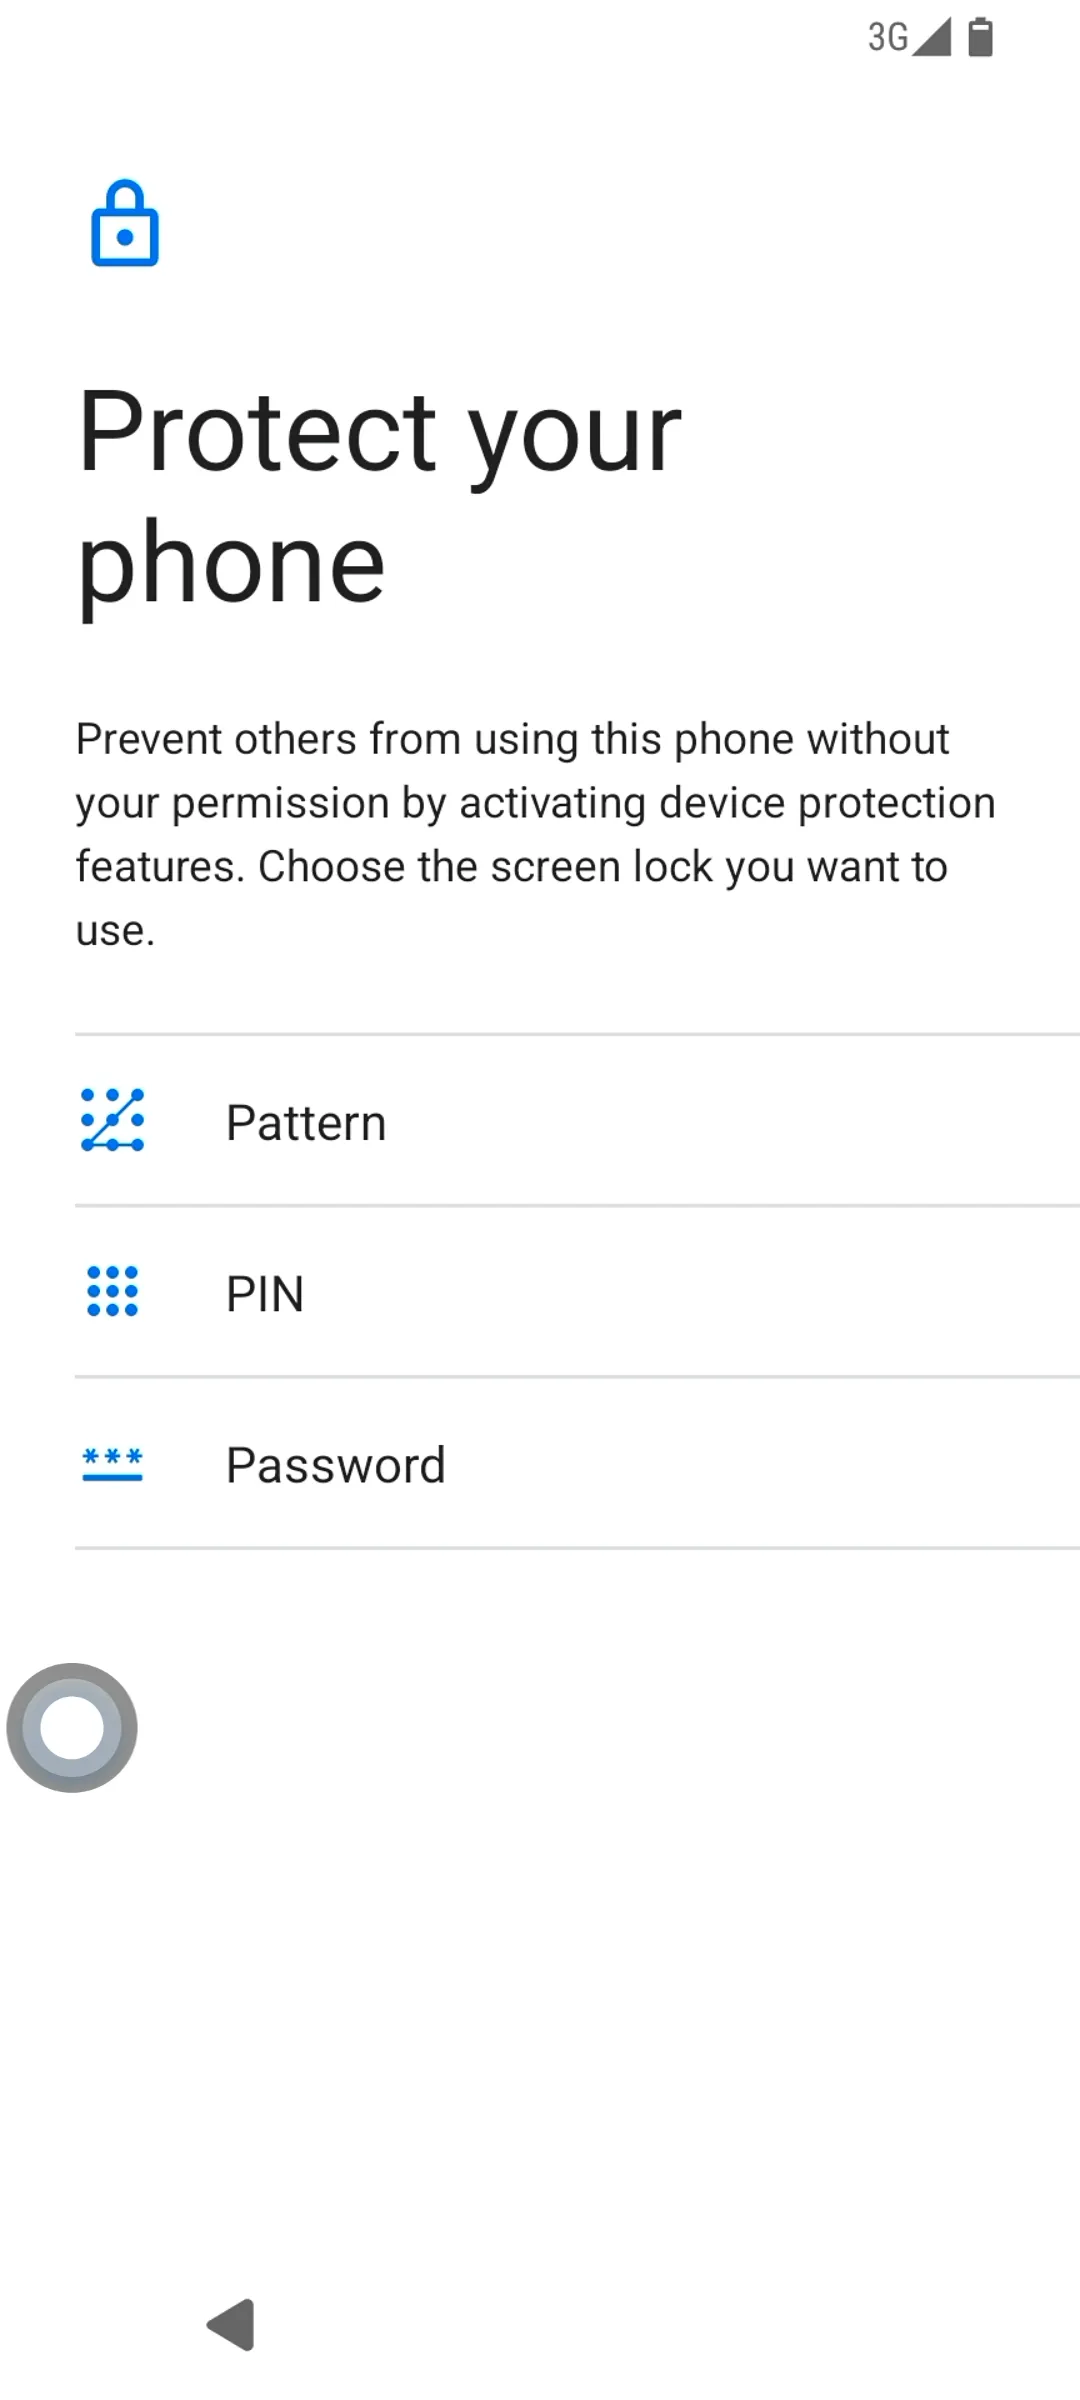
For the first access, you need to perform system initialization settings:
- Set the language, select your preferred language, then click “Next”.
- Set the region, date and time, complete the settings and click “Next”.
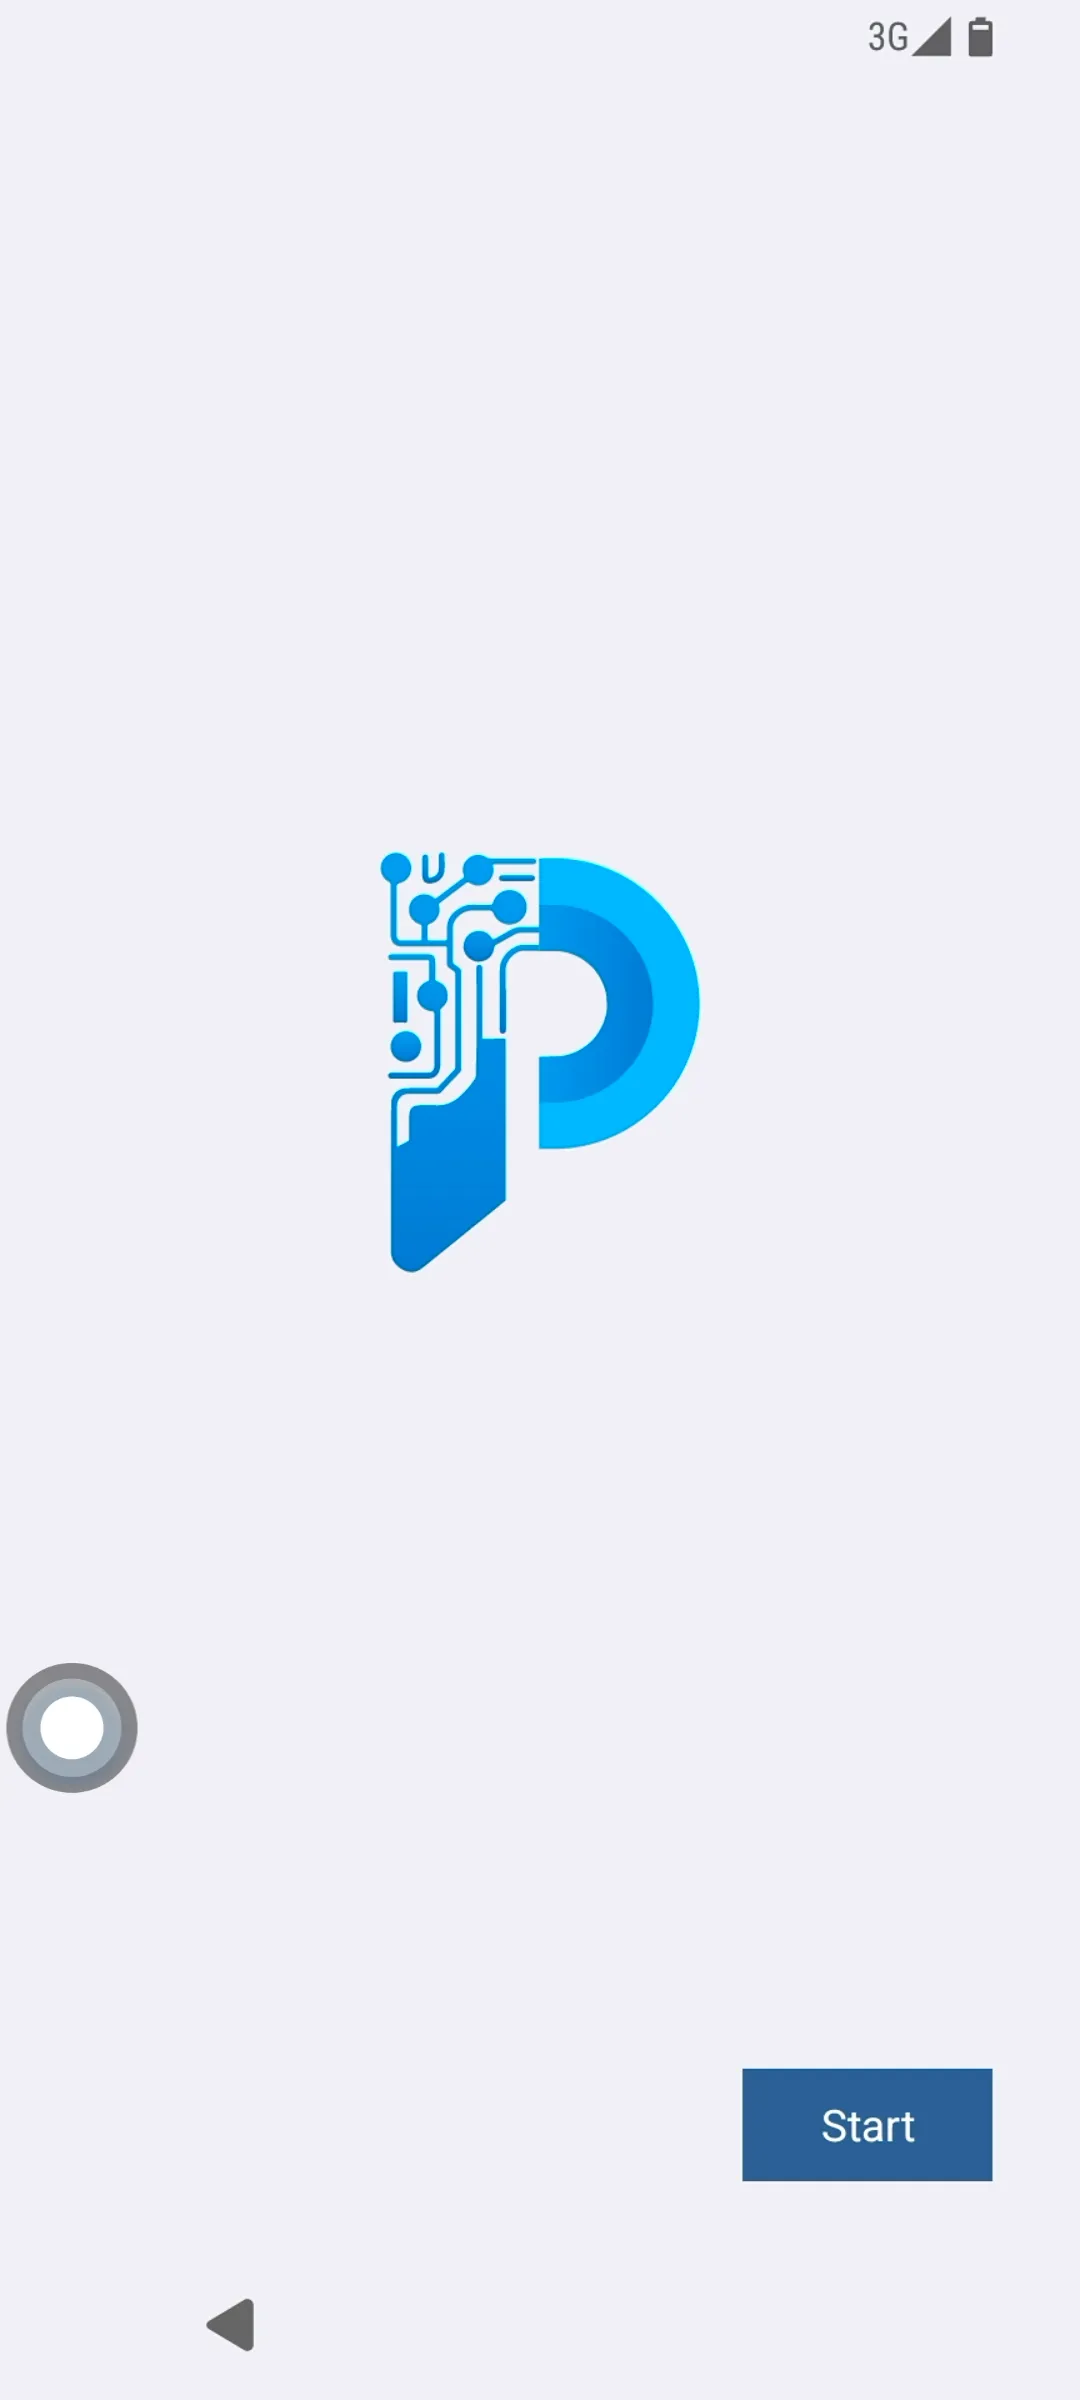
- Set the system unlock method. The PlugOS system supports three unlock methods: pattern, PIN code, and password. Select one unlock method; after verification, click “Start” to access the system.
Now you can start using the PlugOS system officially.
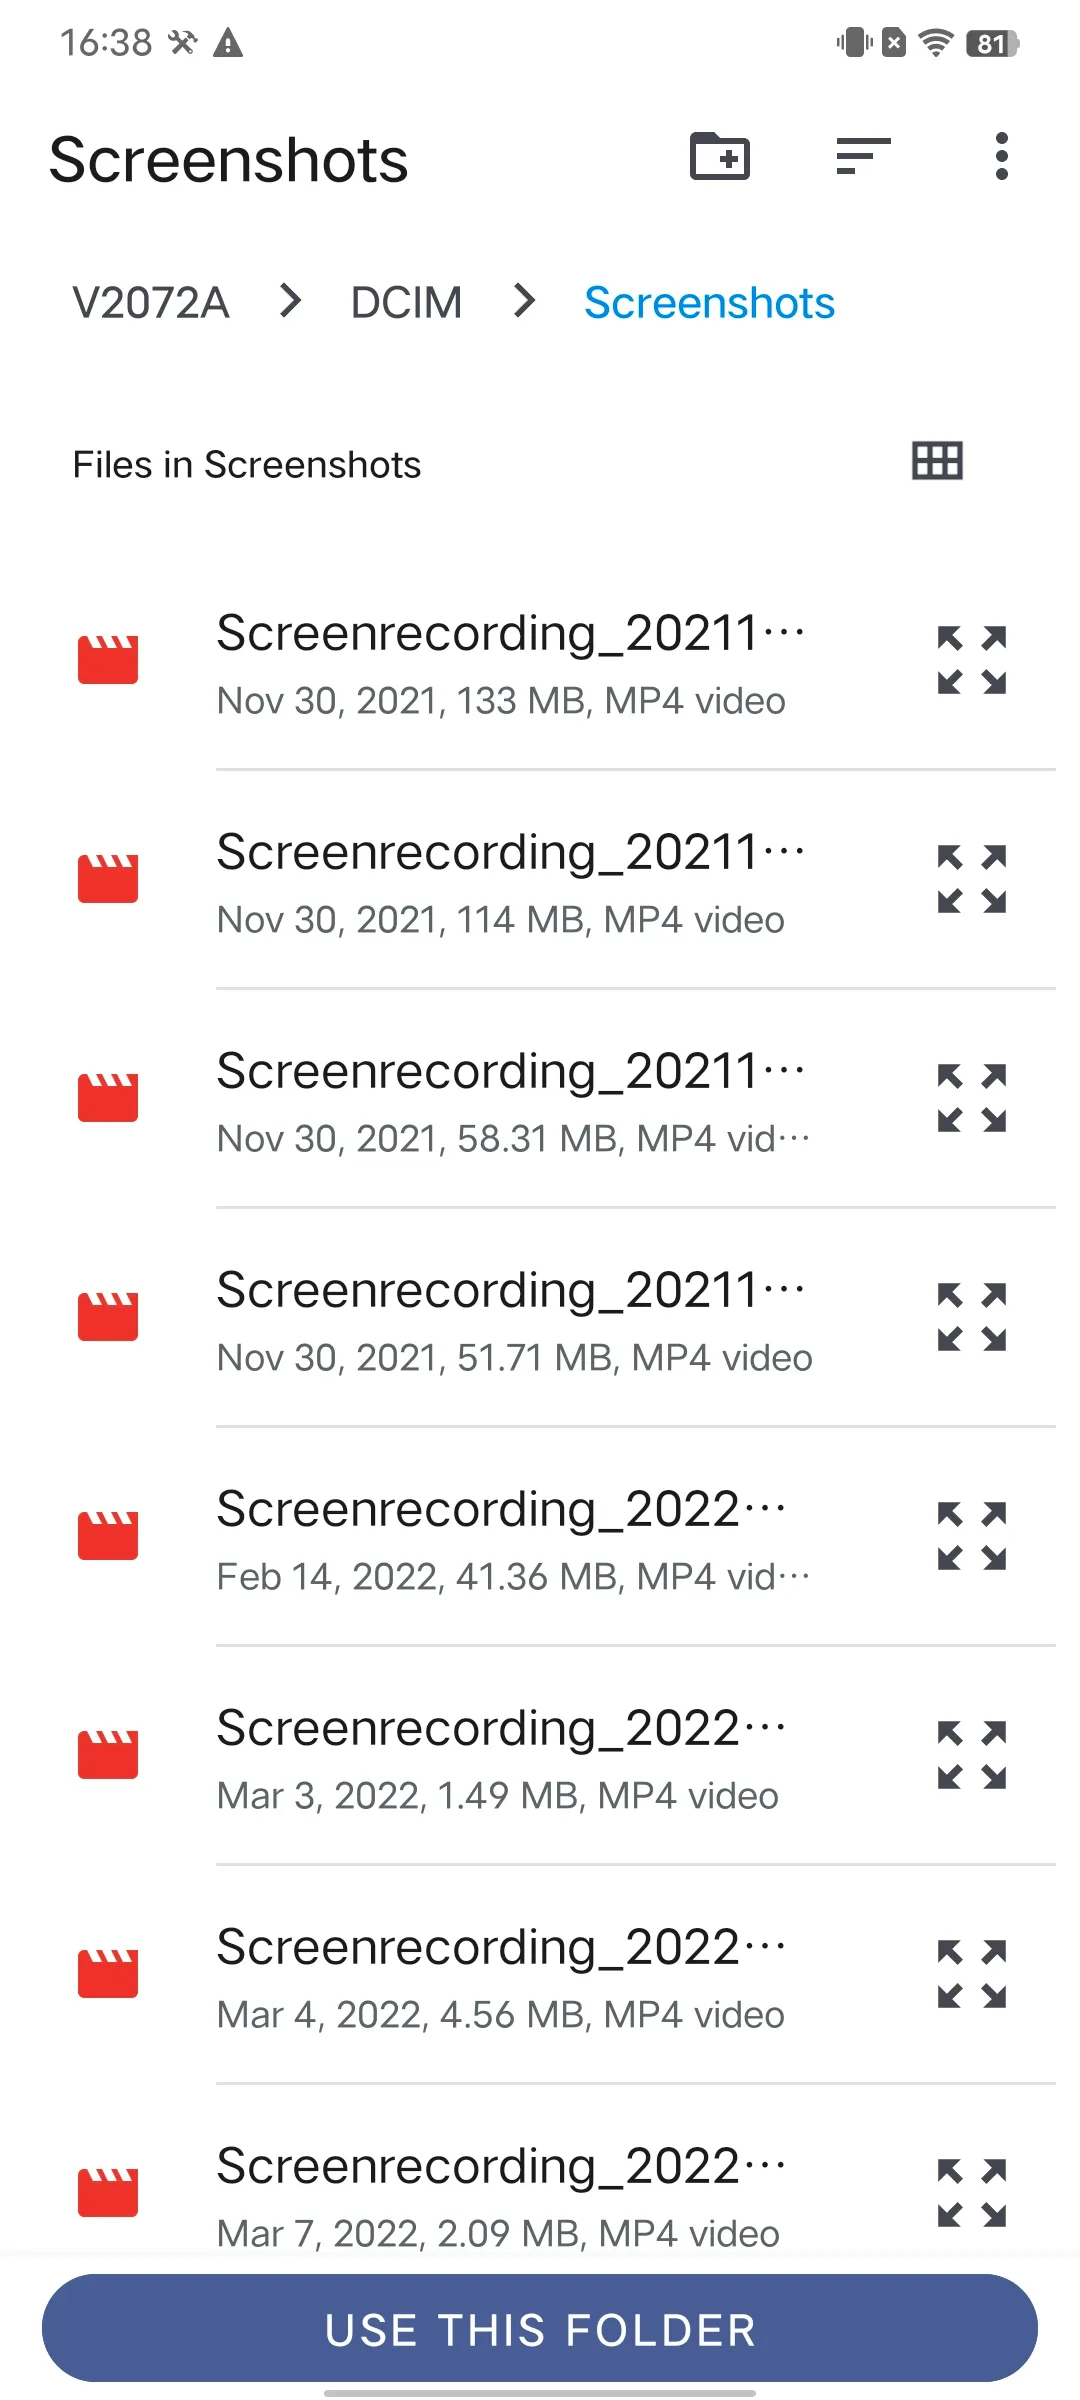
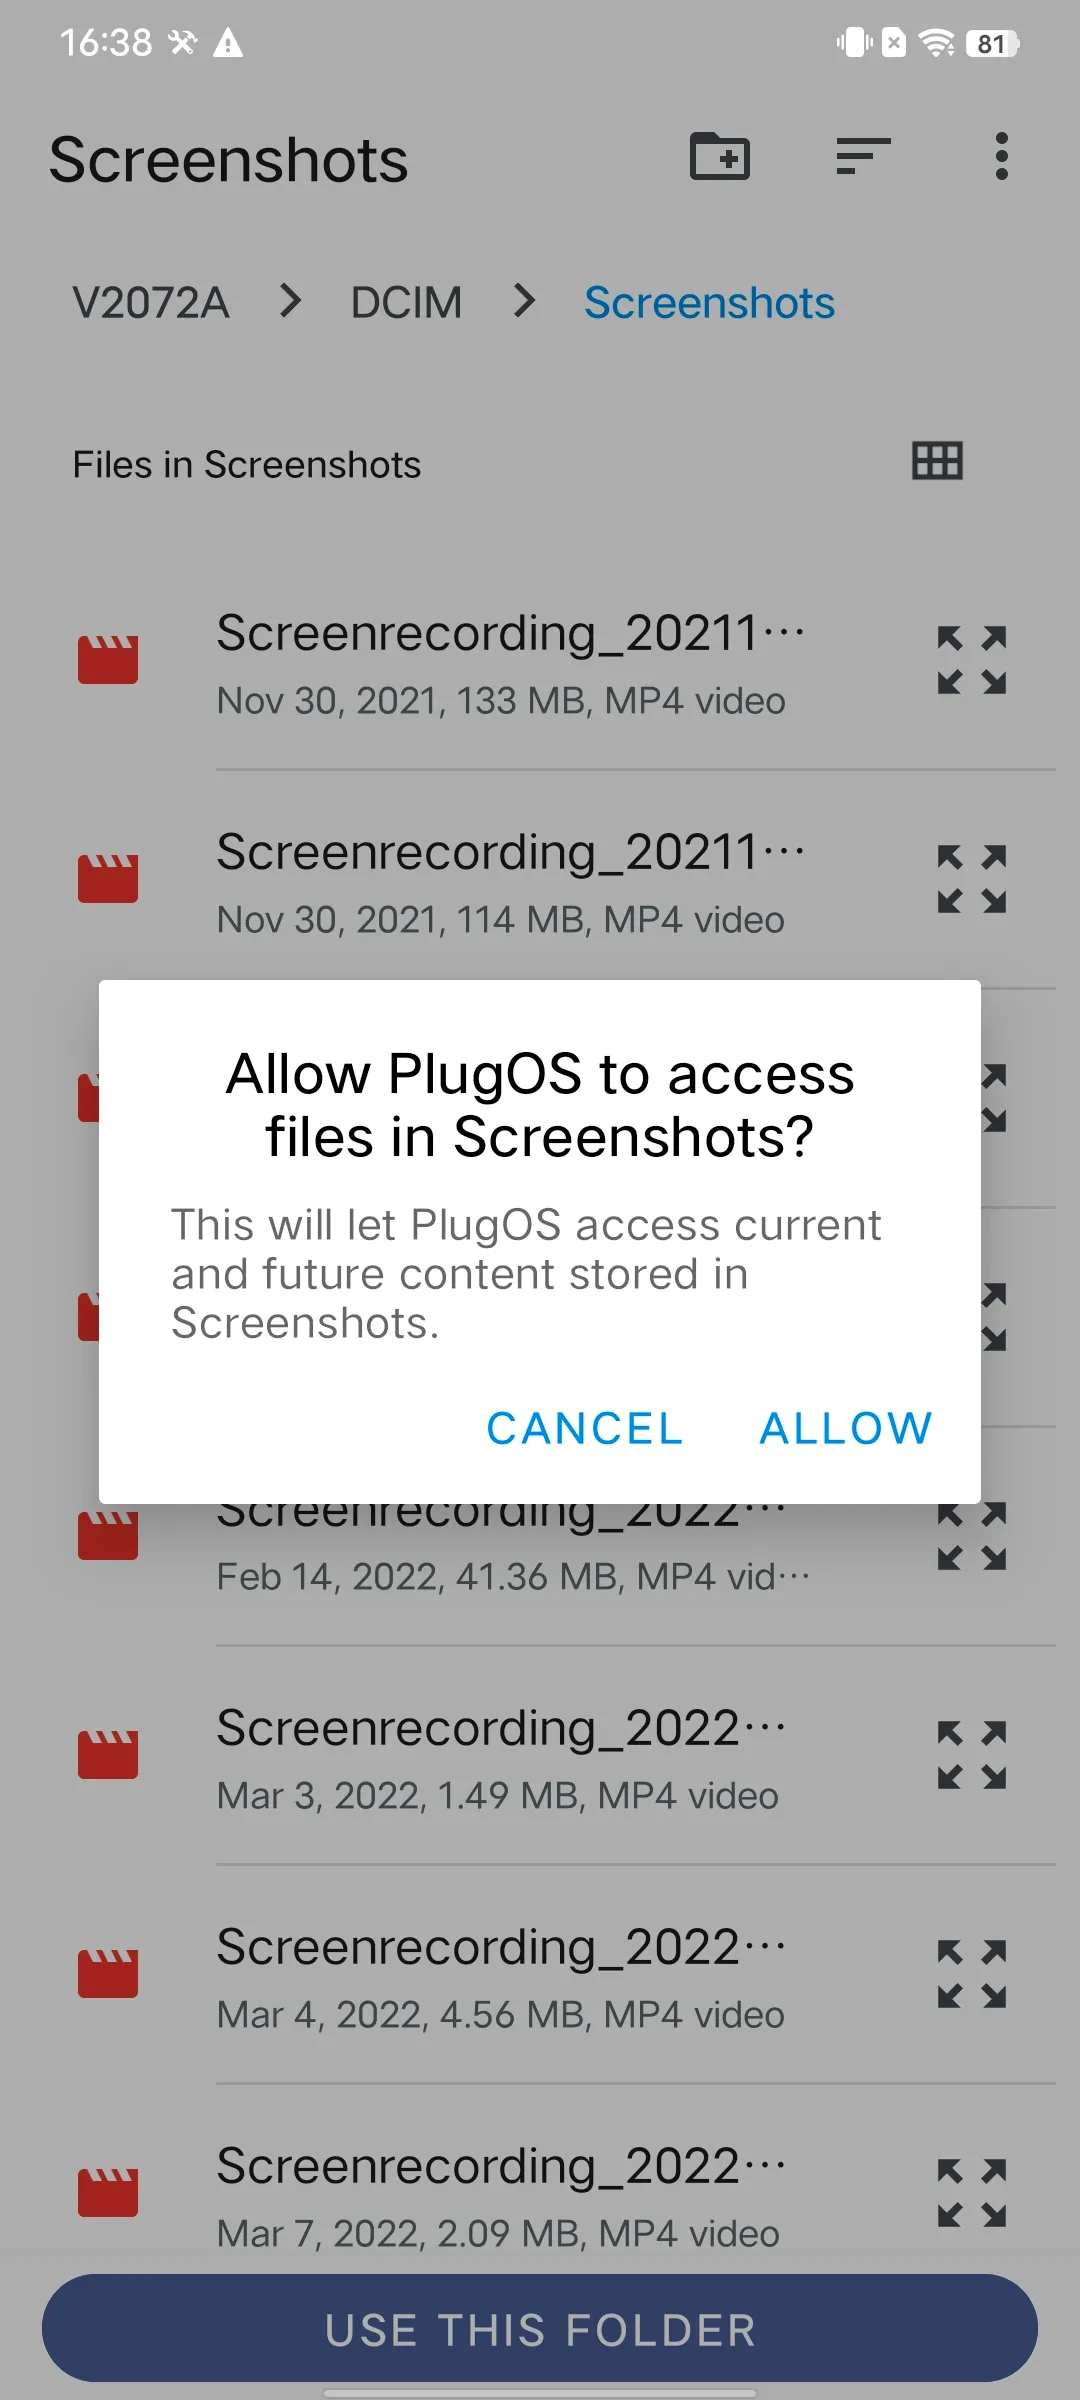
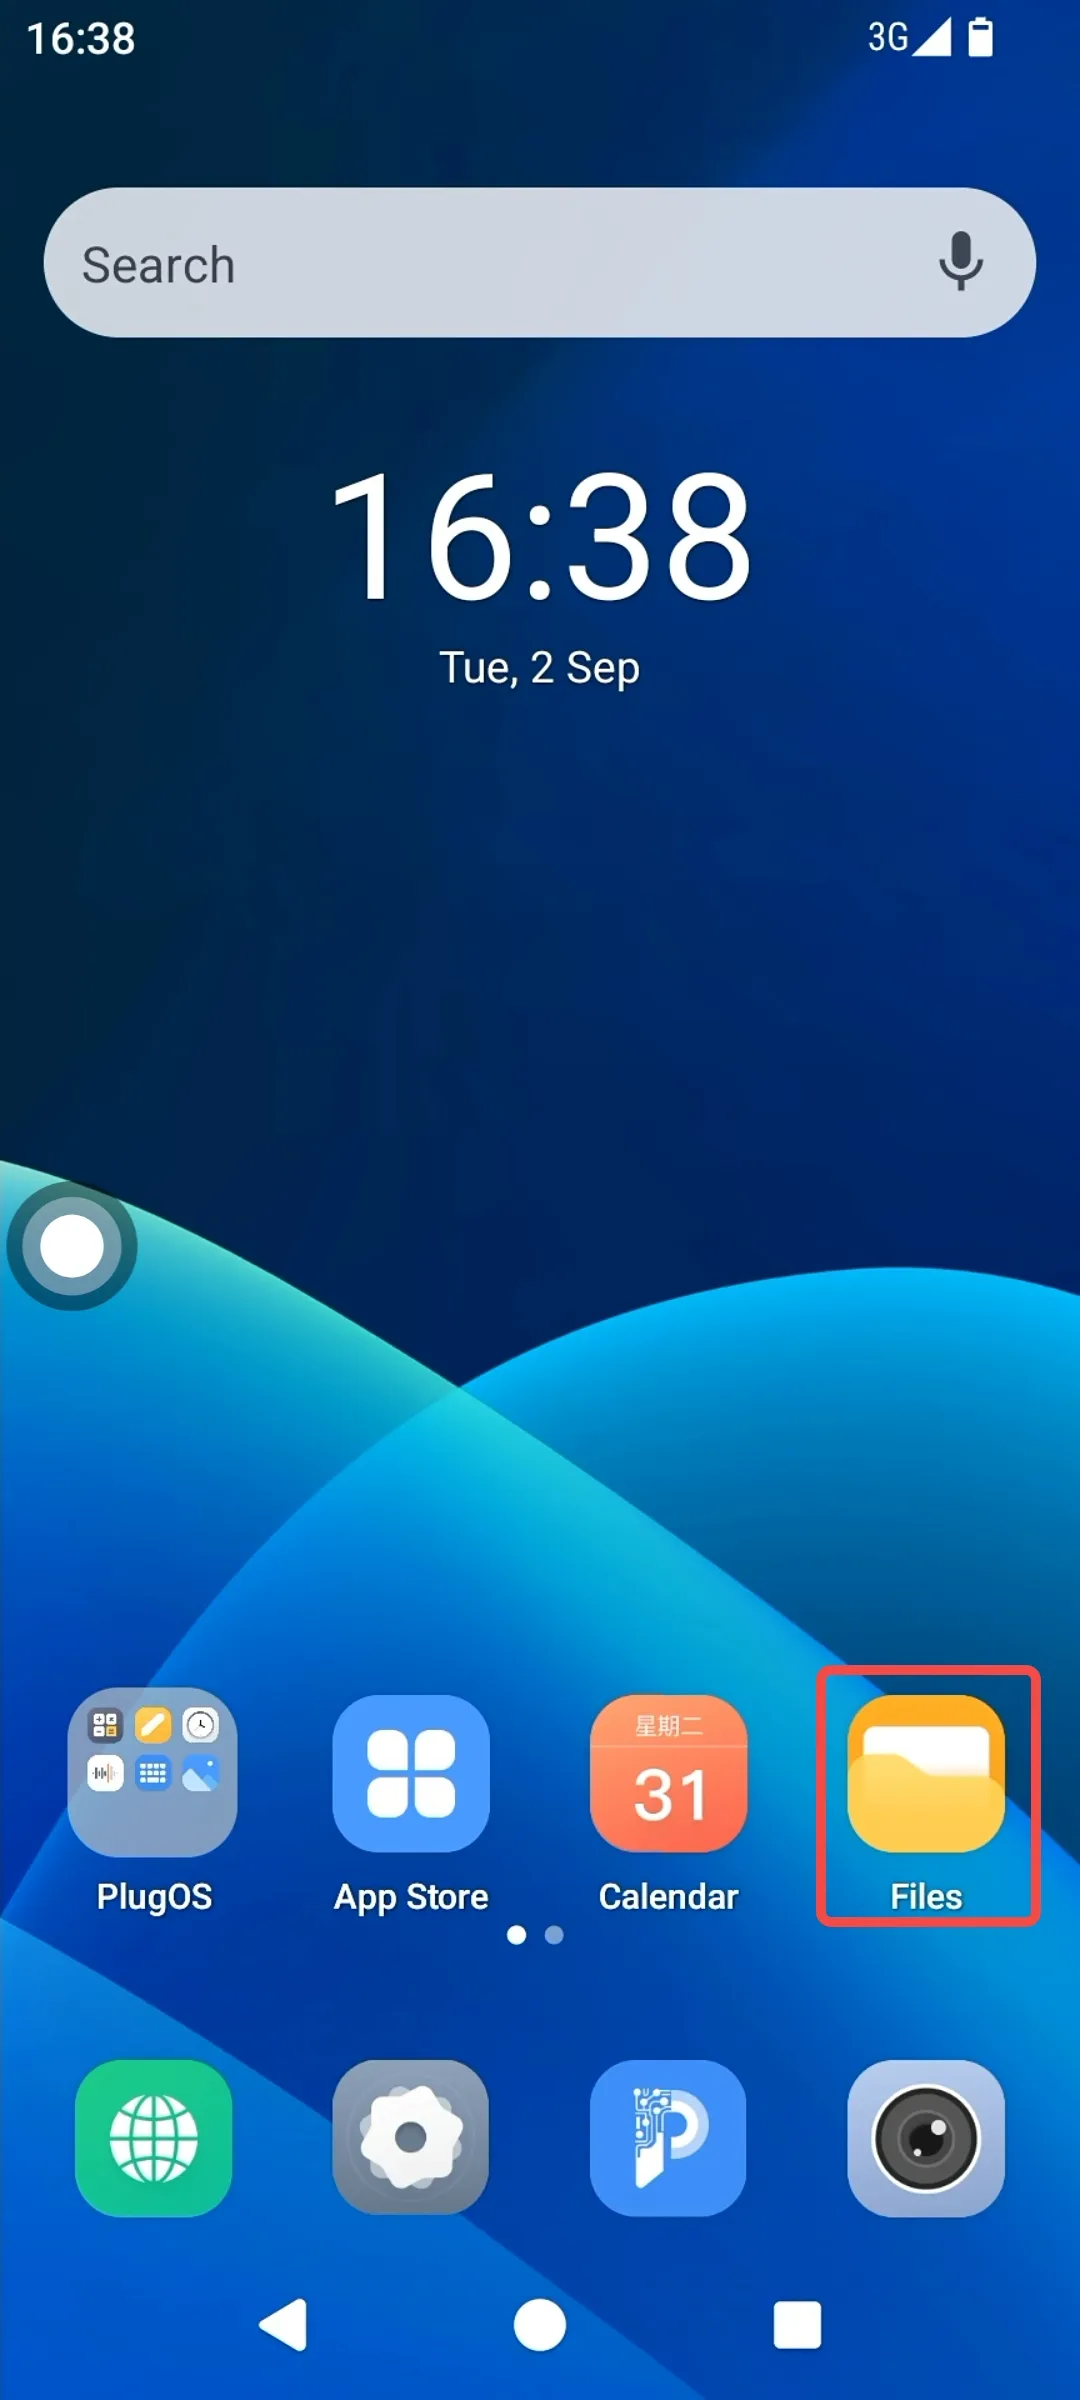
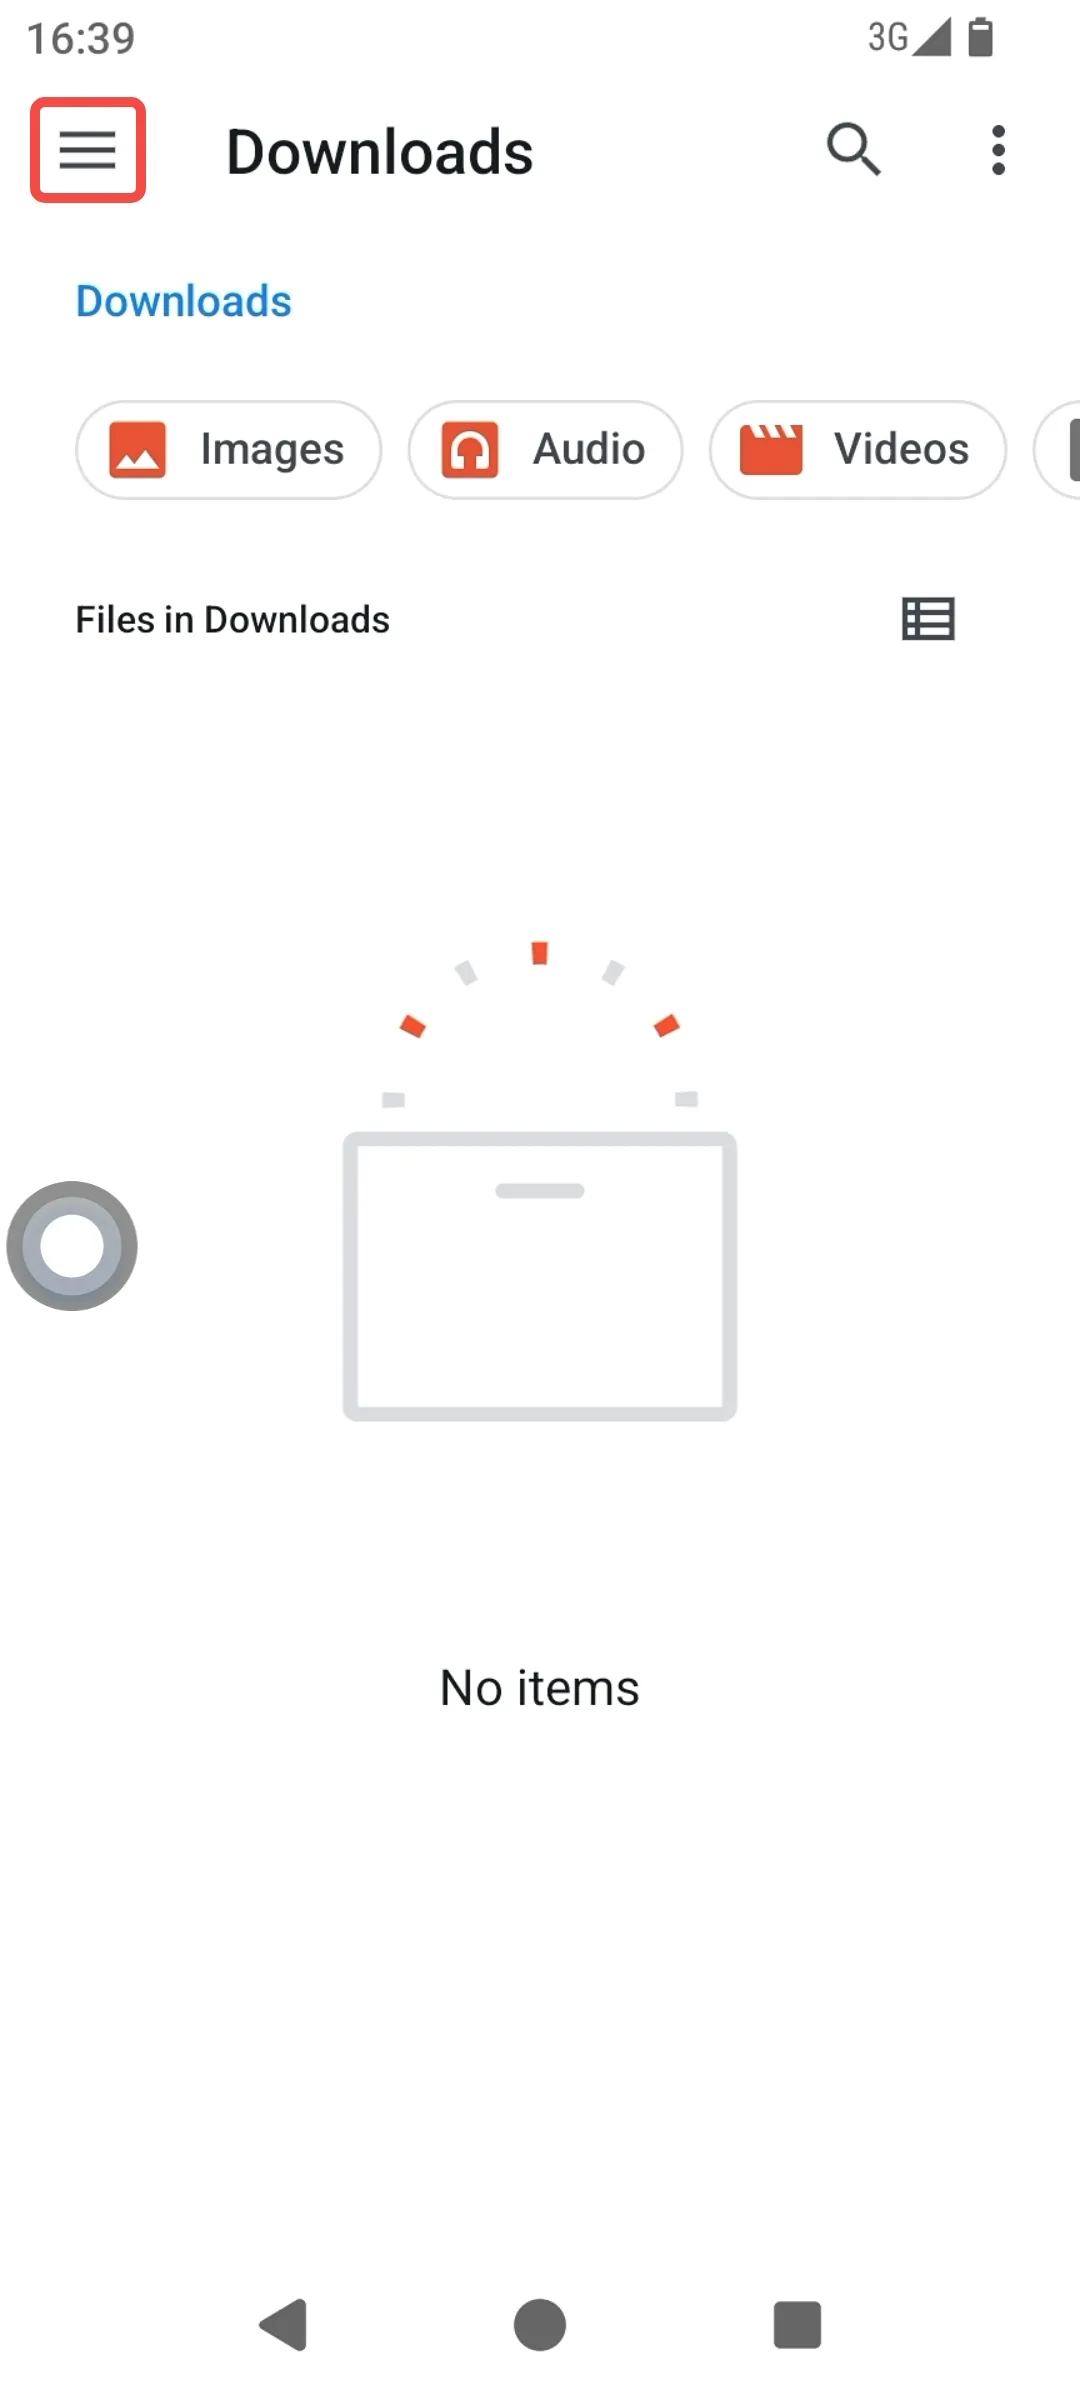
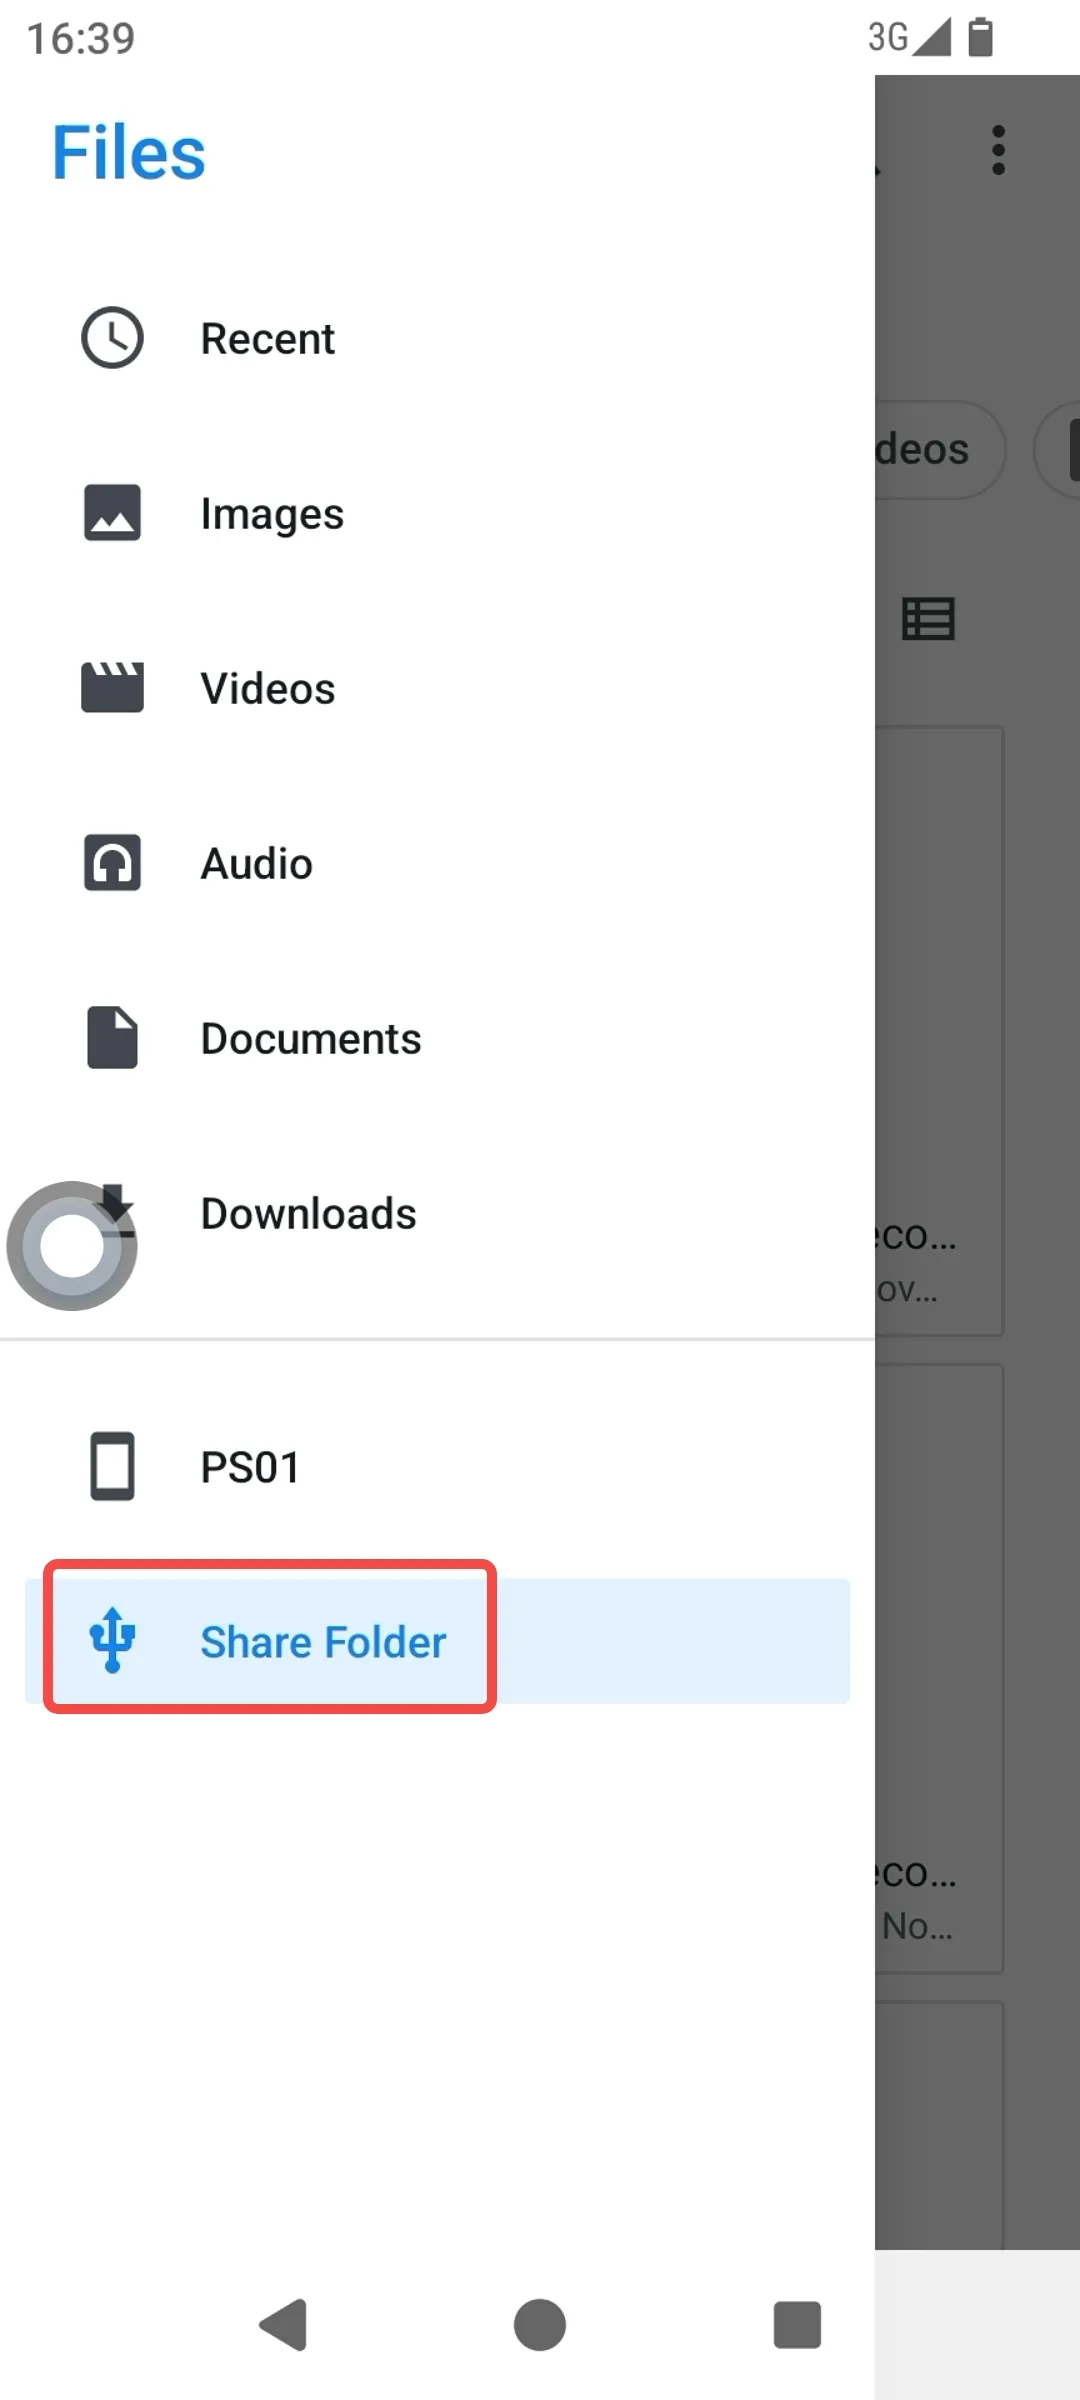
Configure Shared Folder
With the “Shared Folder” function provided by the PlugOS APP, you can realize data transfer between the host device and the PlugOS device.
Usage Method:
-
Open the PlugOS APP → Navigate to the homepage (ensure the device is connected) → Click the “Shared Folder” button (either the icon or the text) → Select the folder you want to share, then click “Use This Folder” → Allow the device to access this folder.
-
Access the PlugOS device system, click the “Files” icon on the desktop of the device system → Enter File Management and click the menu bar in the upper left corner → Click “Share Folder” to view the contents in the shared folder of the host device.
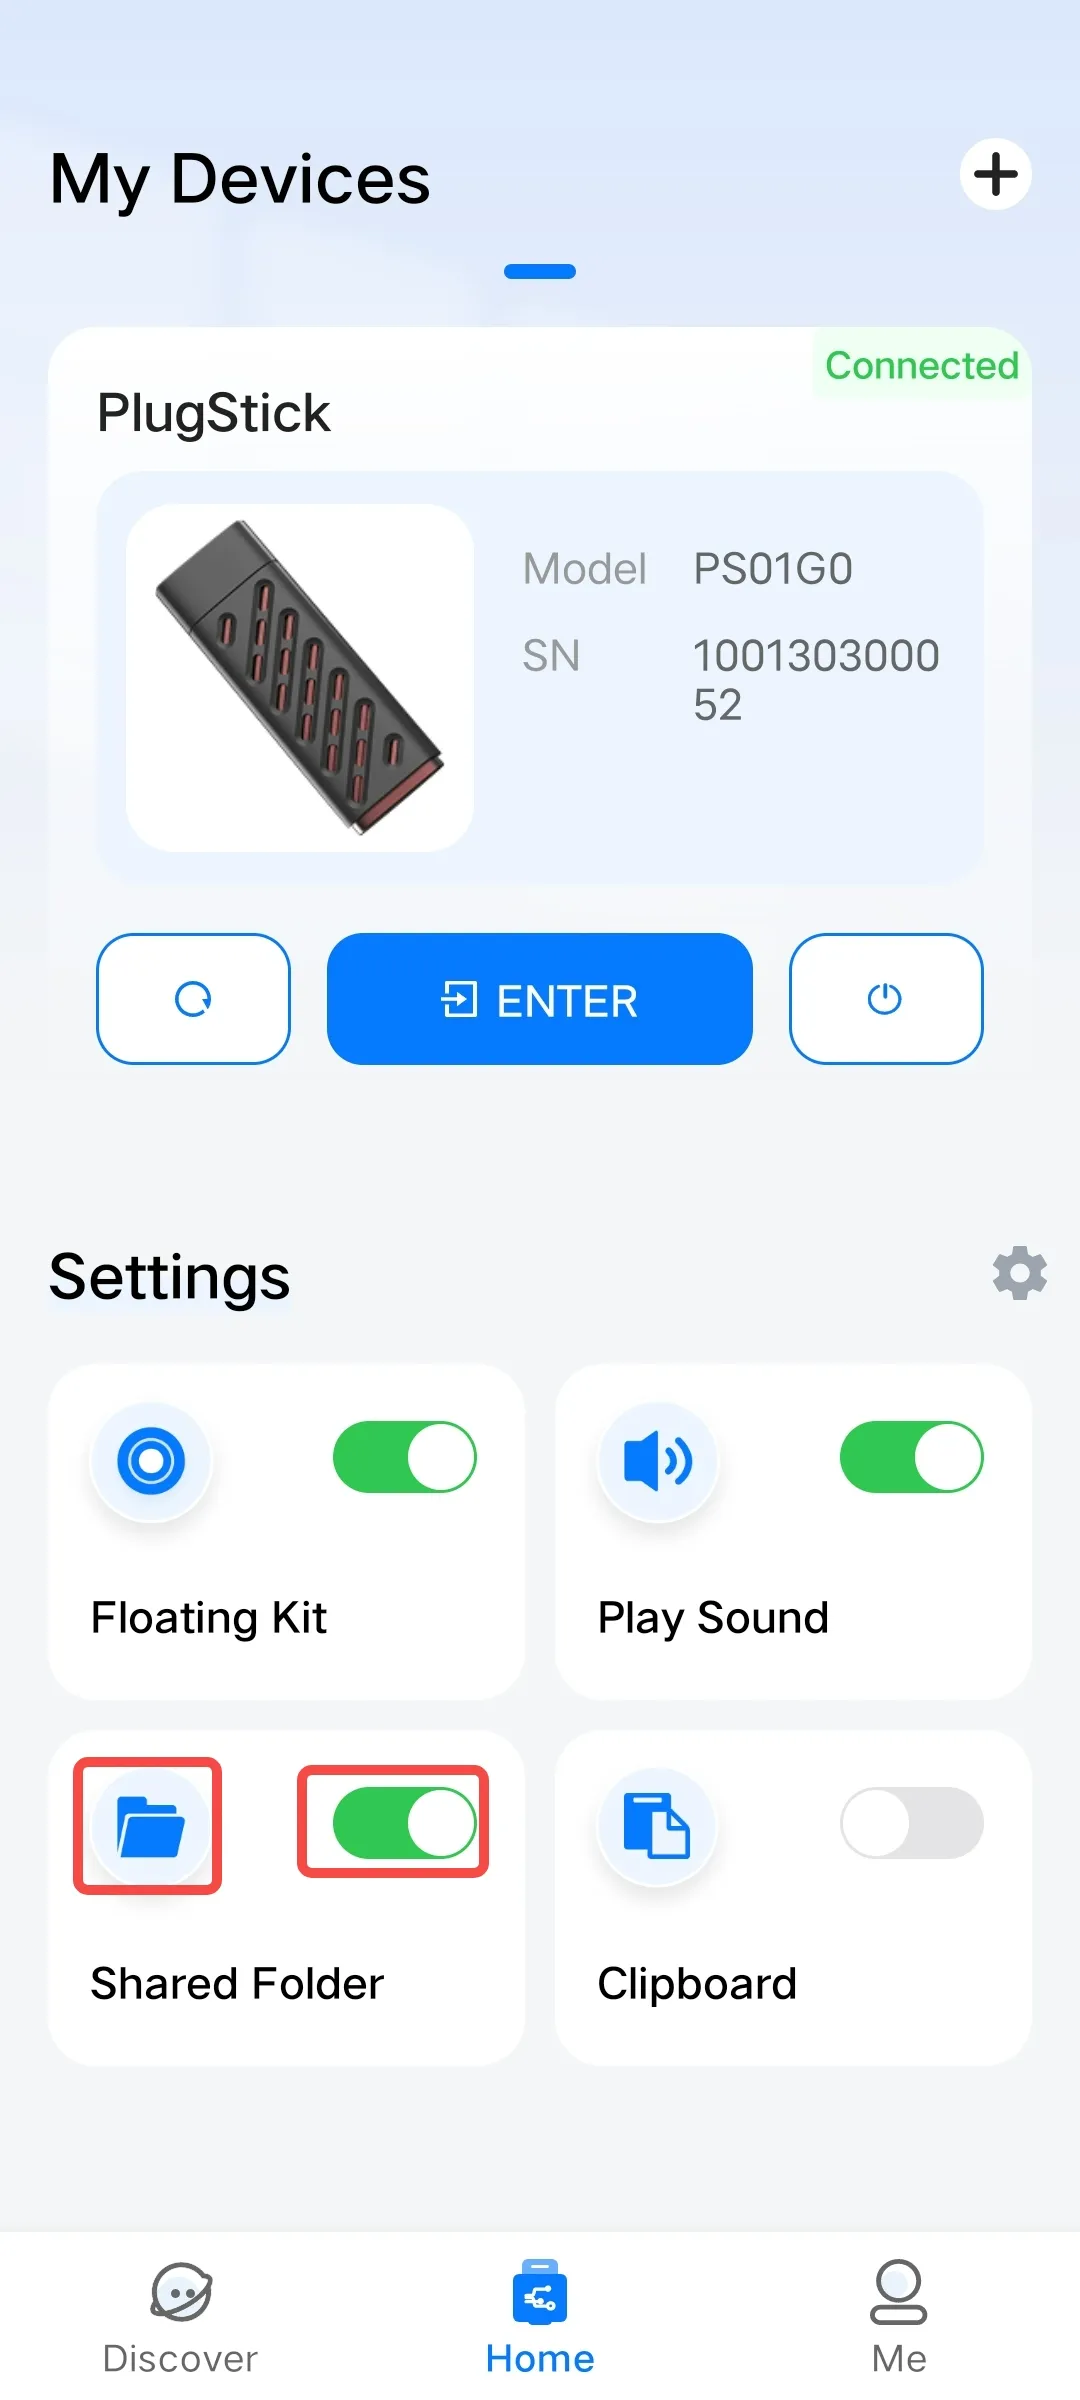
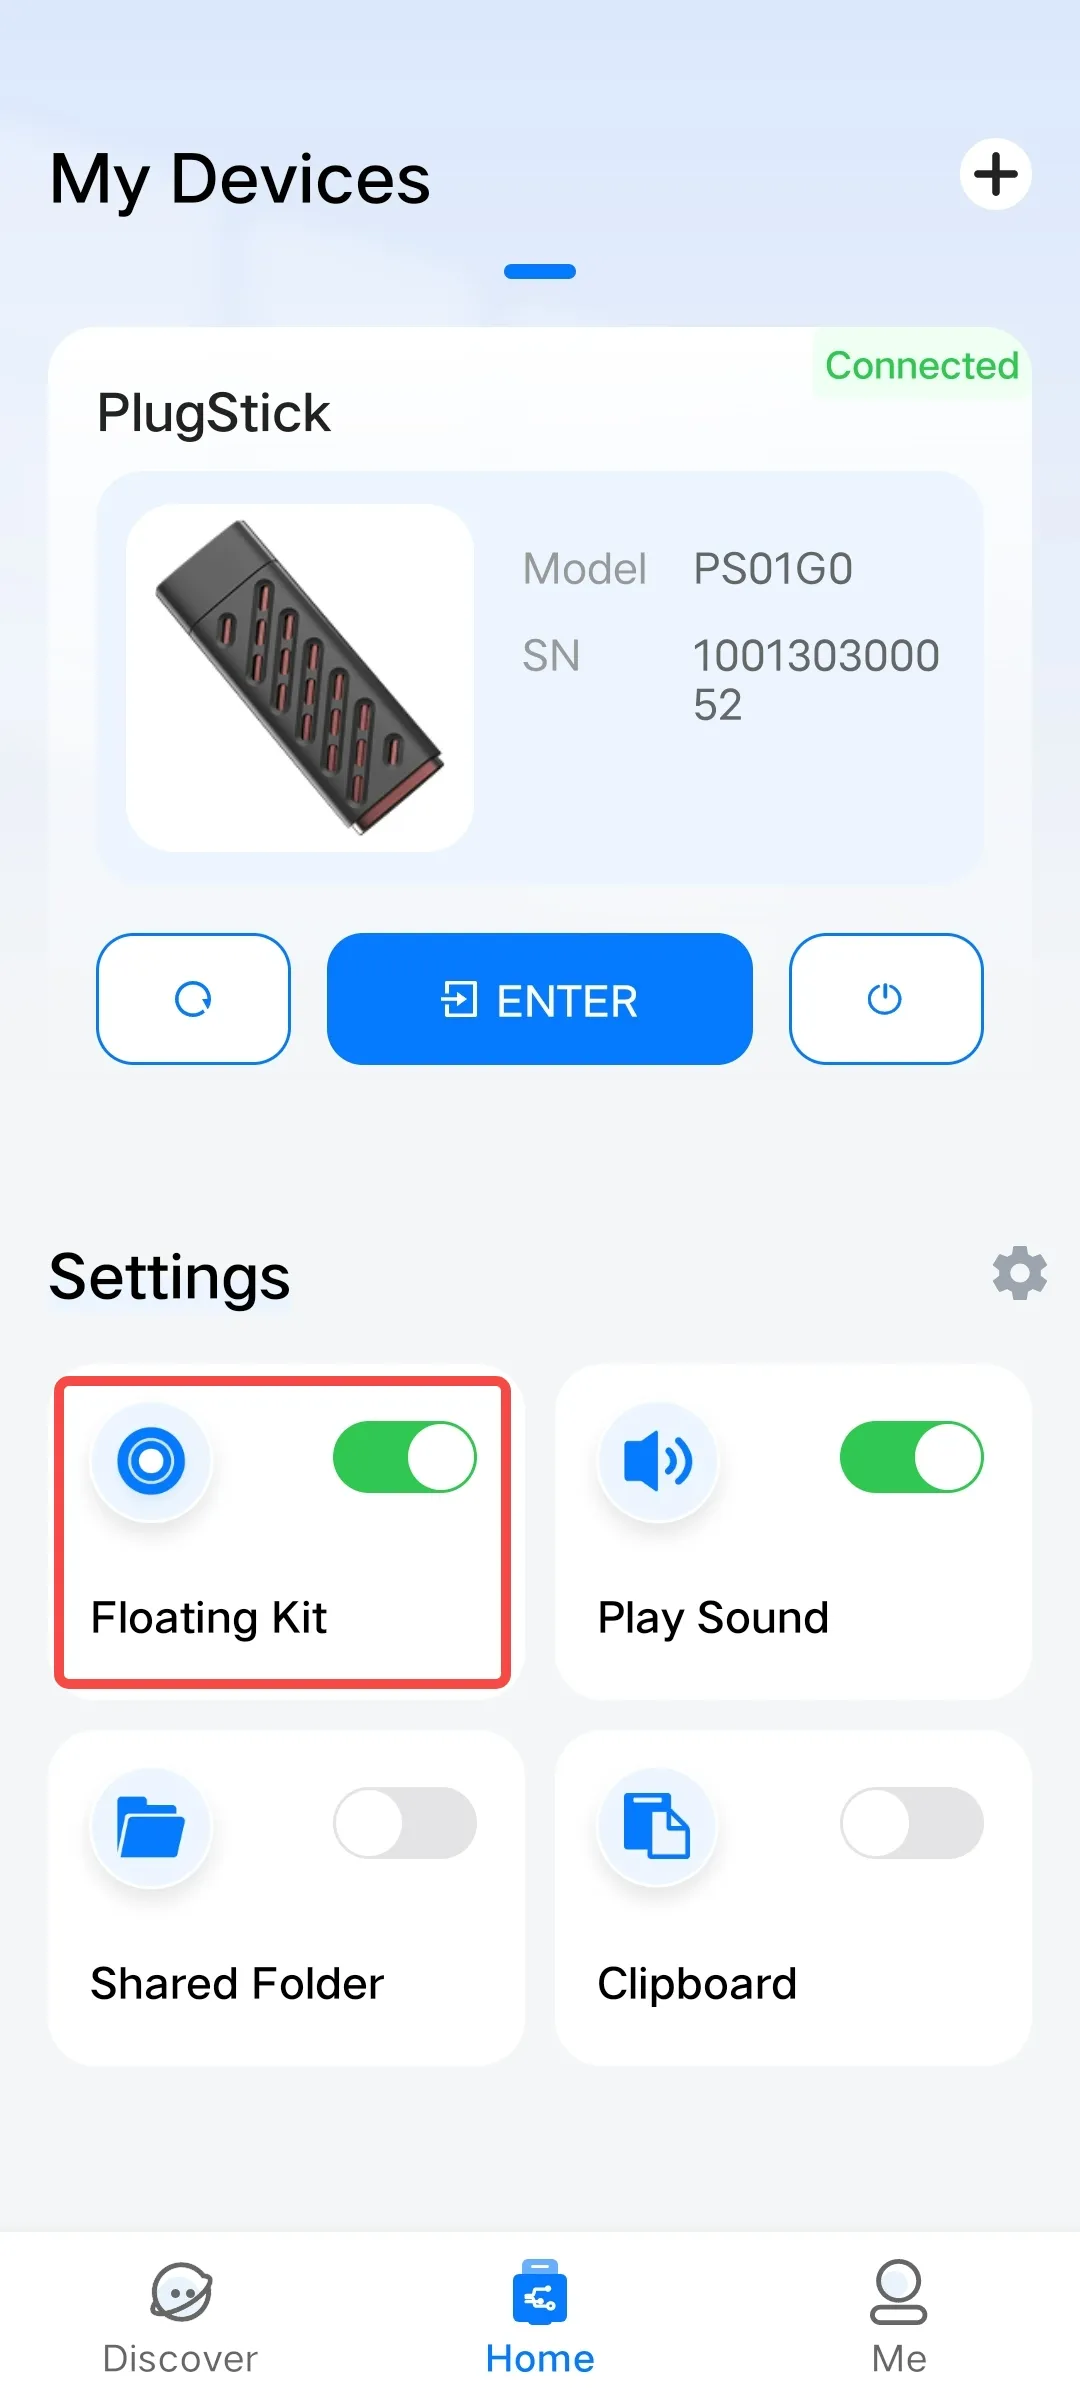
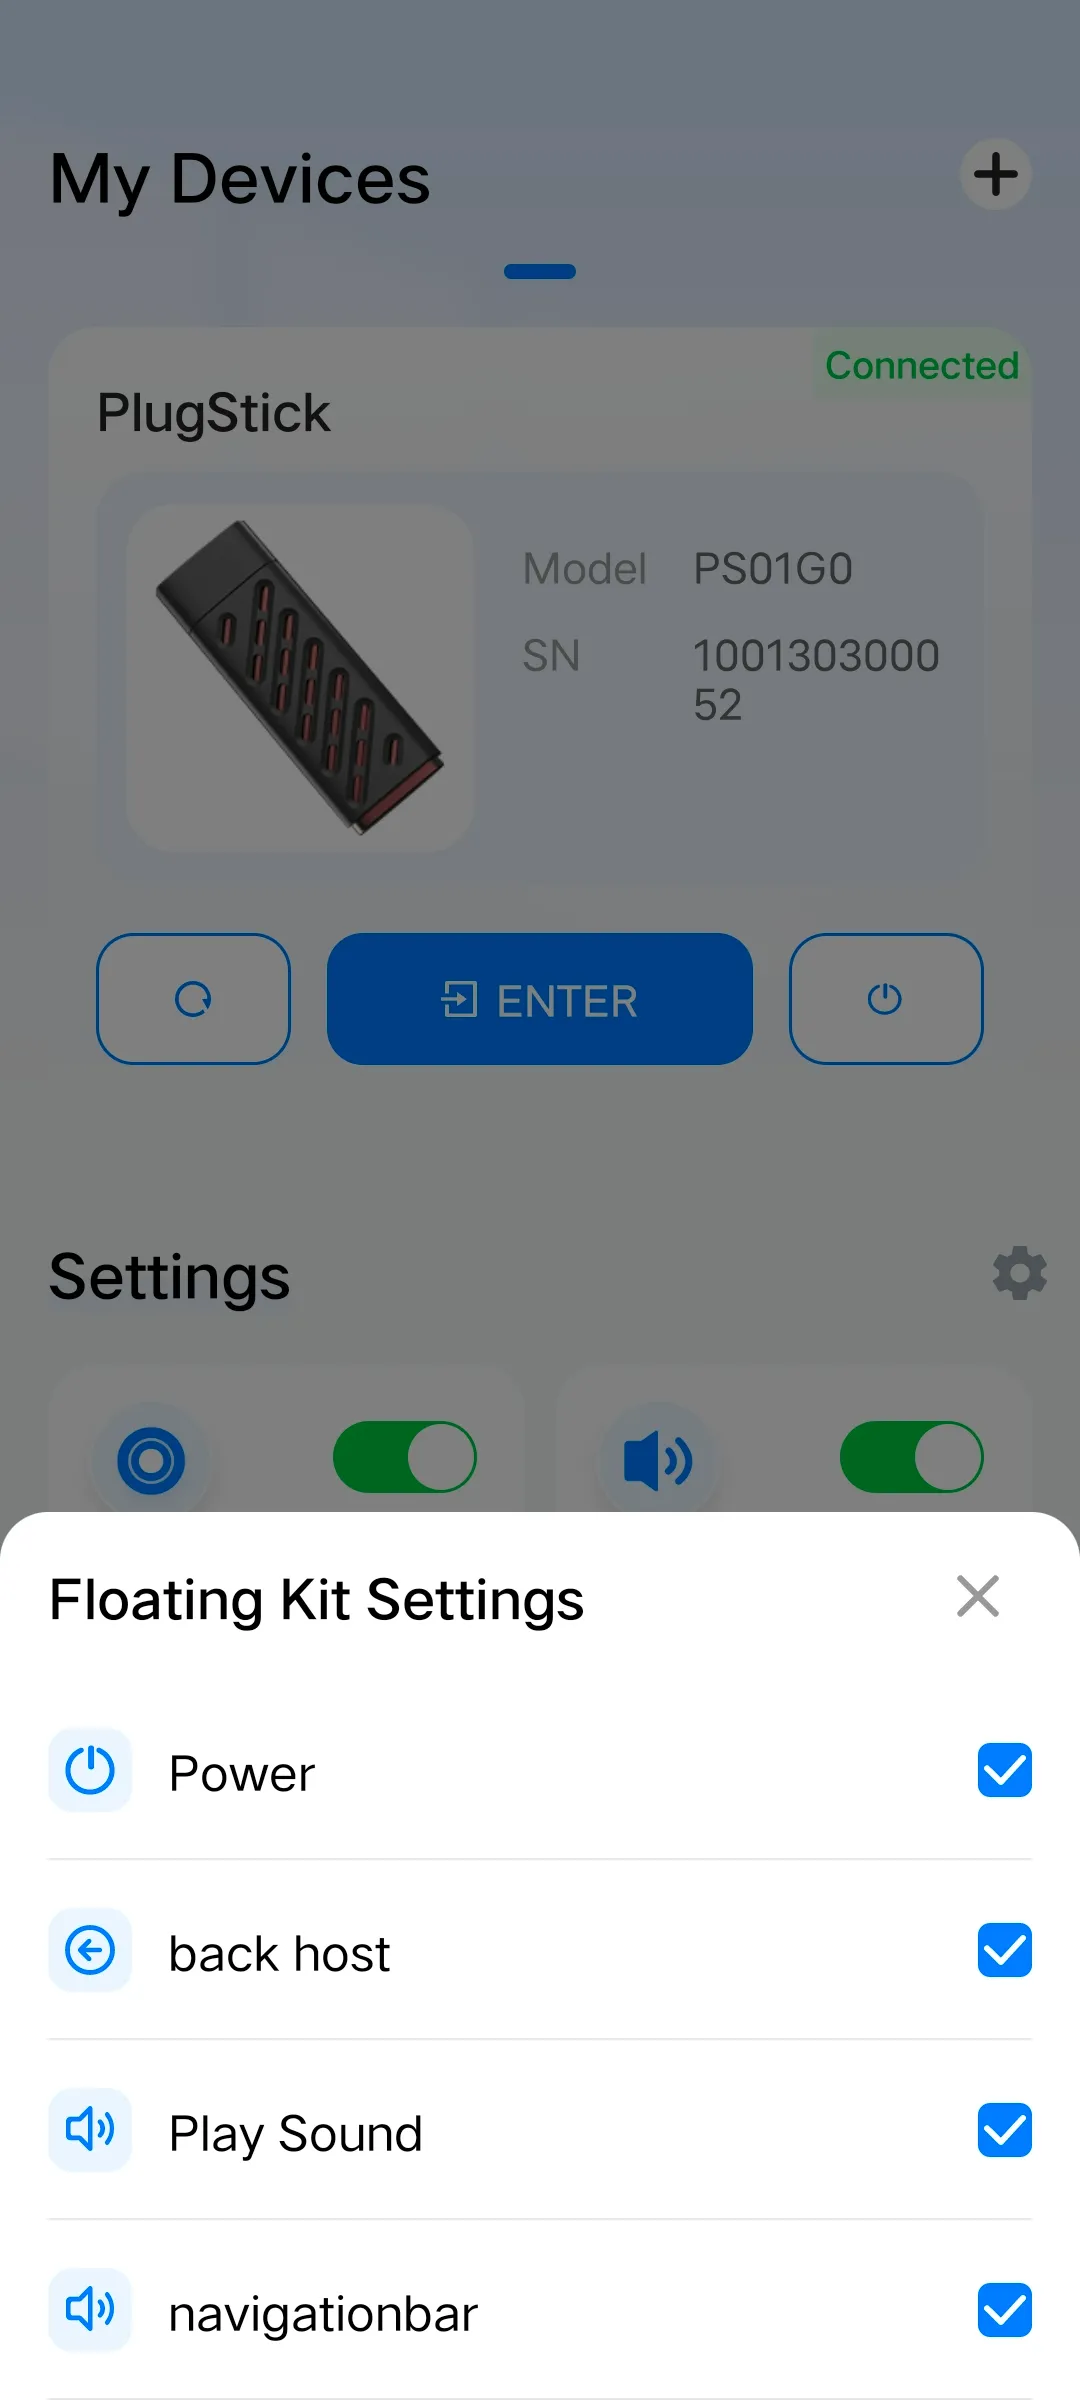
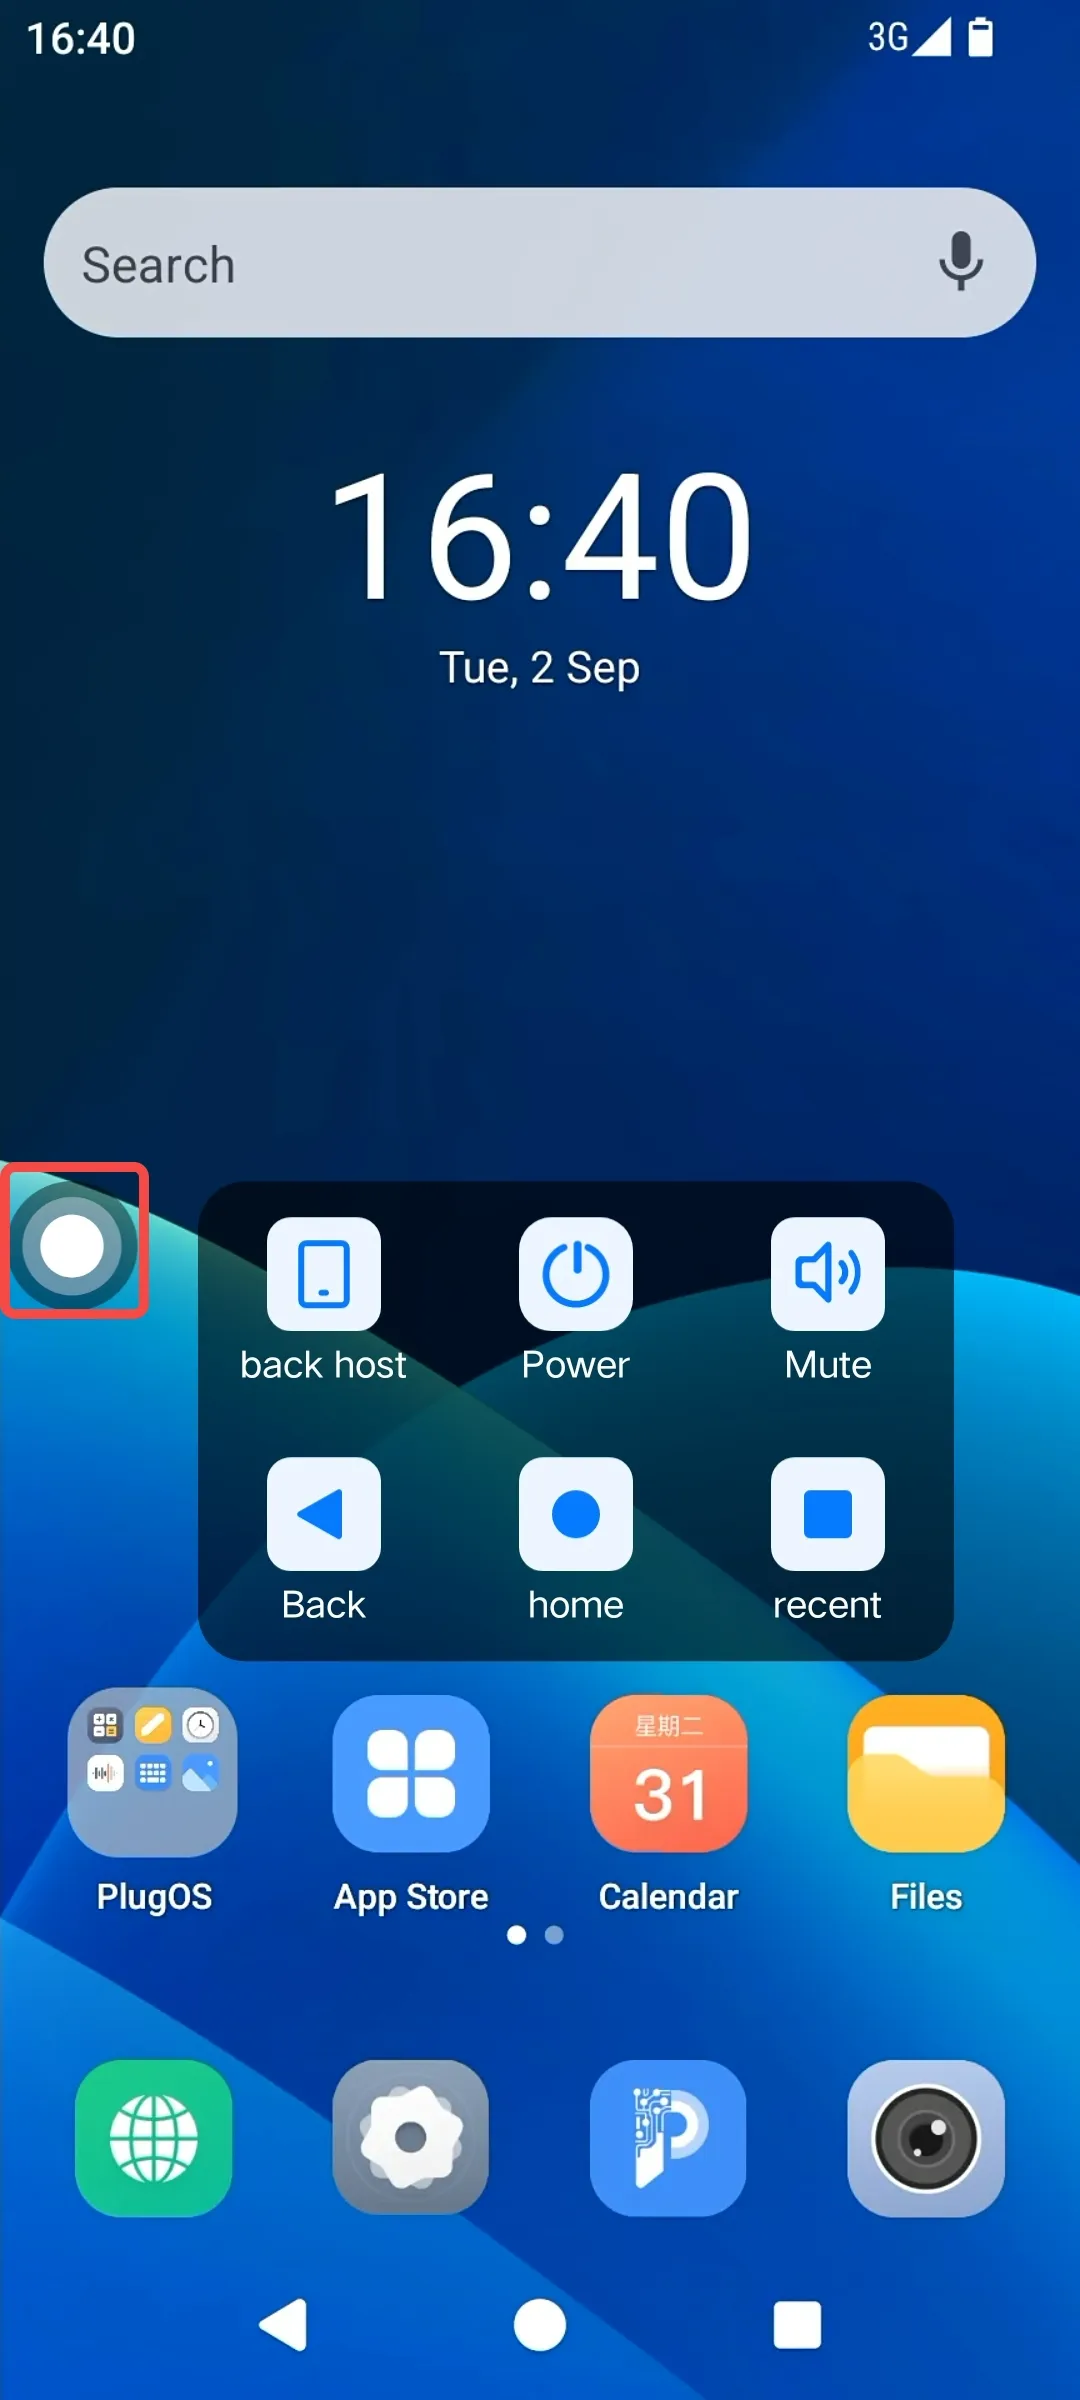
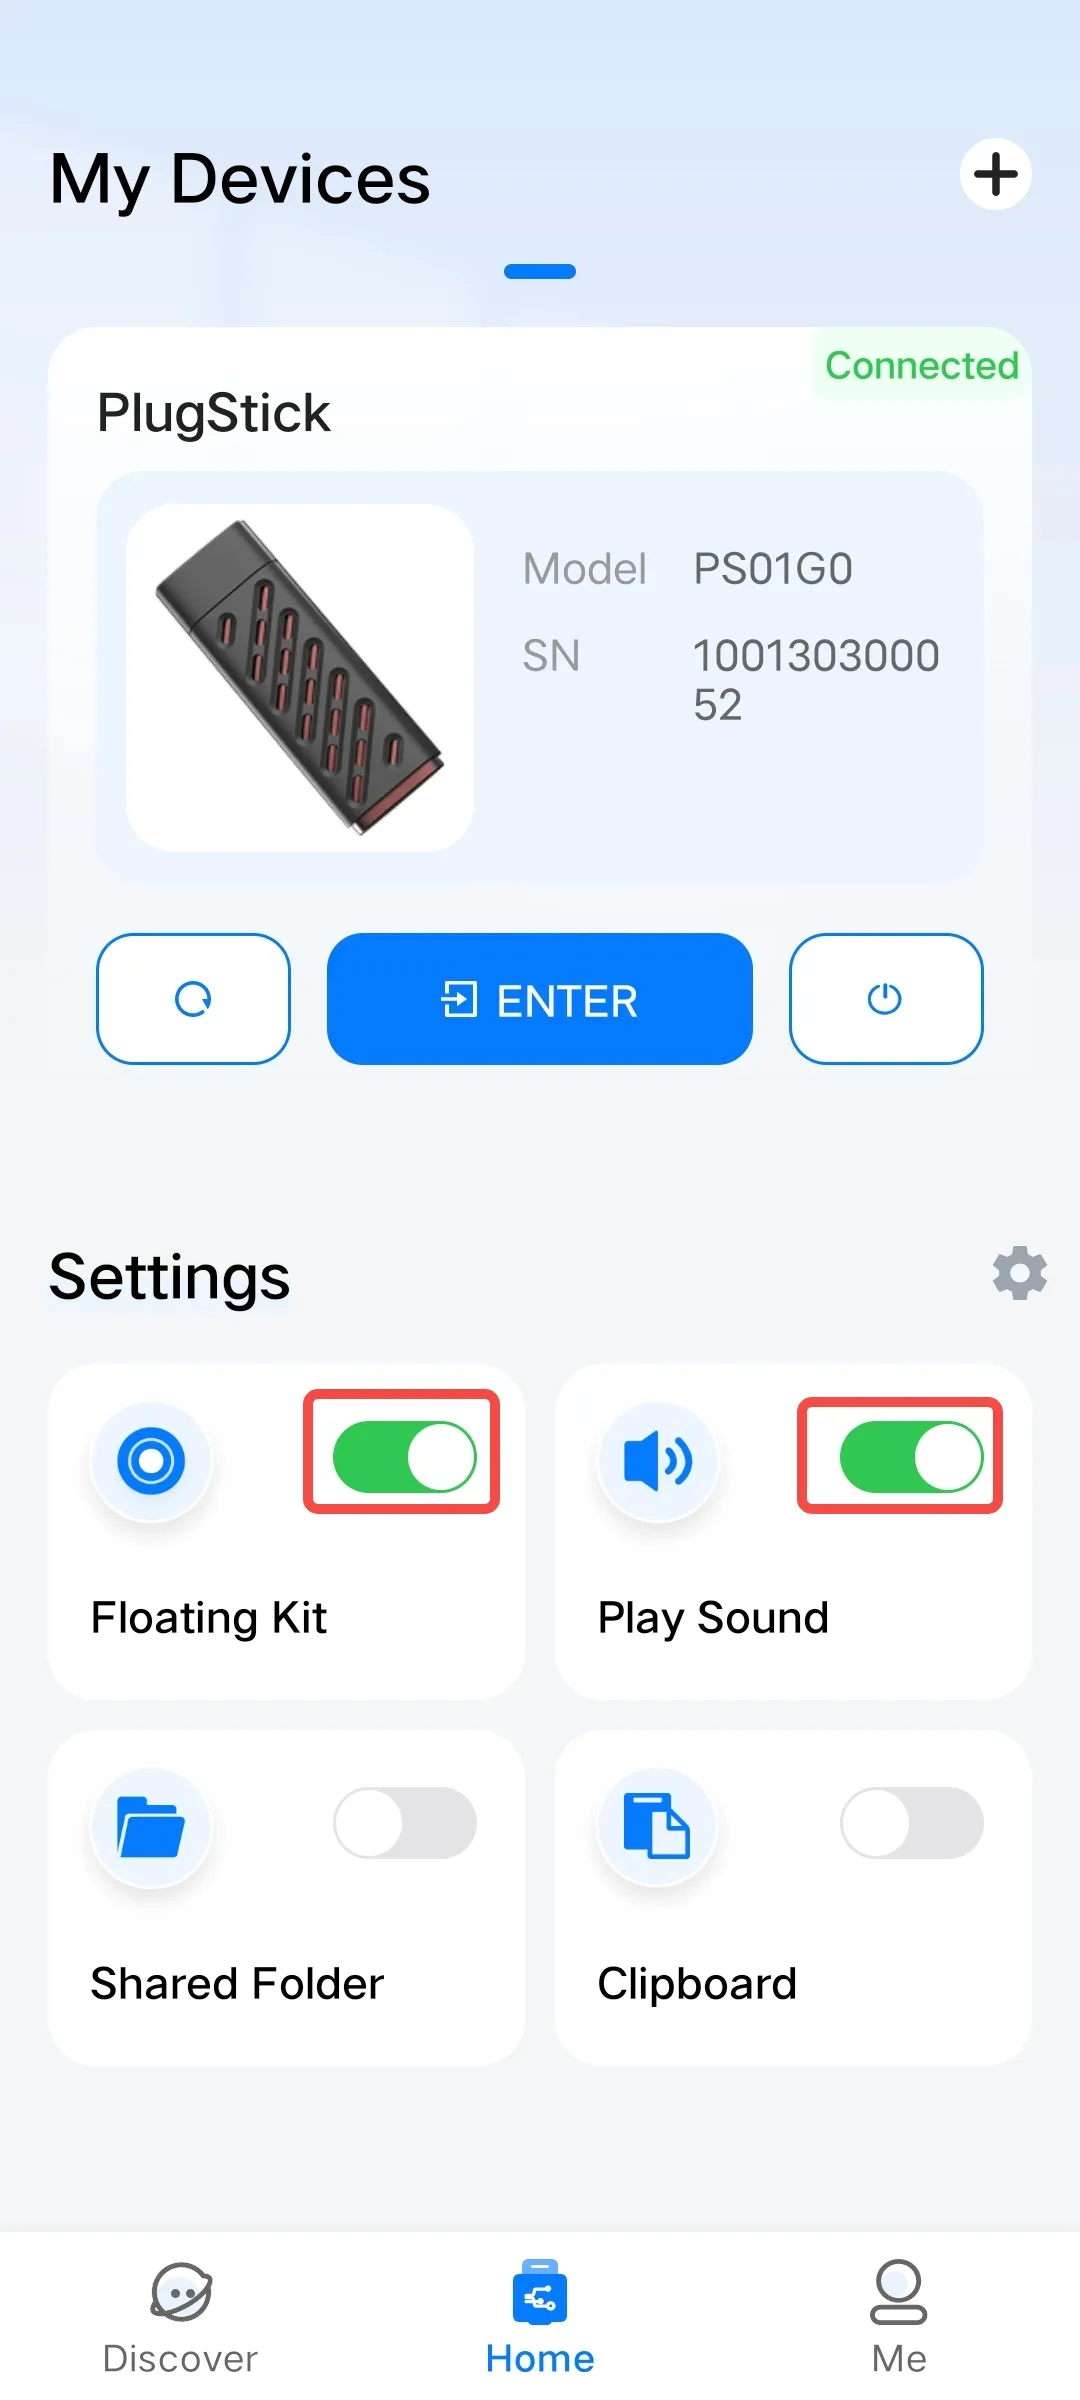
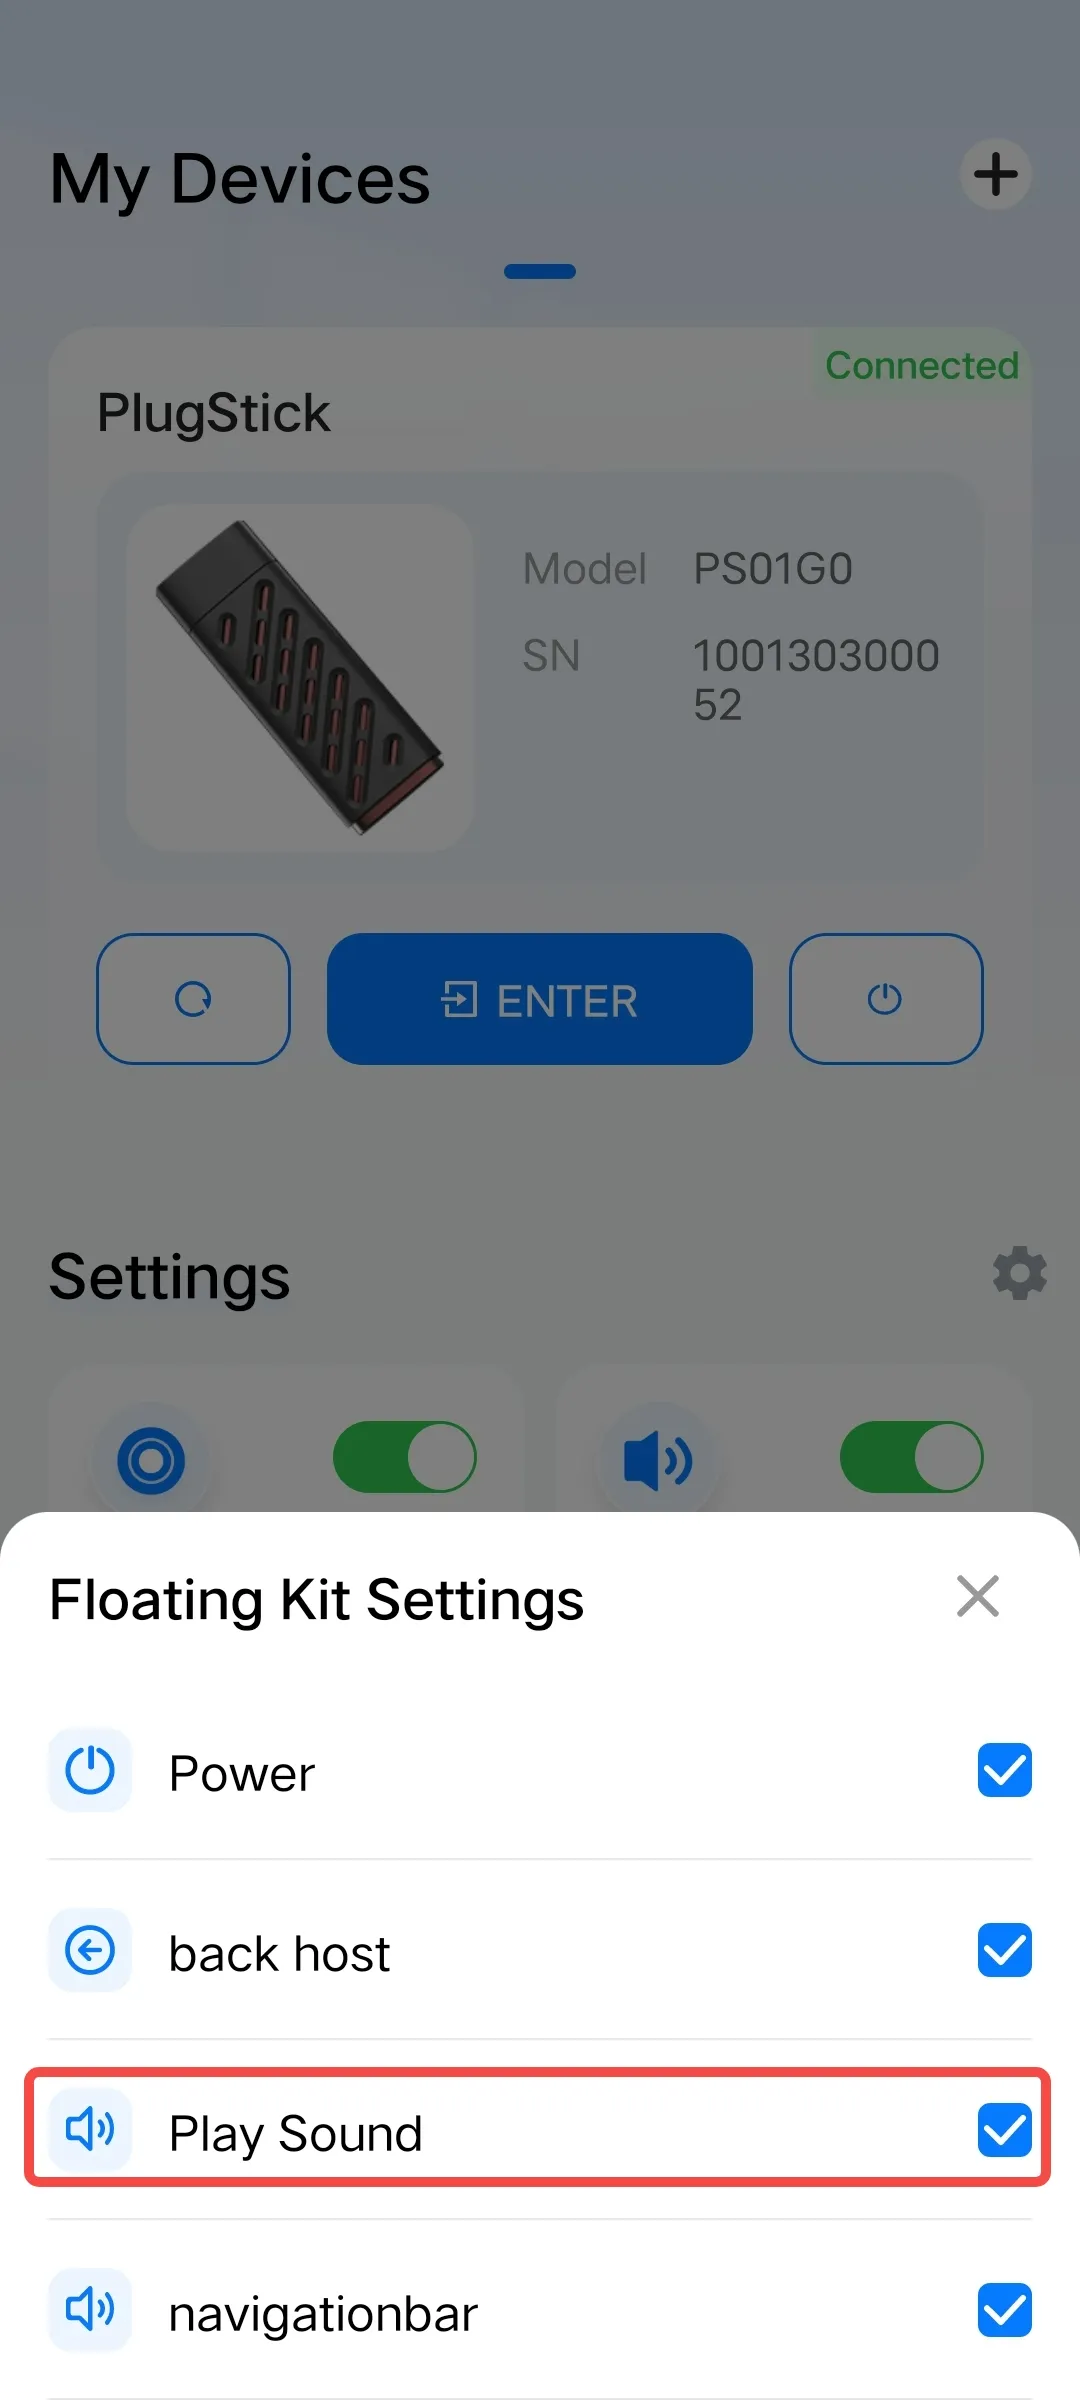
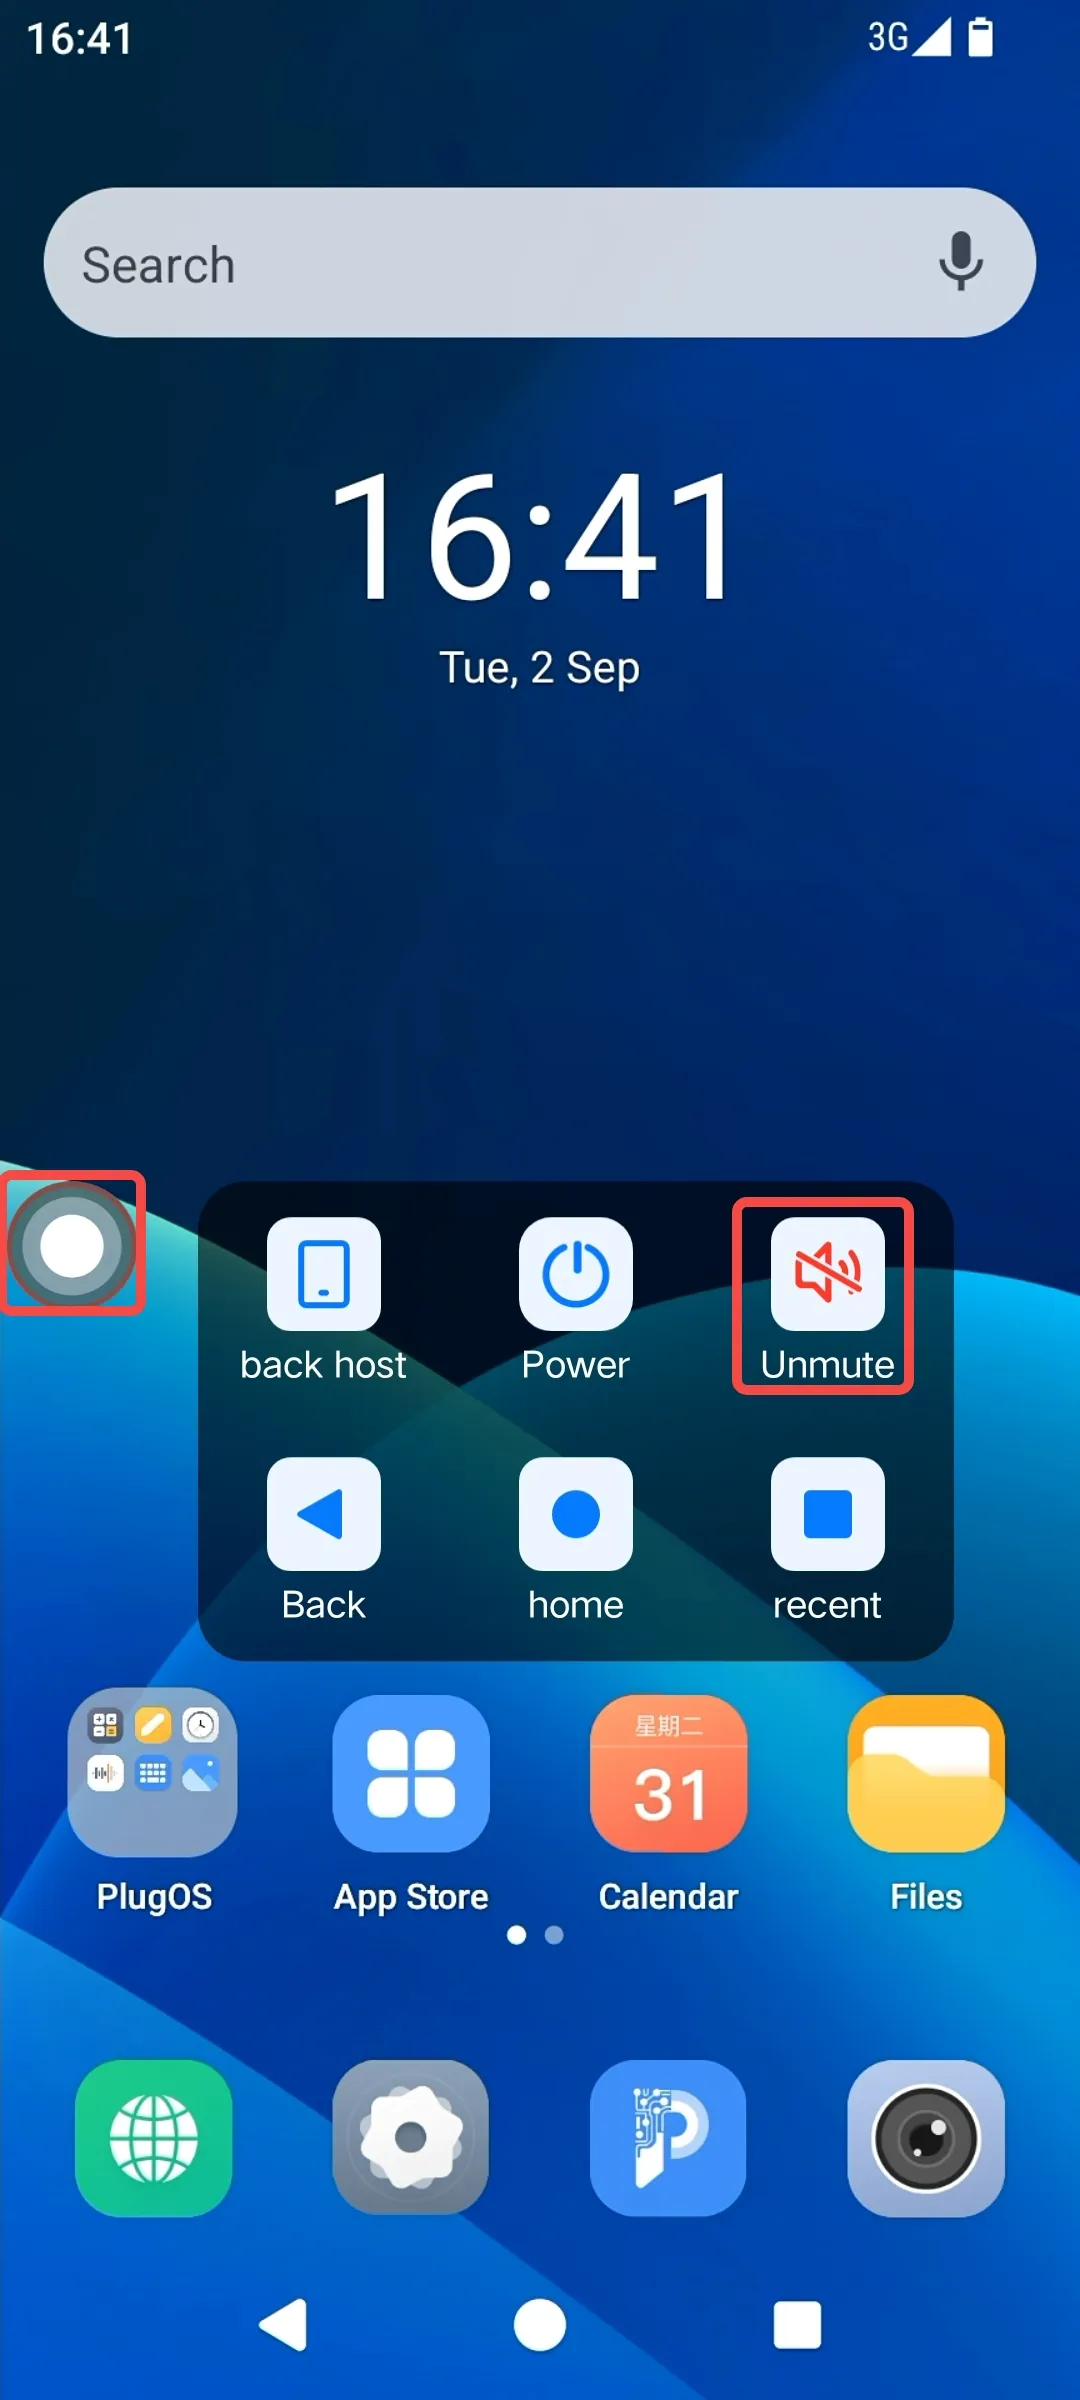
Customize Floating Kit
PlugOS provides quick operations via a floating Kit. After enabling the “Floating Kit”, you can use common tools on the device desktop and customize it according to your personal usage habits.
Usage Method:
- Open the PlugOS APP → Navigate to the homepage (ensure the device is connected).
- Turn on the “Floating Kit” switch to enable the setting.
- Click the “Floating Kit” icon or the “Floating Kit” text to customize the floating Kit shortcuts for device operations, including returning to the host device, shutting down, restarting the device, turning sound on & off, and navigation bar functions (back, home, and recent tasks within the system).
- Access the system → On the home screen, click the “Floating Kit” button to select quick operations.
Select Audio Output Mode
The PlugOS APP provides the function of playing device audio, and you can set the device’s audio output according to your personal habits.
Usage Method 1:
- Open the PlugOS APP → Navigate to the homepage (ensure the device is connected).
- The PlugOS APP on the host device is muted by default.
- On the homepage → Select the output source and toggle the switch in the “Play Sound” settings card. You can choose either the earpiece or the external speaker as the audio output source.
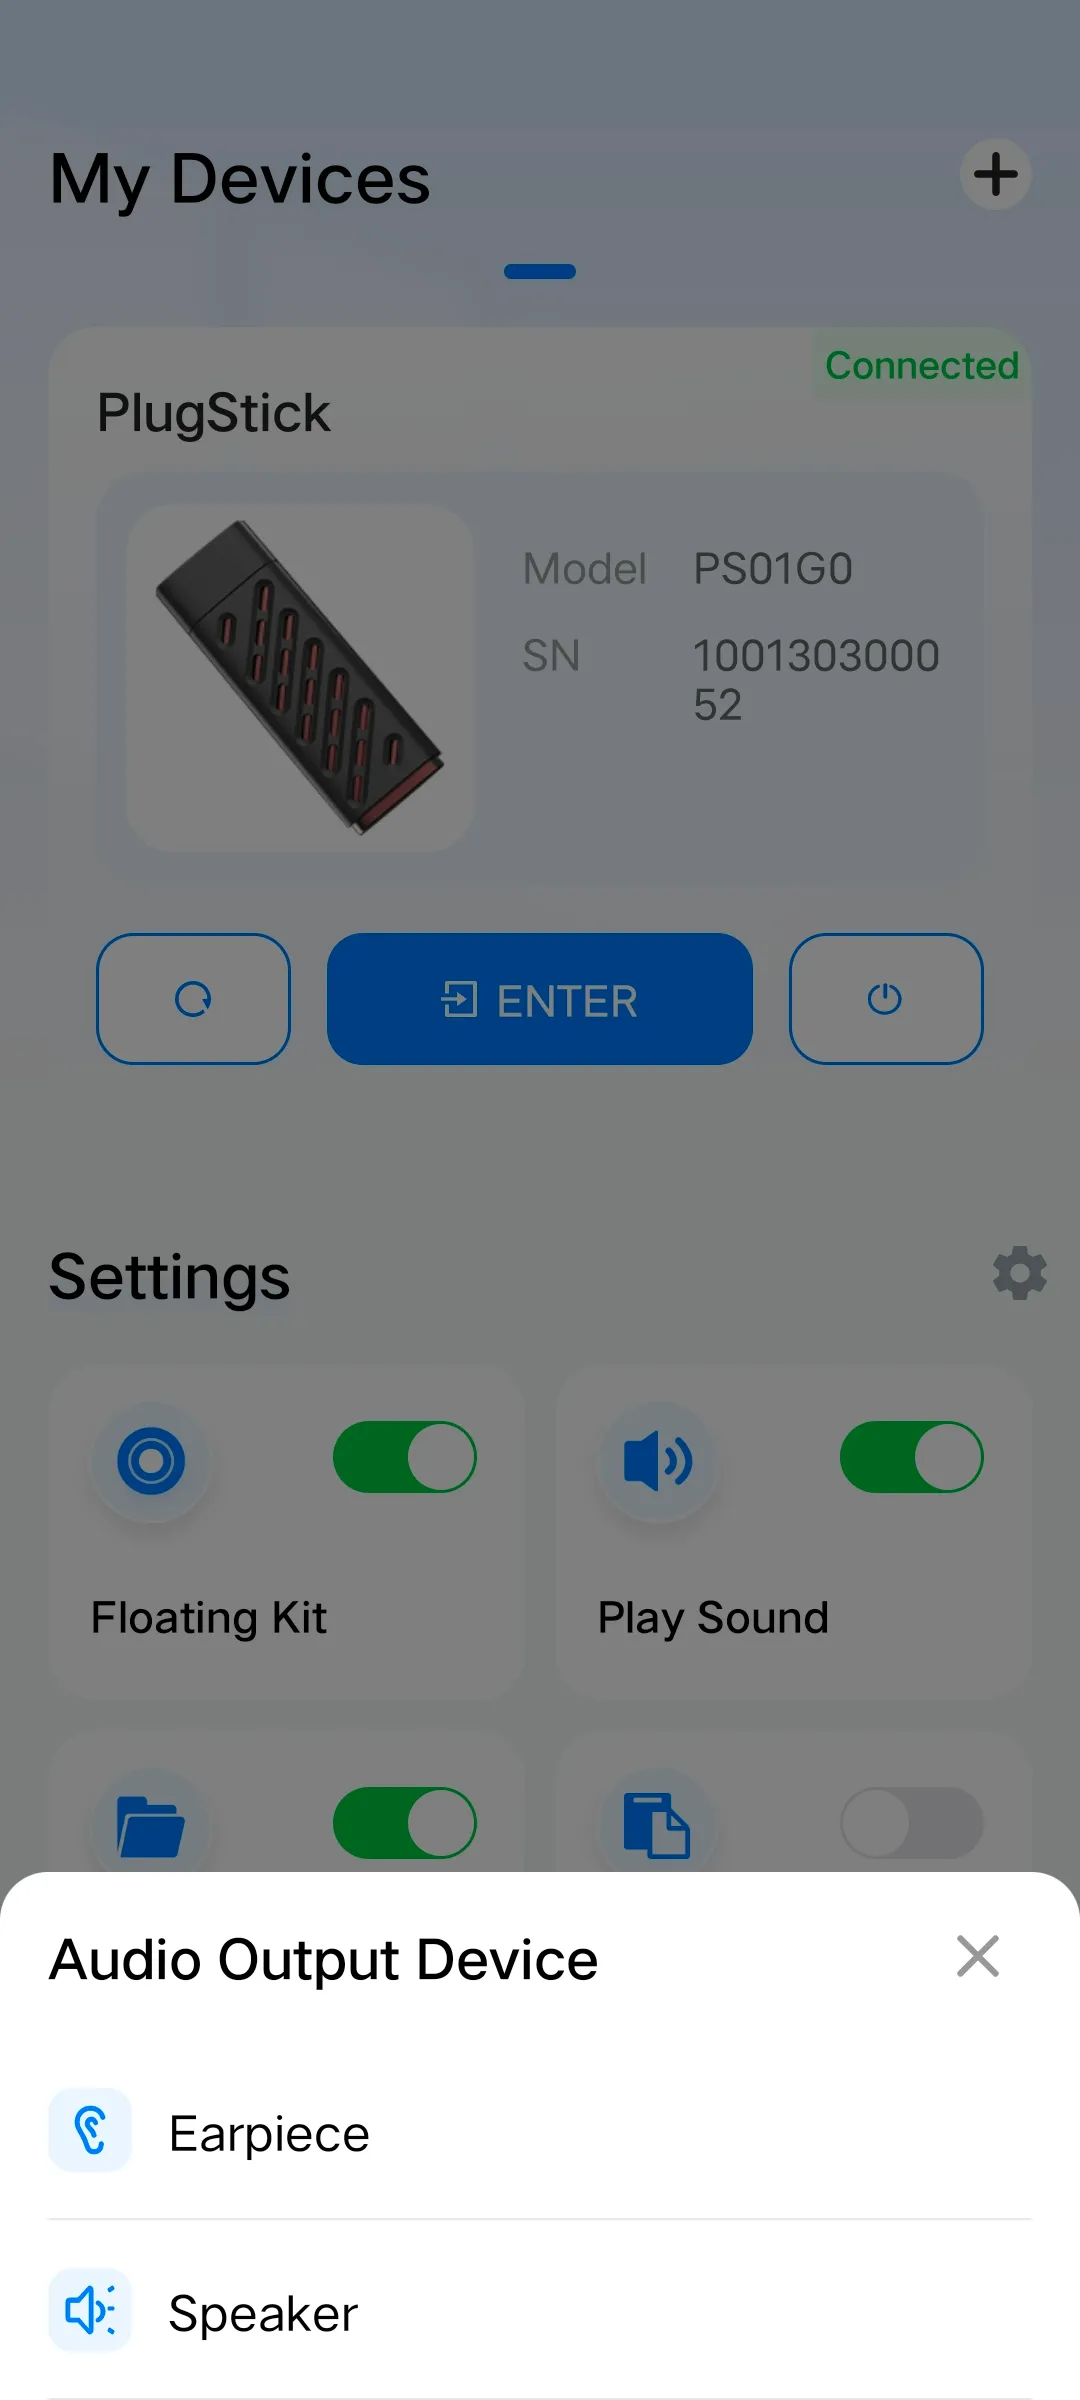
Usage Method 2:
Select the “Toggle Sound Playback” option from the floating Kit shortcuts.
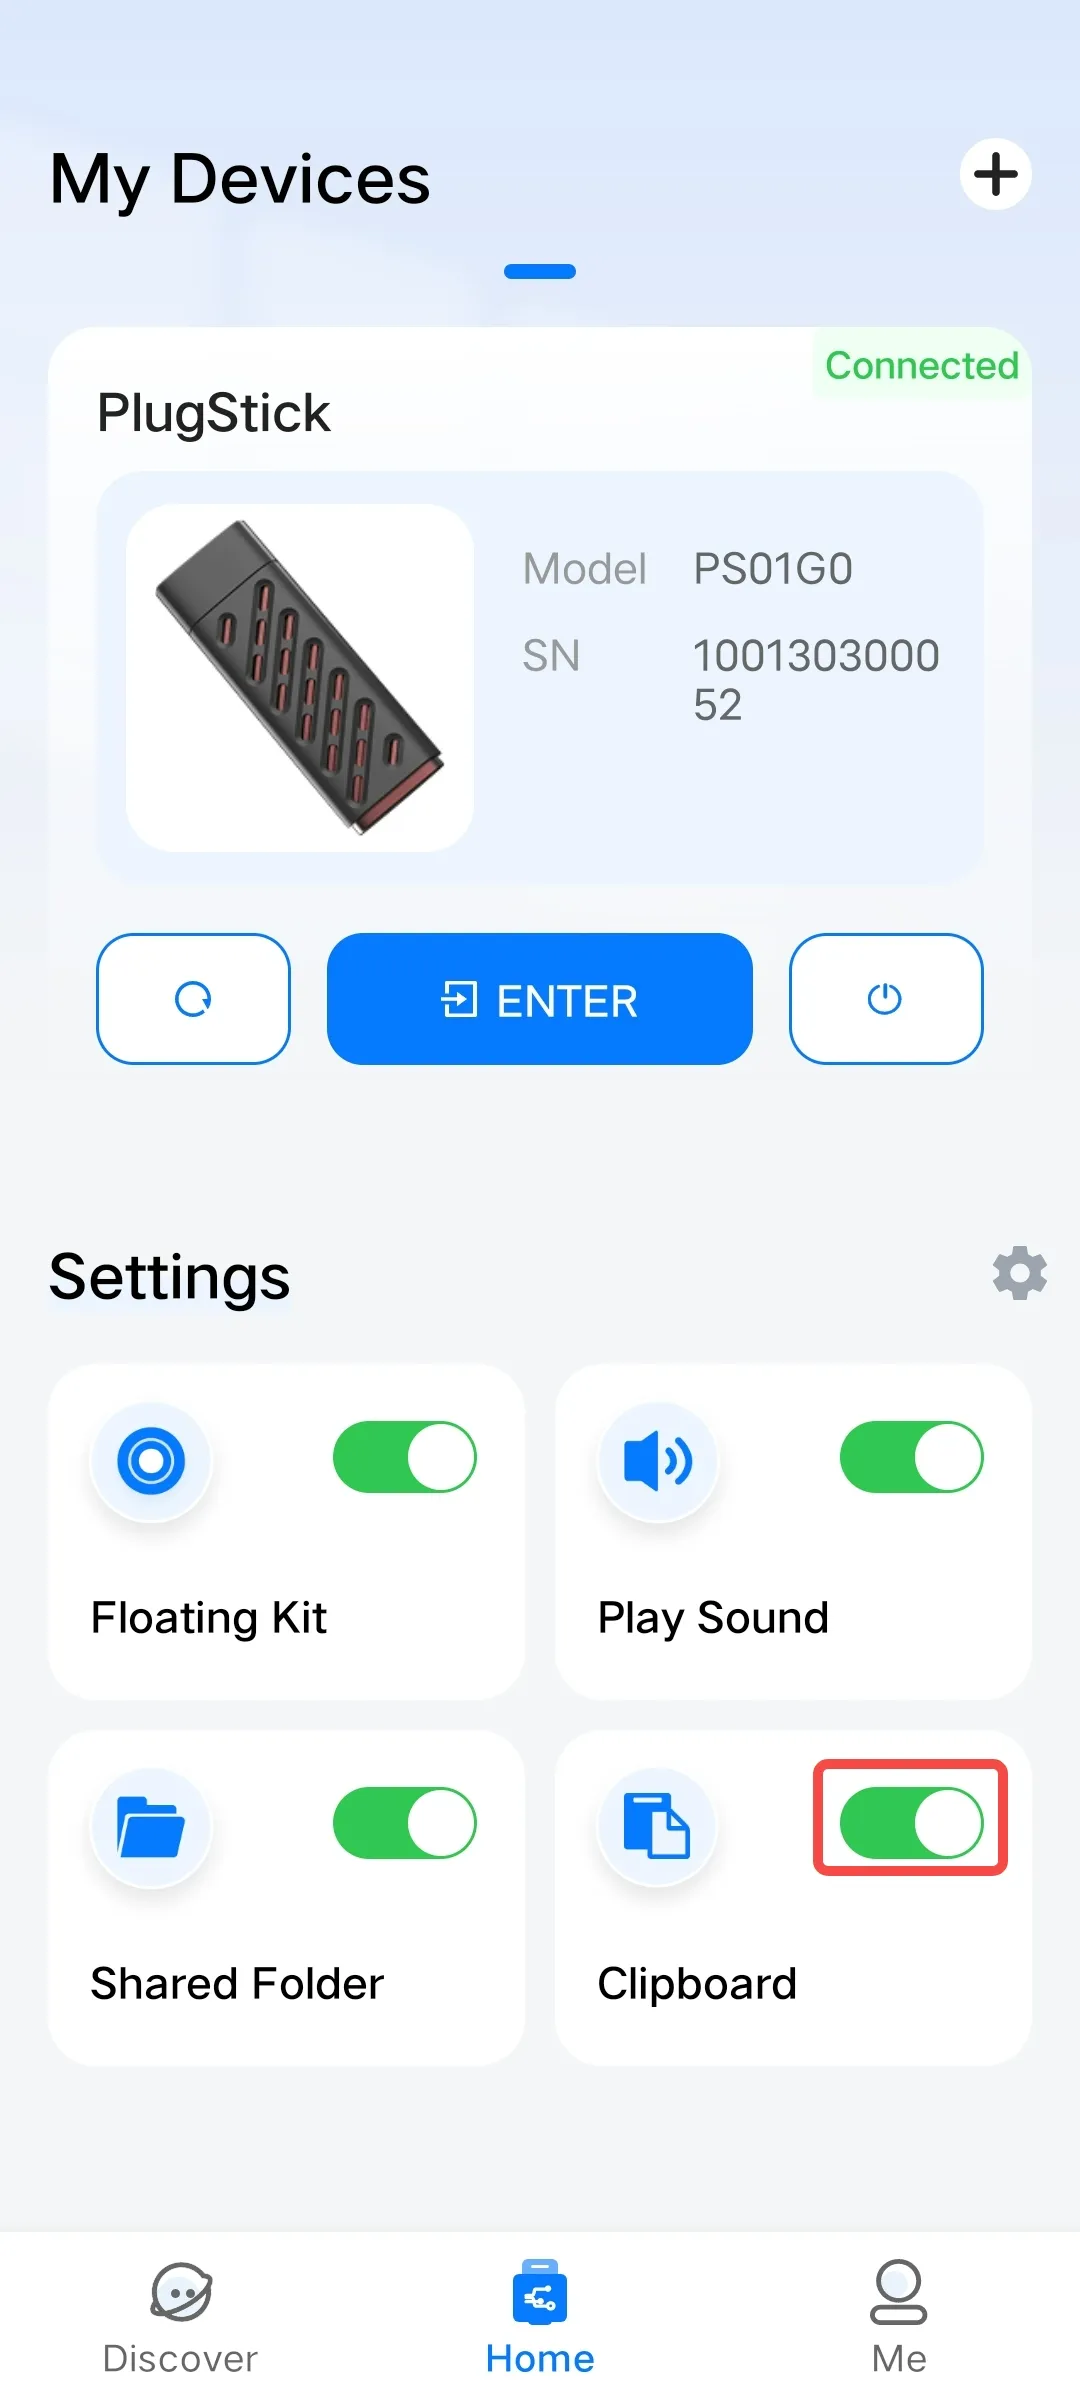
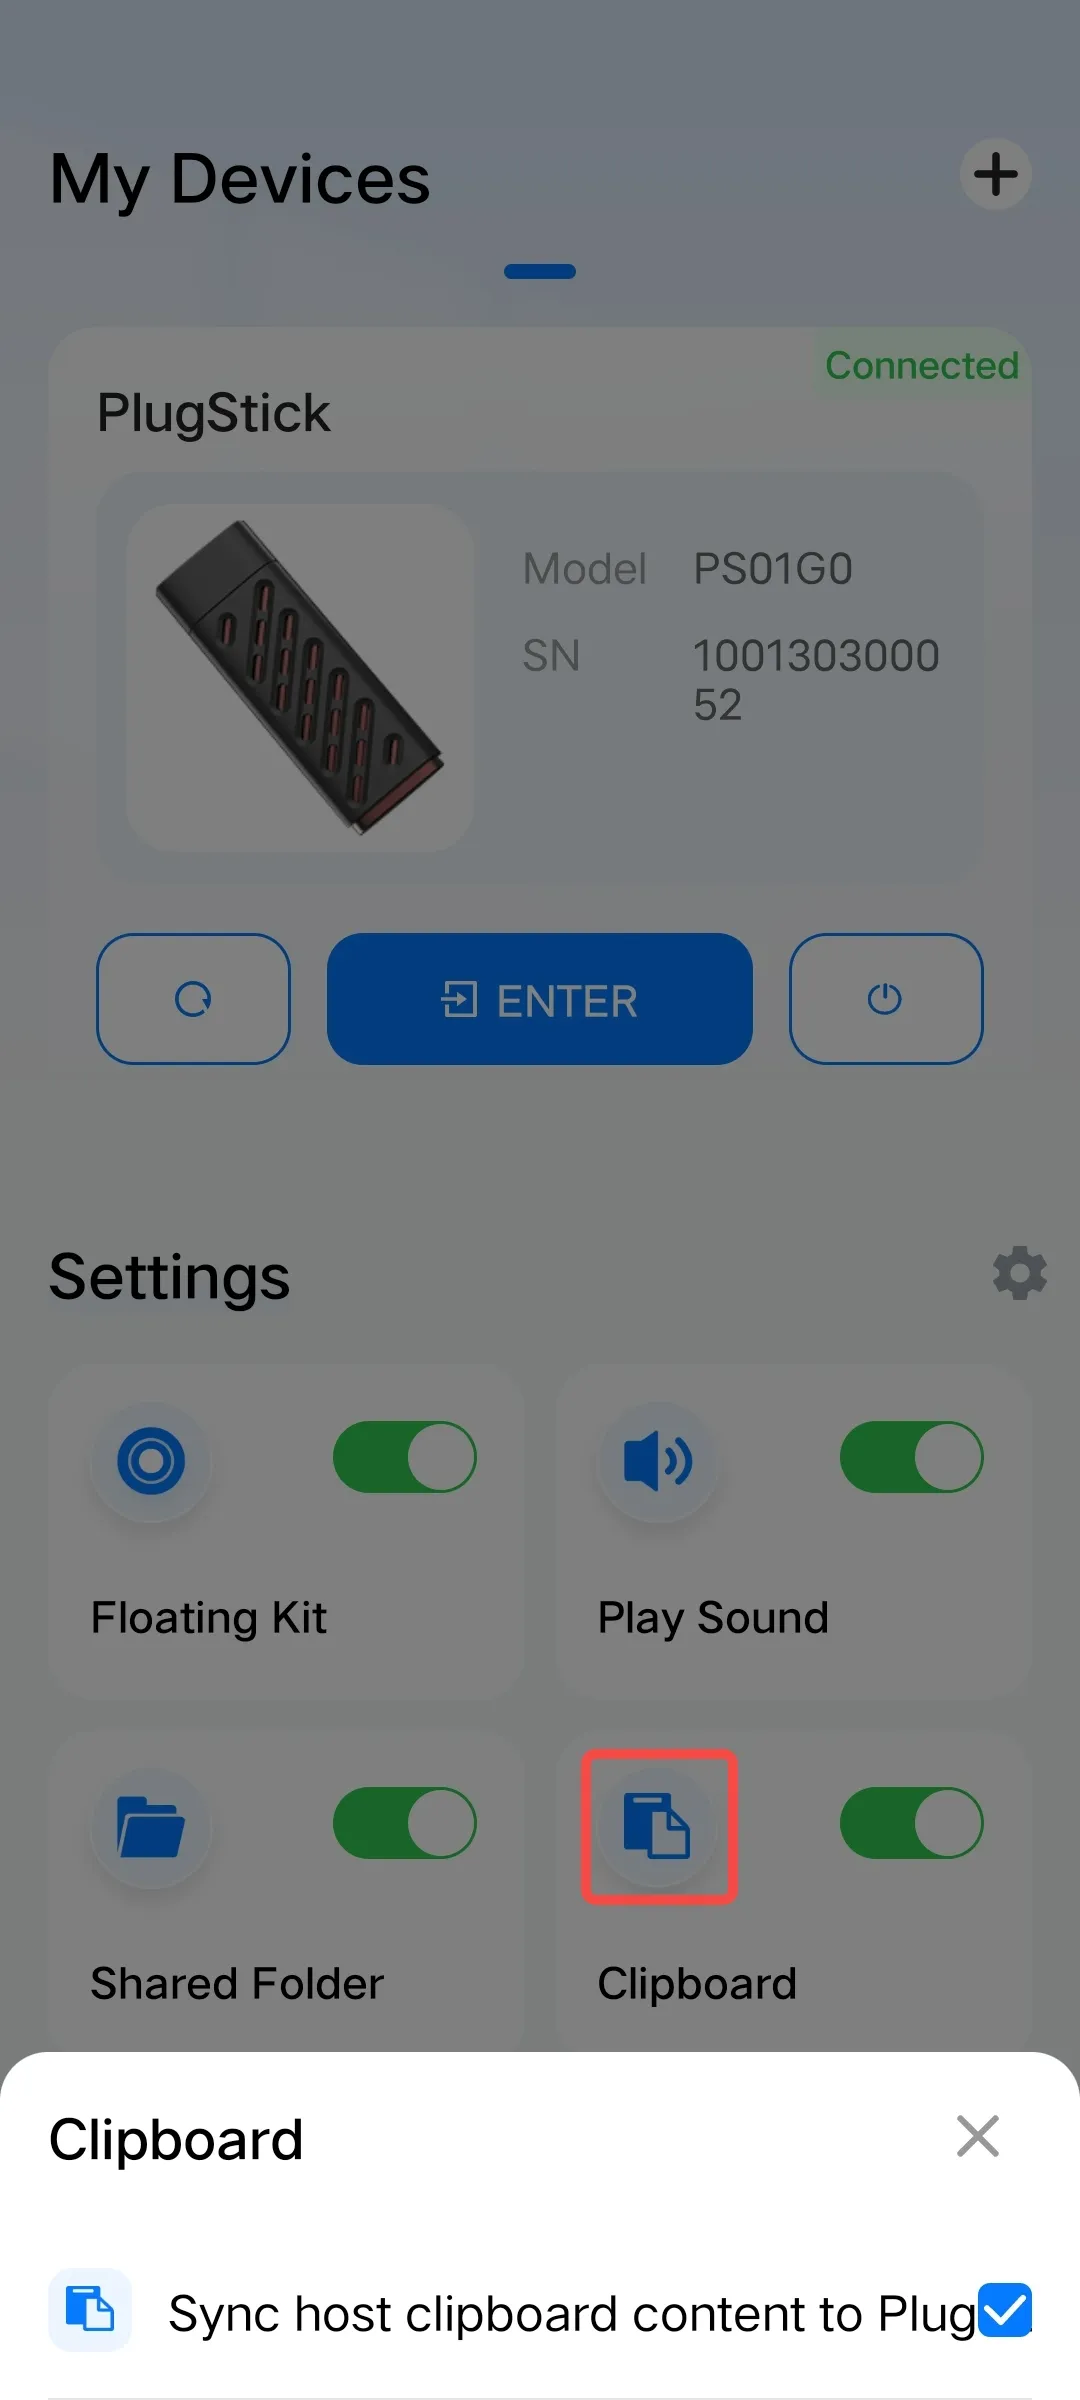
Clipboard Settings
Sync the clipboard content from the host device to the PlugOS system, with the option to enable or disable this function.
Usage Method:
- Open the PlugOS APP → Navigate to the homepage (ensure the device is connected).
- Turn on the “Clipboard” switch to enable the setting.
- Copy text content on the host device → Access the PlugOS system → Paste the content.
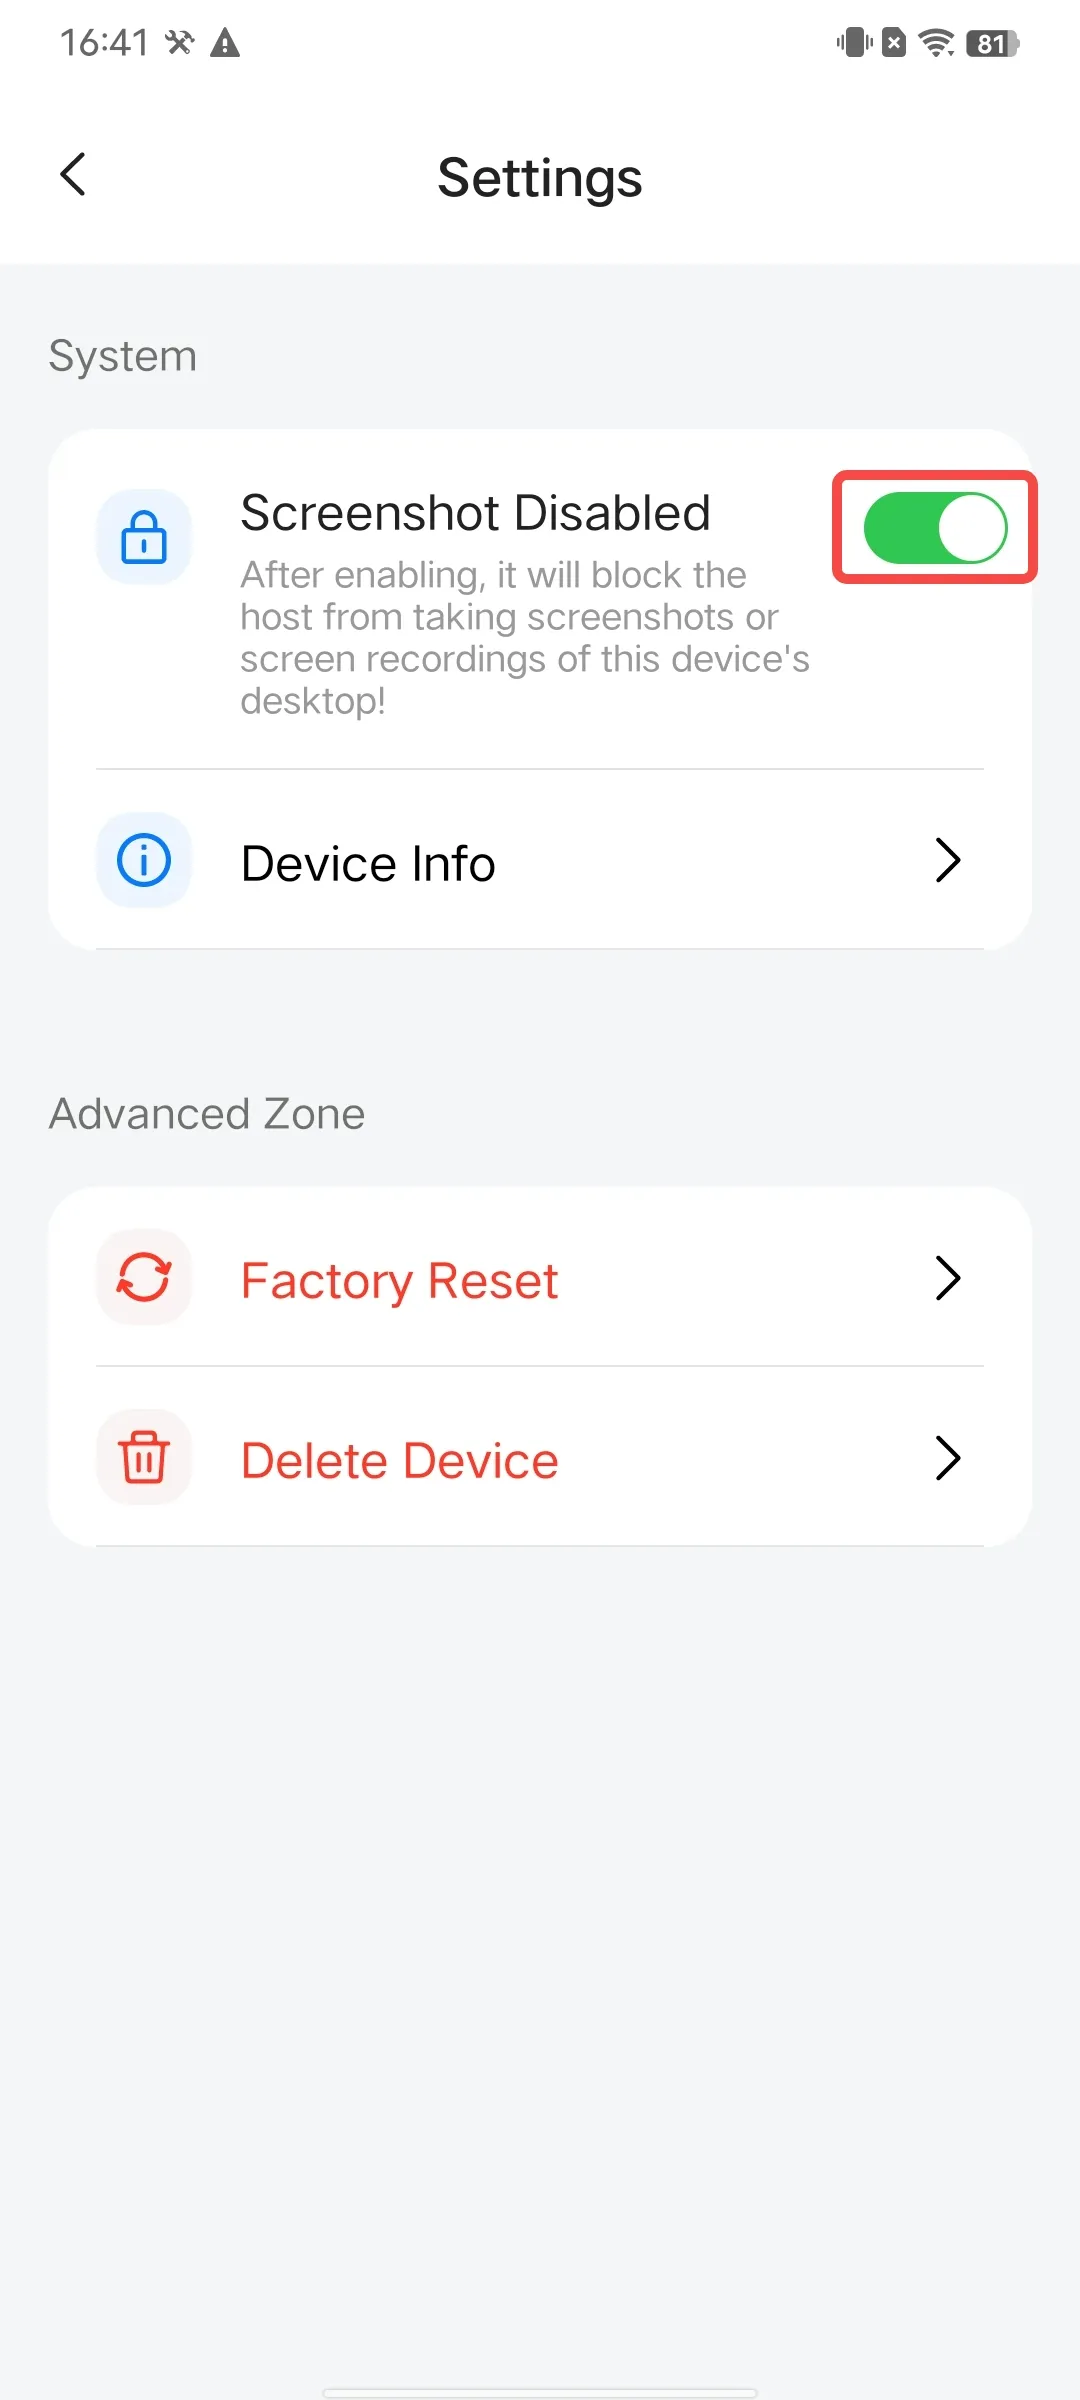
Disable Screenshot
The function to enable/disable screenshot blocking is supported: When the host device is connected to PlugOS, enabling this function can block the screenshot and screen recording operations of the mobile phone system, preventing the device desktop or data interface from being saved privately and leaked; disabling it adapts to daily use, flexibly balancing security and convenience.
Usage Method:
- Open the PlugOS APP → Navigate to the homepage.
- Click the settings button in the figure below → Enter the settings page.
- Enable/disable the screenshot blocking function.
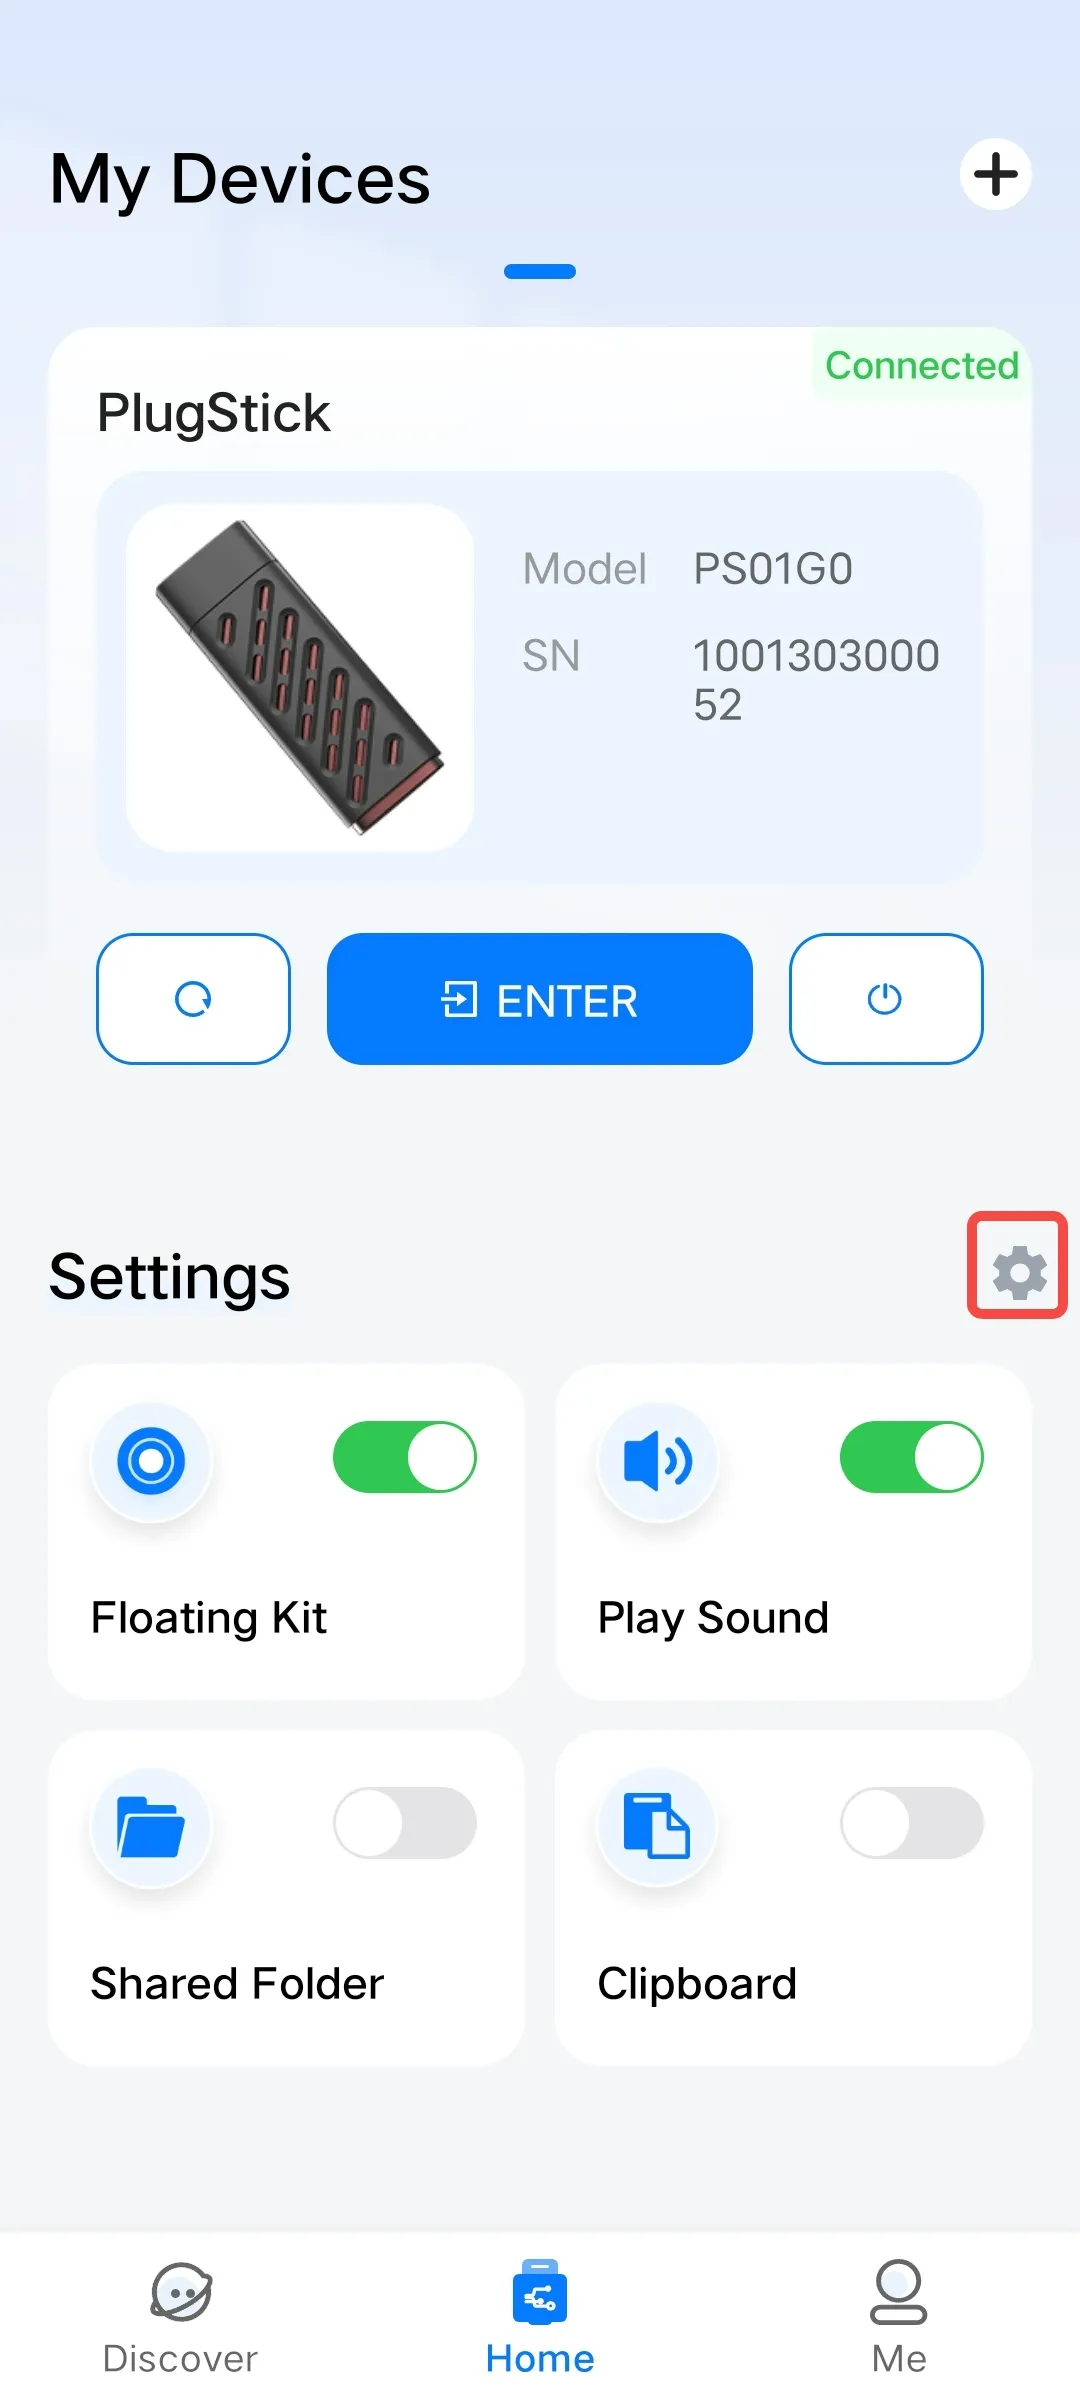
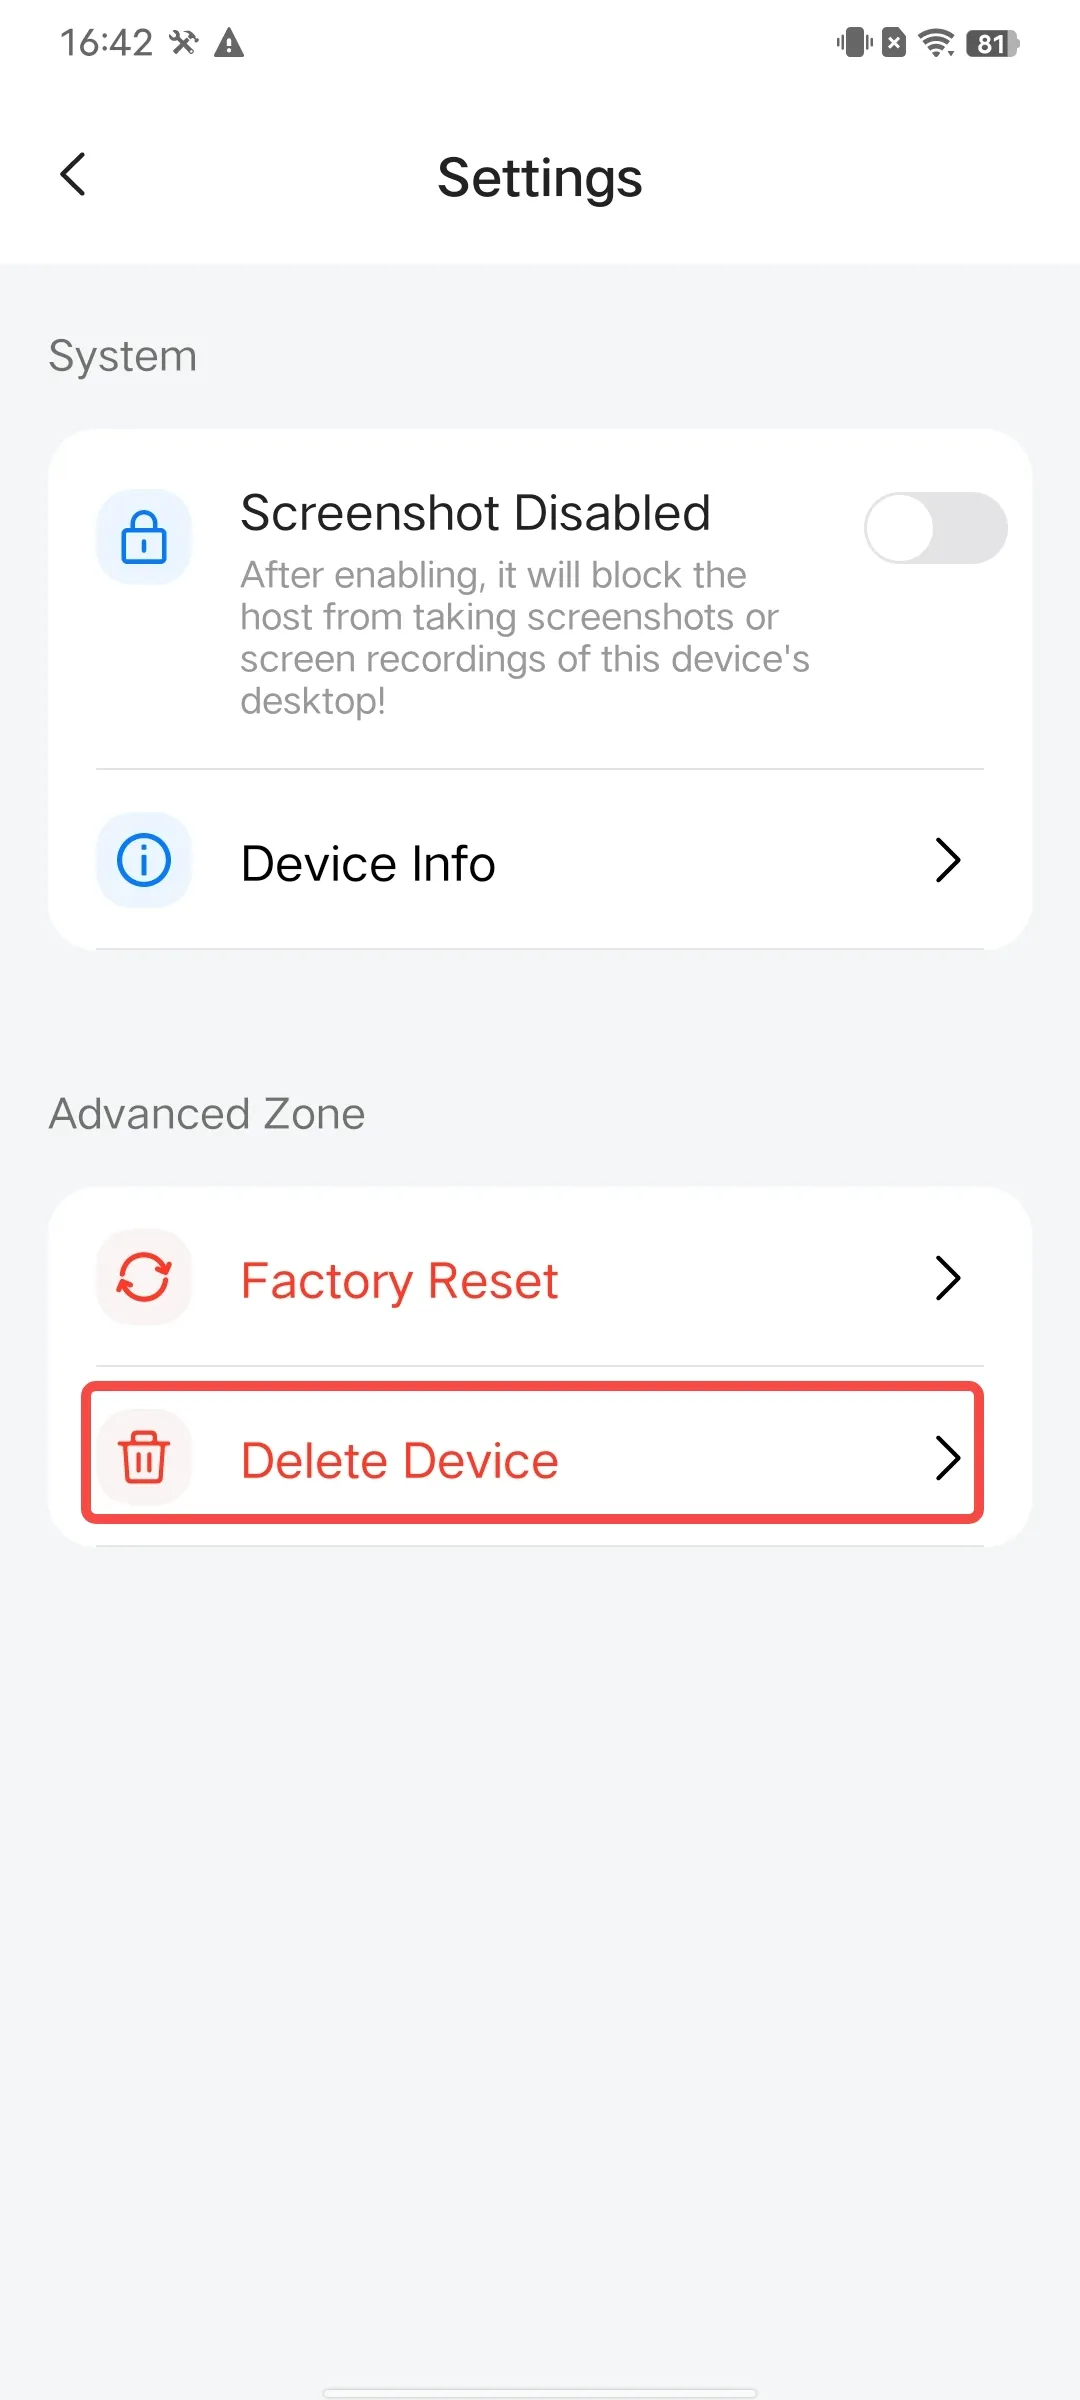
Delete Device
For devices that have already been added, the PlugOS APP provides a delete function when you need to replace the host device or deactivate the PlugOS device.
Usage Method:
- Open the PlugOS APP → Navigate to the homepage.
- Click the settings button in the figure below → Enter the settings page.
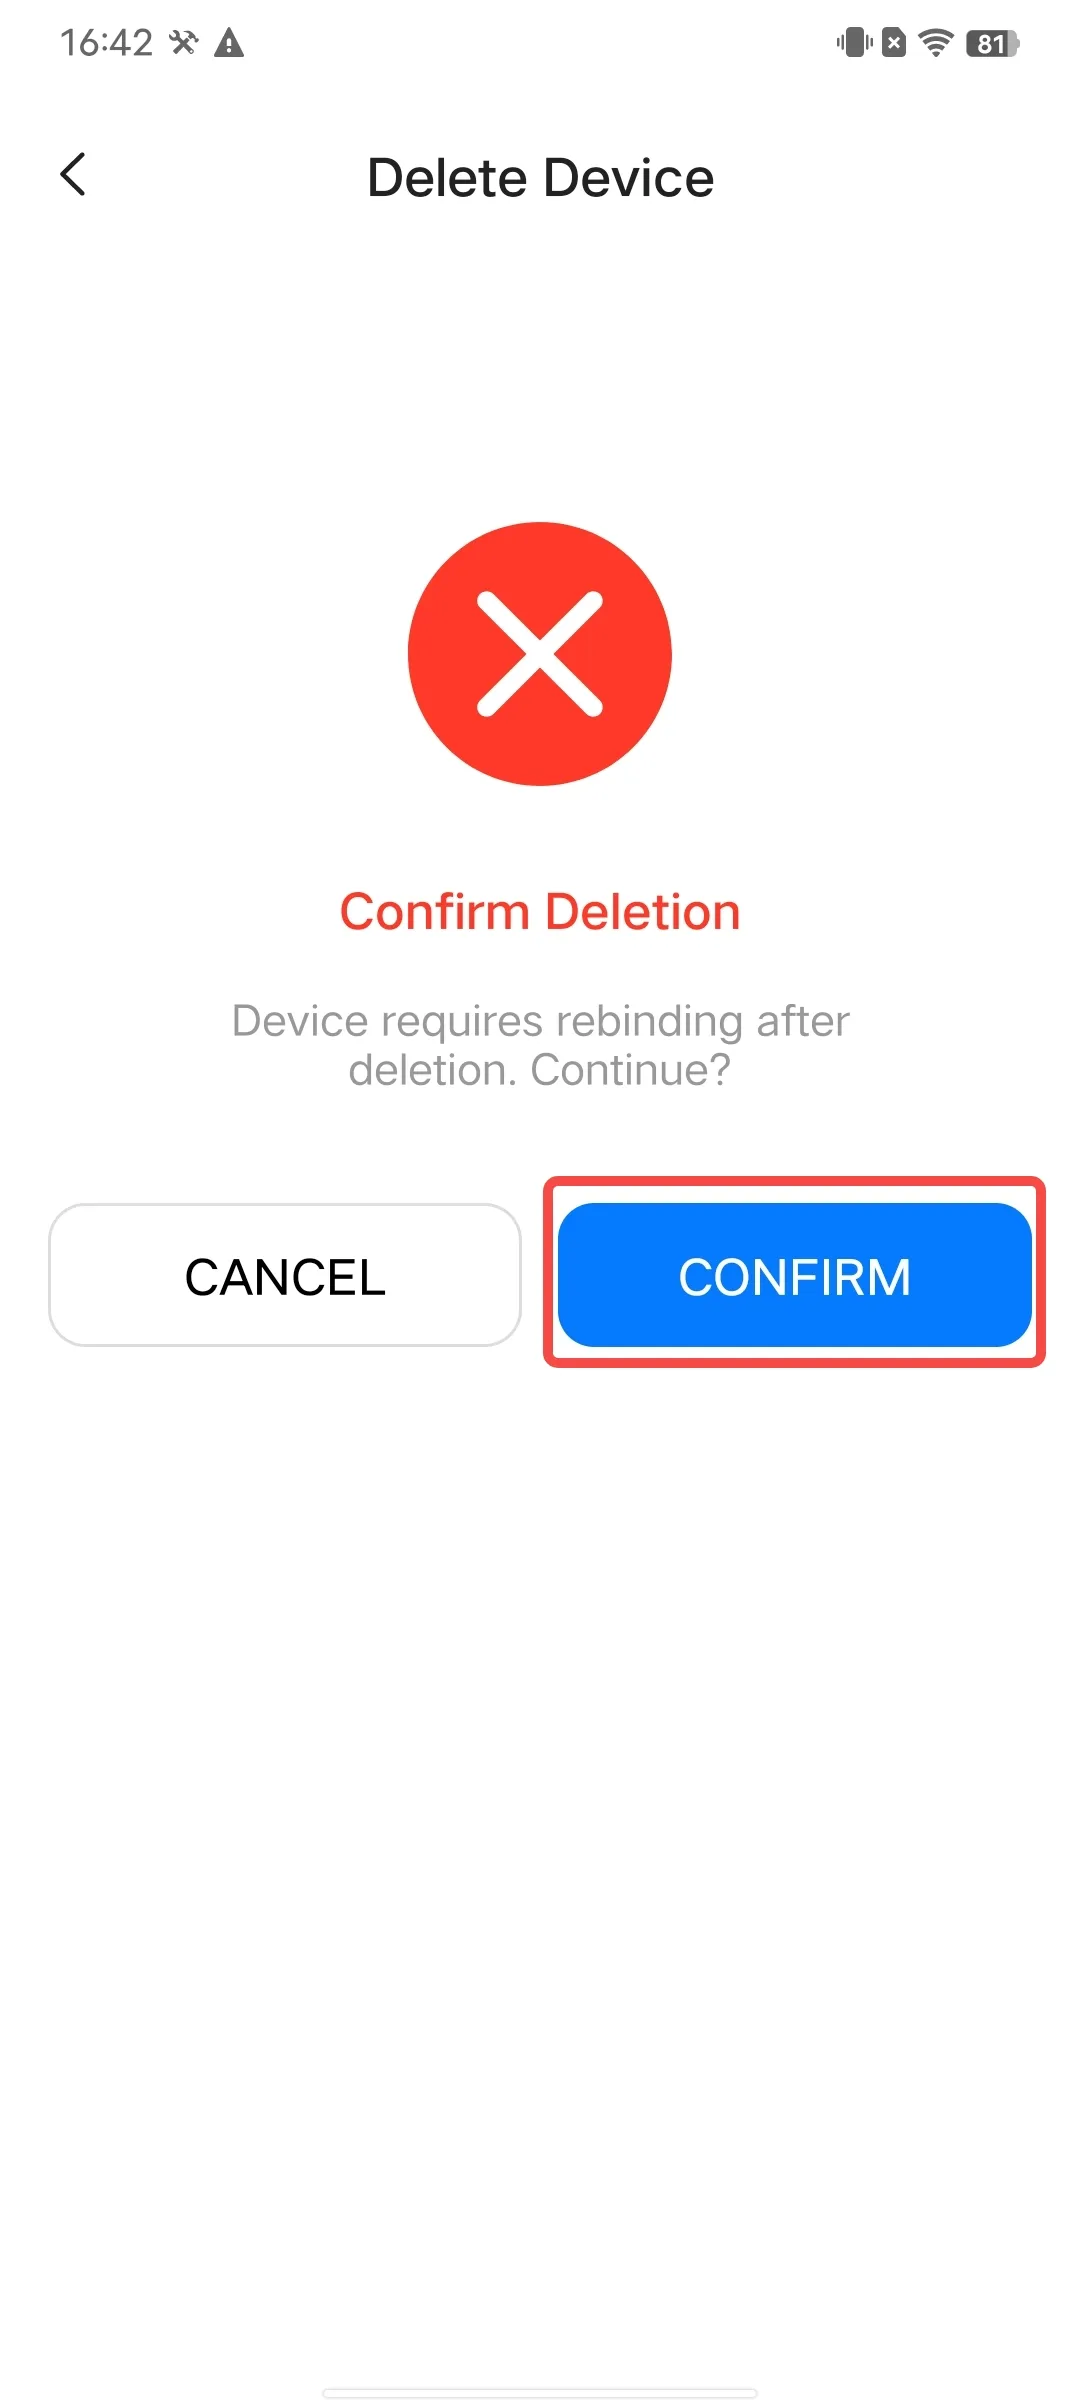
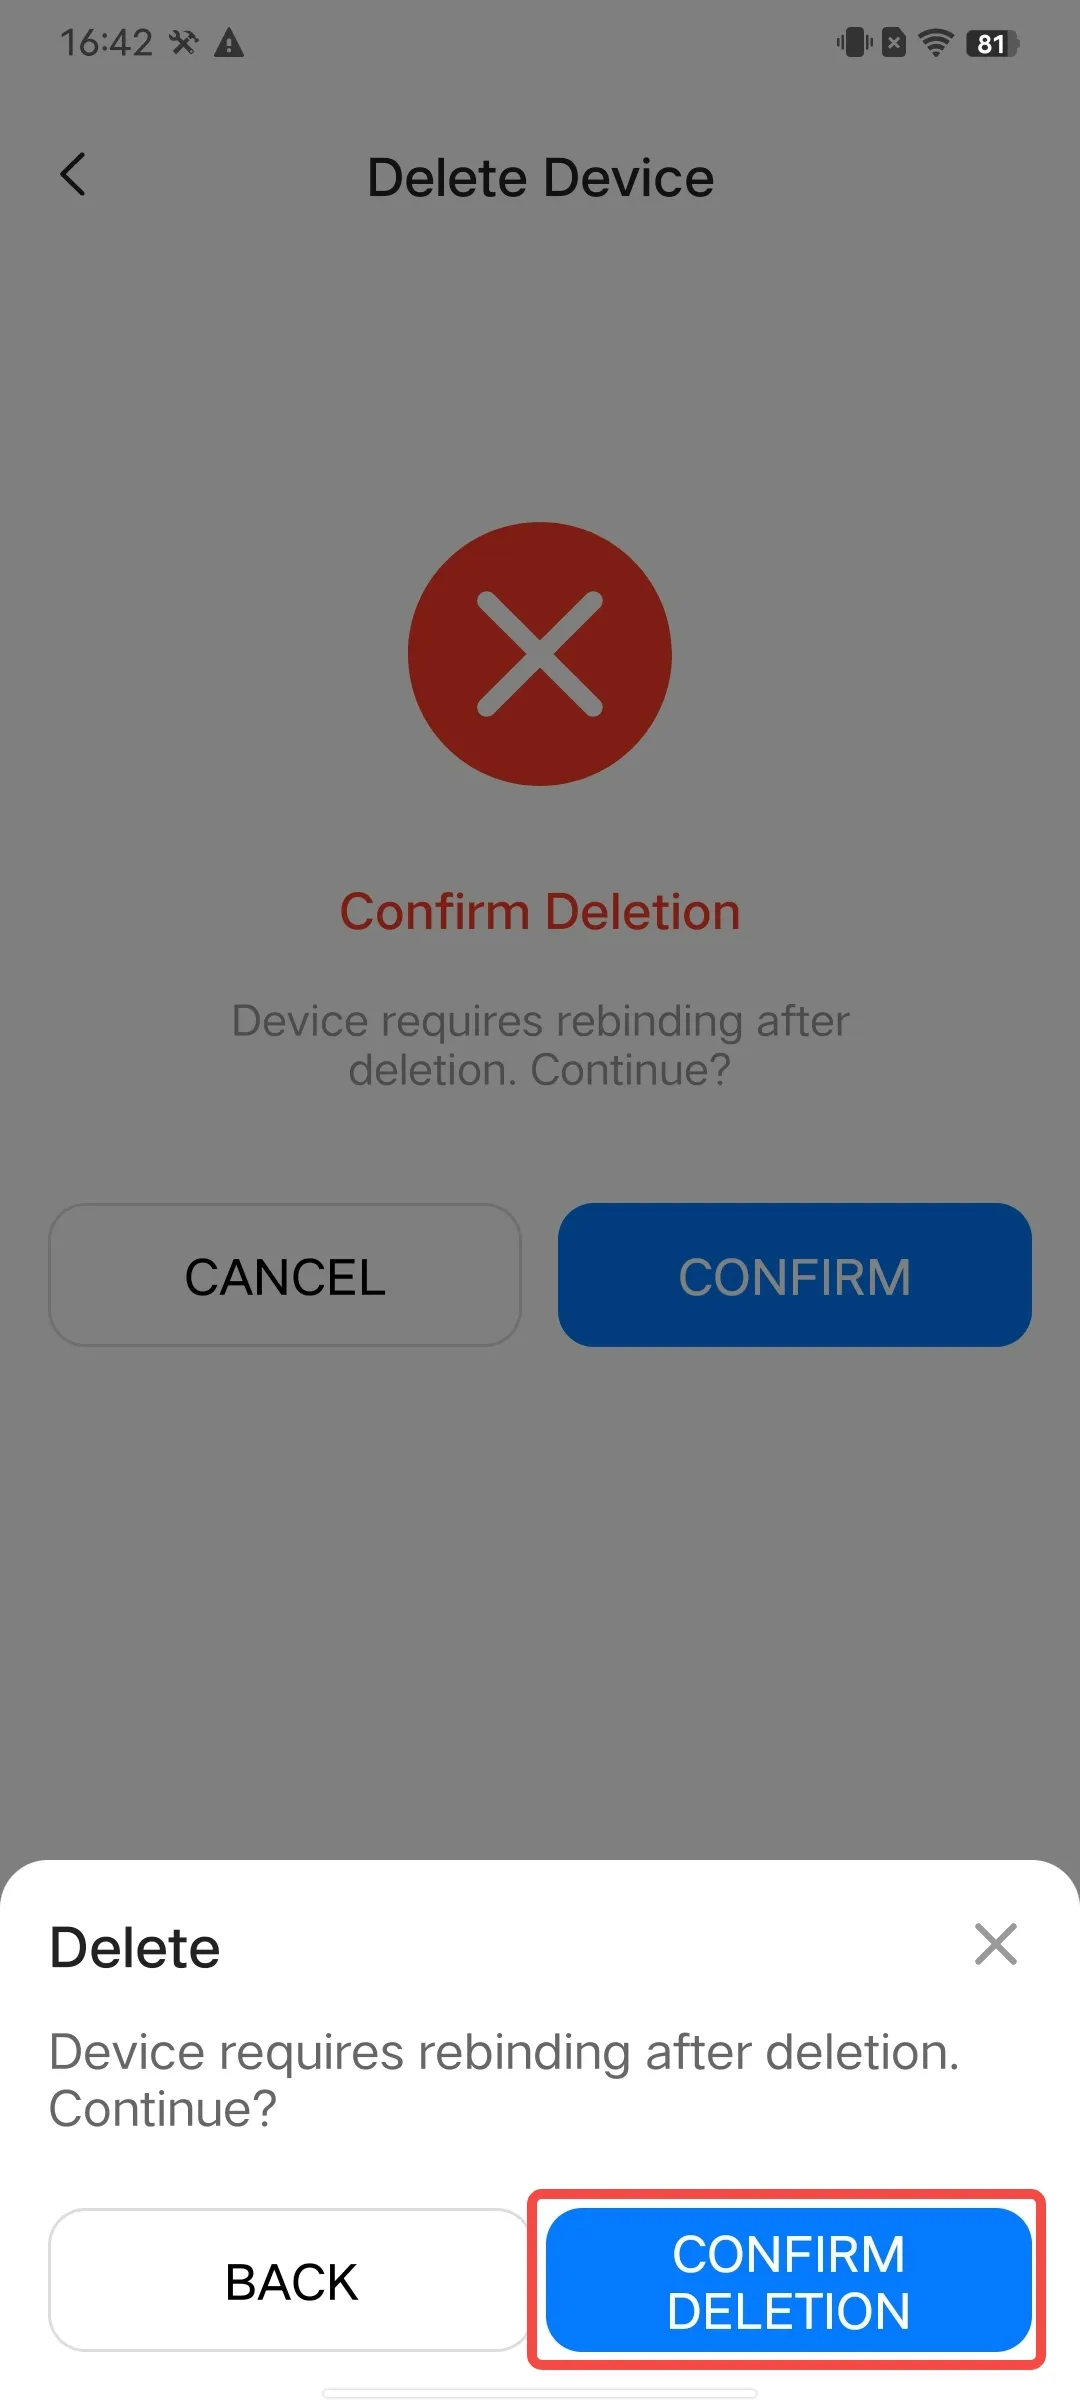
- Click “Delete Device” → Confirm the deletion.
Note: After the device is deleted, if you need to use the device again on this host, you will need to re-bind it.
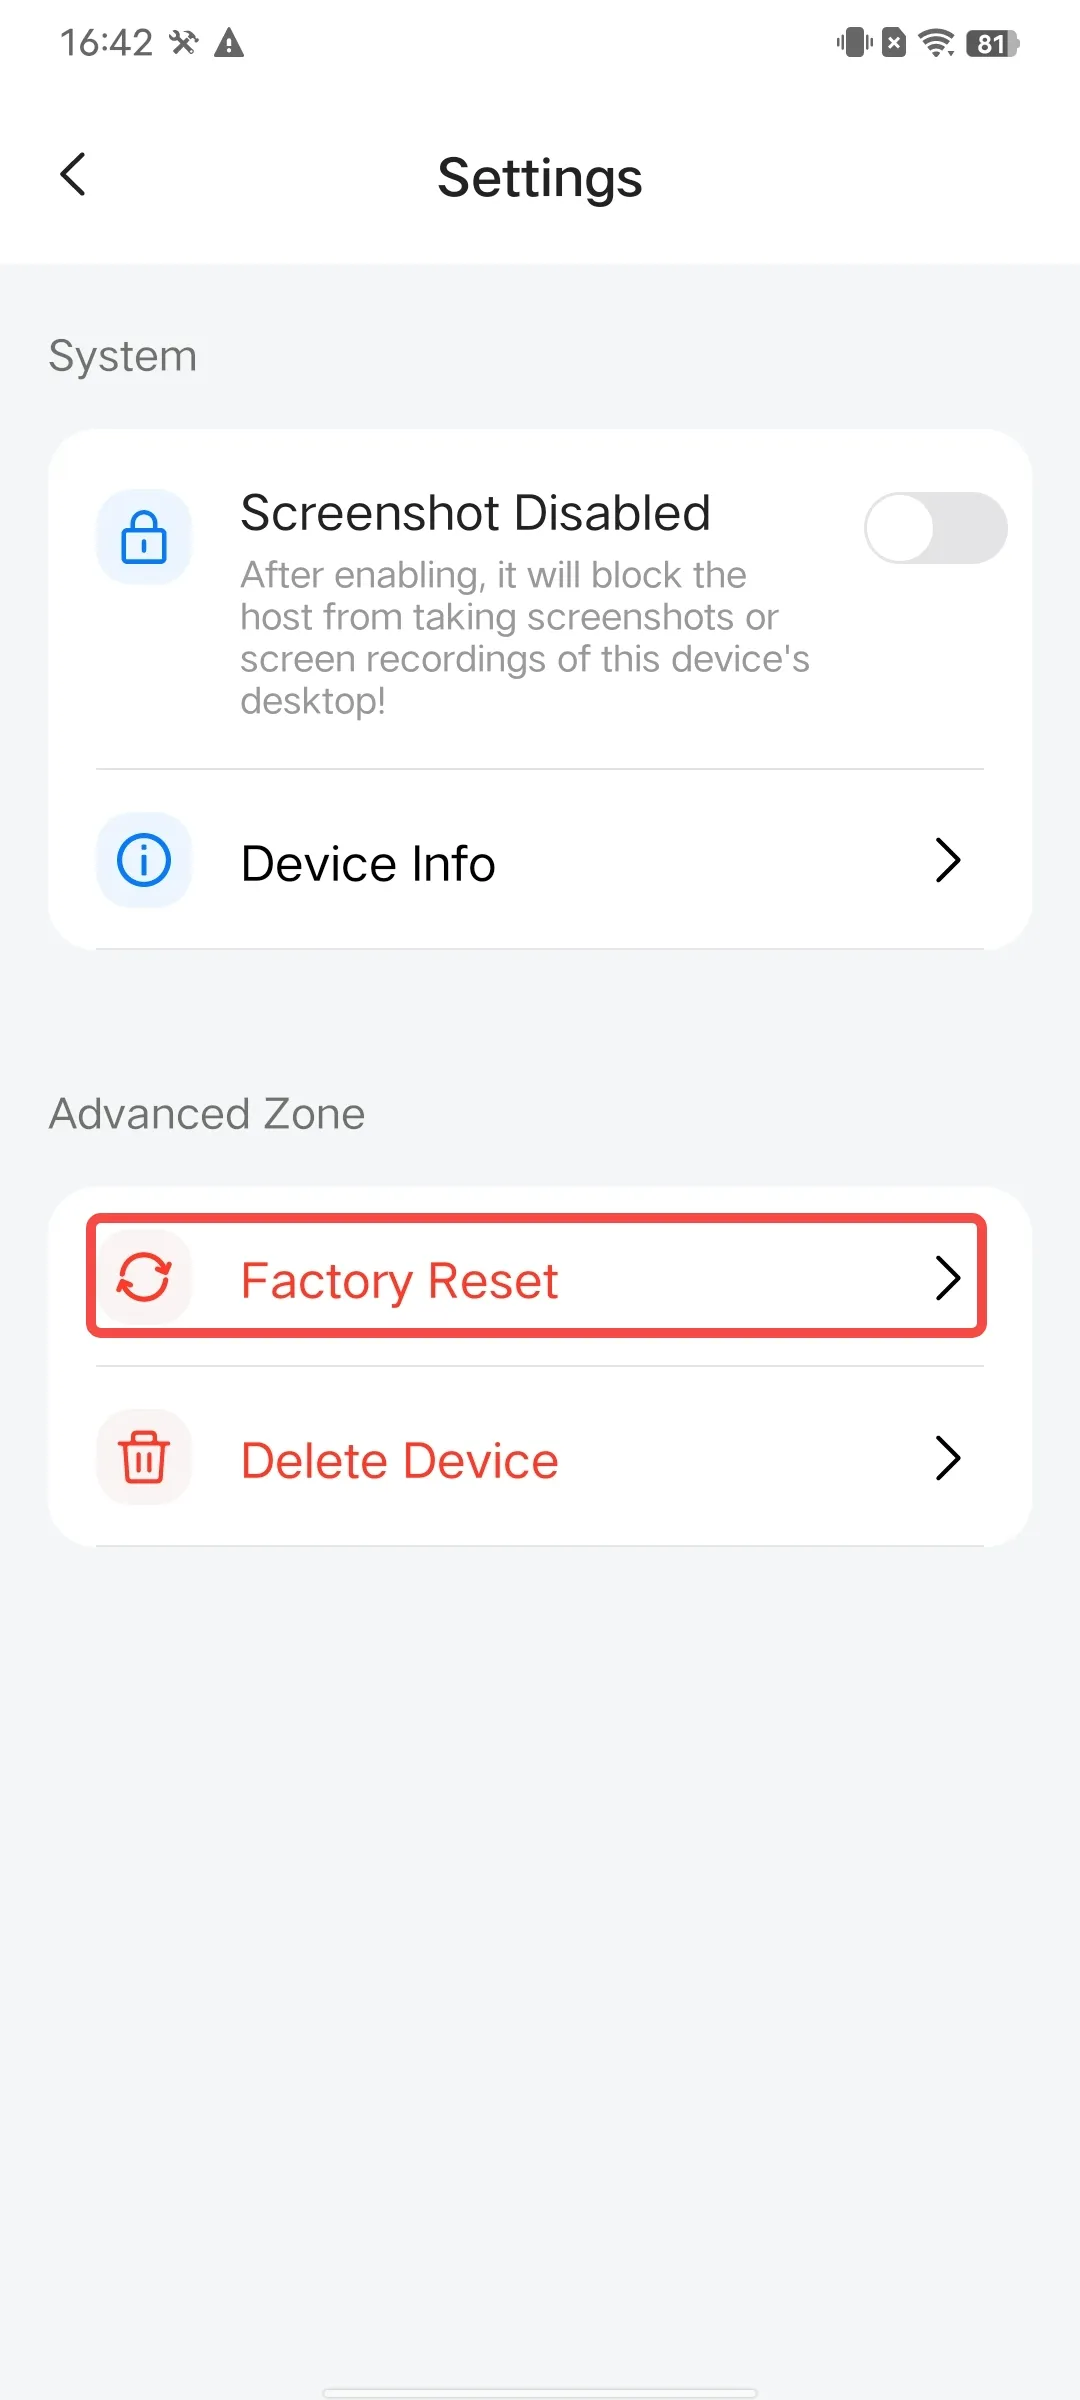
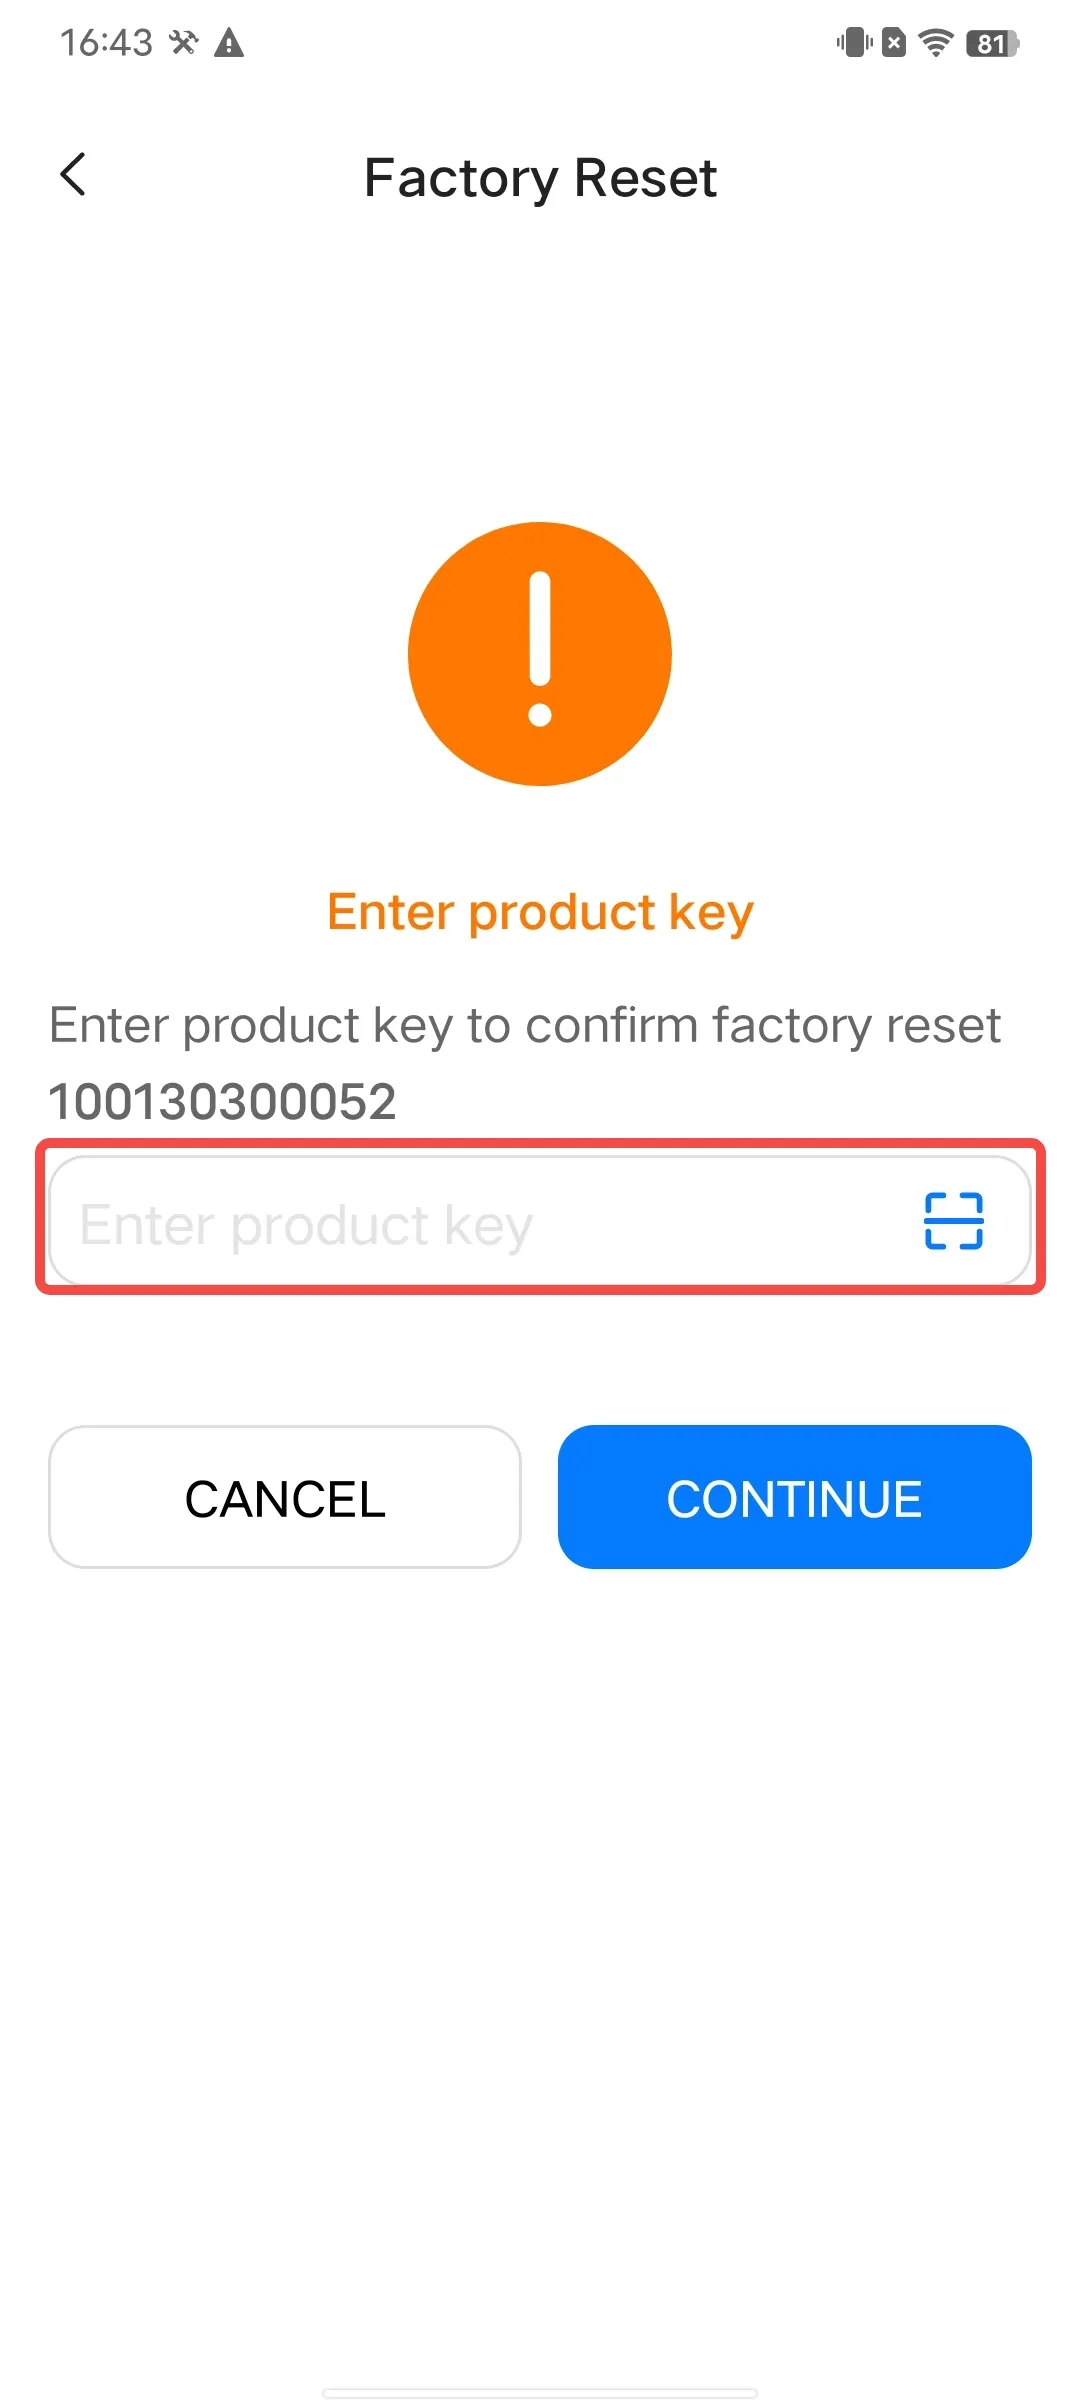
Restore Device to Factory Settings
If you encounter situations such as forgetting the system unlock password, needing to return the device to the factory, or transferring the device, and you need to restore the device to its factory settings, please follow the steps below:
Note: After the device is restored to factory settings, all previous data will be erased and cannot be recovered. Please operate with caution.
Usage Method:
- Open the PlugOS APP → Navigate to the homepage (ensure the device is connected).
- Click the settings button in the figure below → Enter the settings page.
- Click “Factory Reset “ → Click “Continue”. Enter the product key for verification; after successful verification, the device will be restored to factory settings successfully.
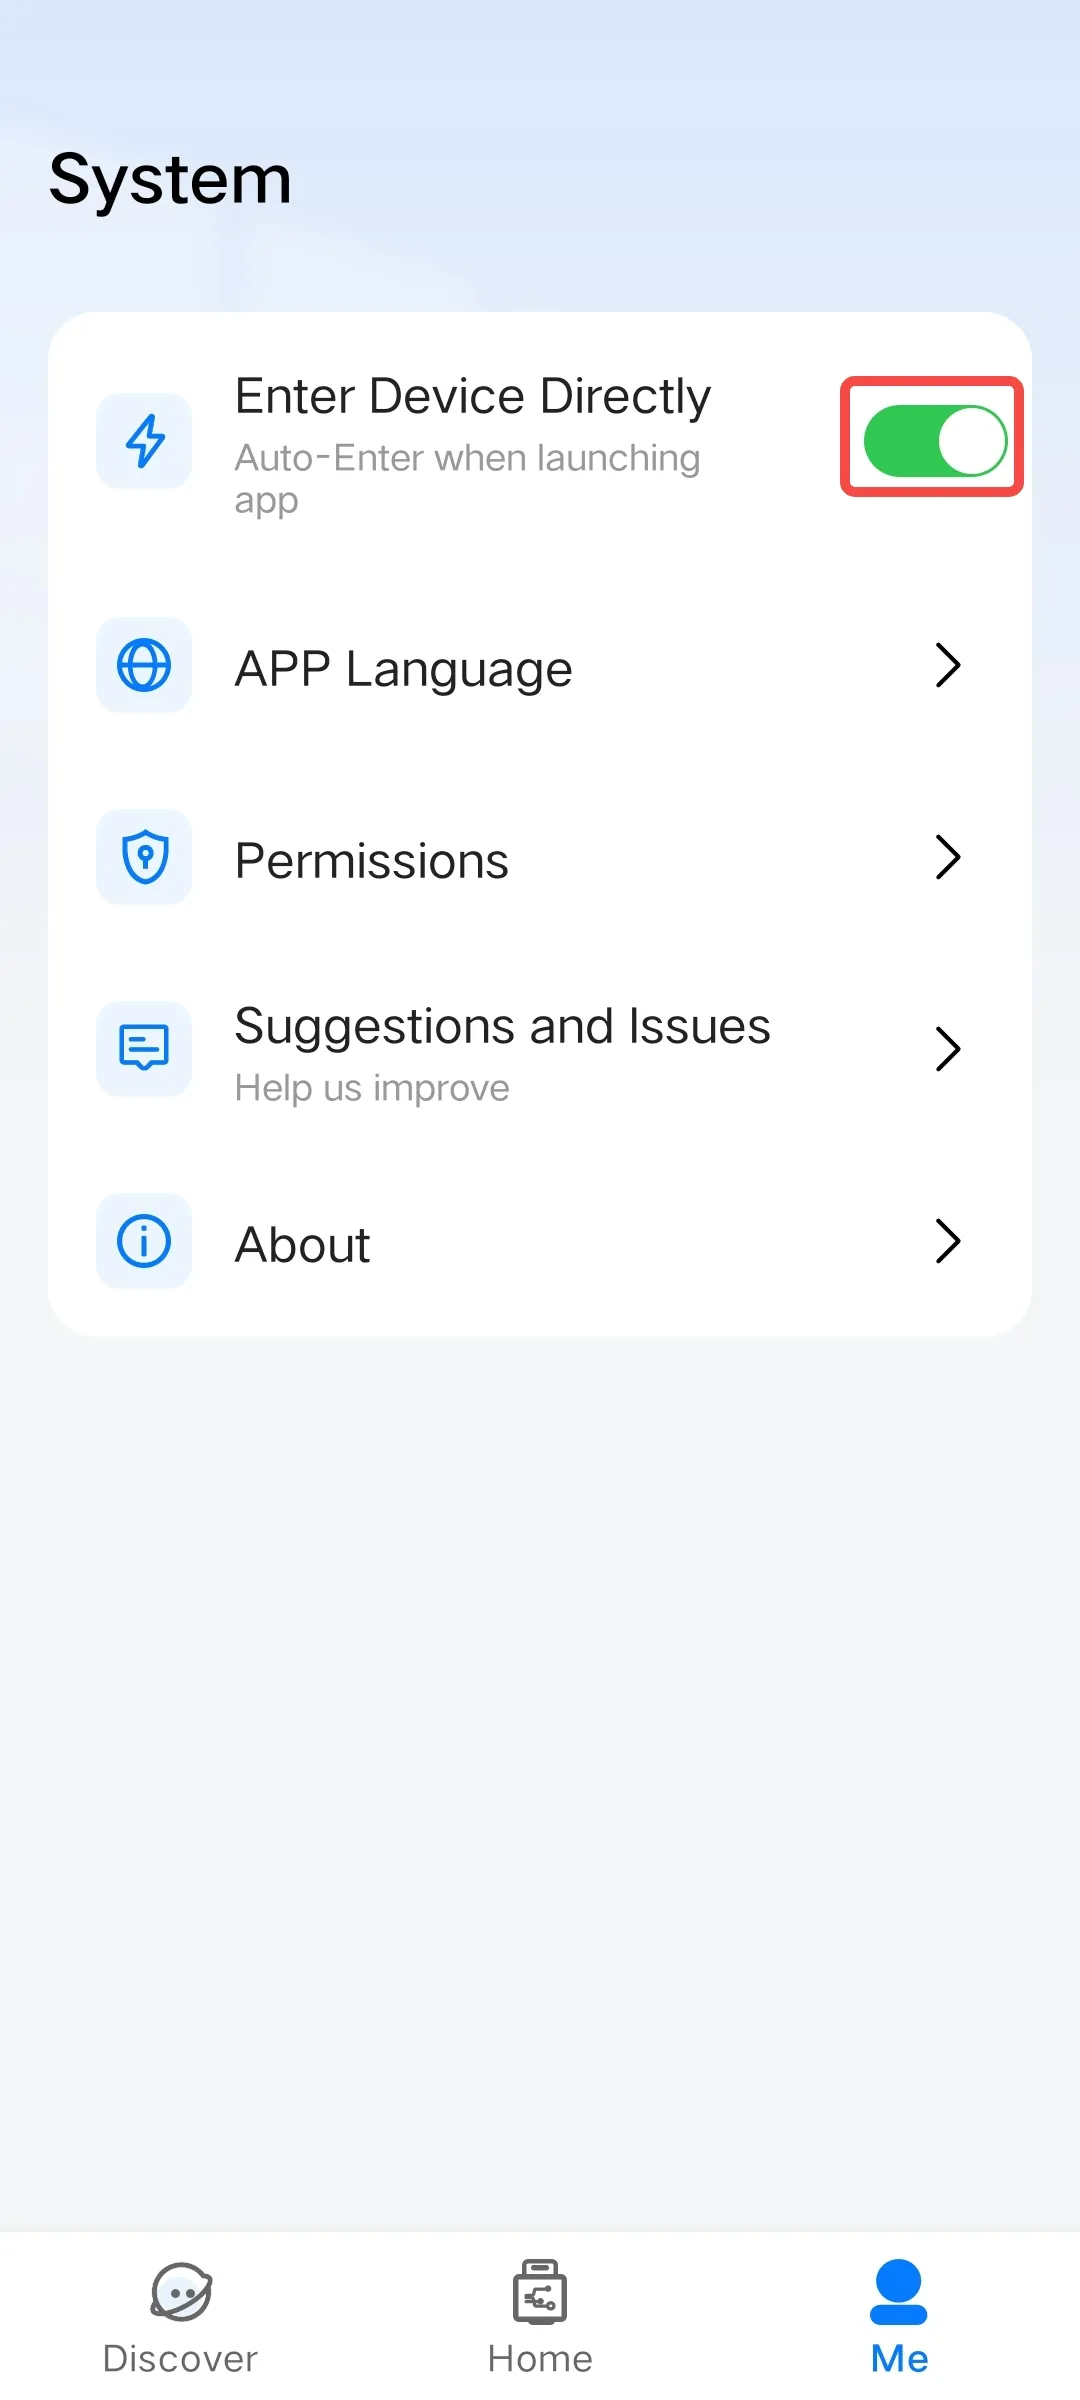
Enable Auto-Access Function
The PlugOS APP provides a function for quick access to the device system. After enabling this function, inserting an already added device will automatically take you to the device desktop.
Usage Method:
Go to “Me” → Click the toggle switch next to “Enter Device Directly” to turn it on.
After enabling, every time you open the PlugOS APP, it will automatically access the system of the connected device and display the device’s operation desktop, without the need to click the “ENTER” button.
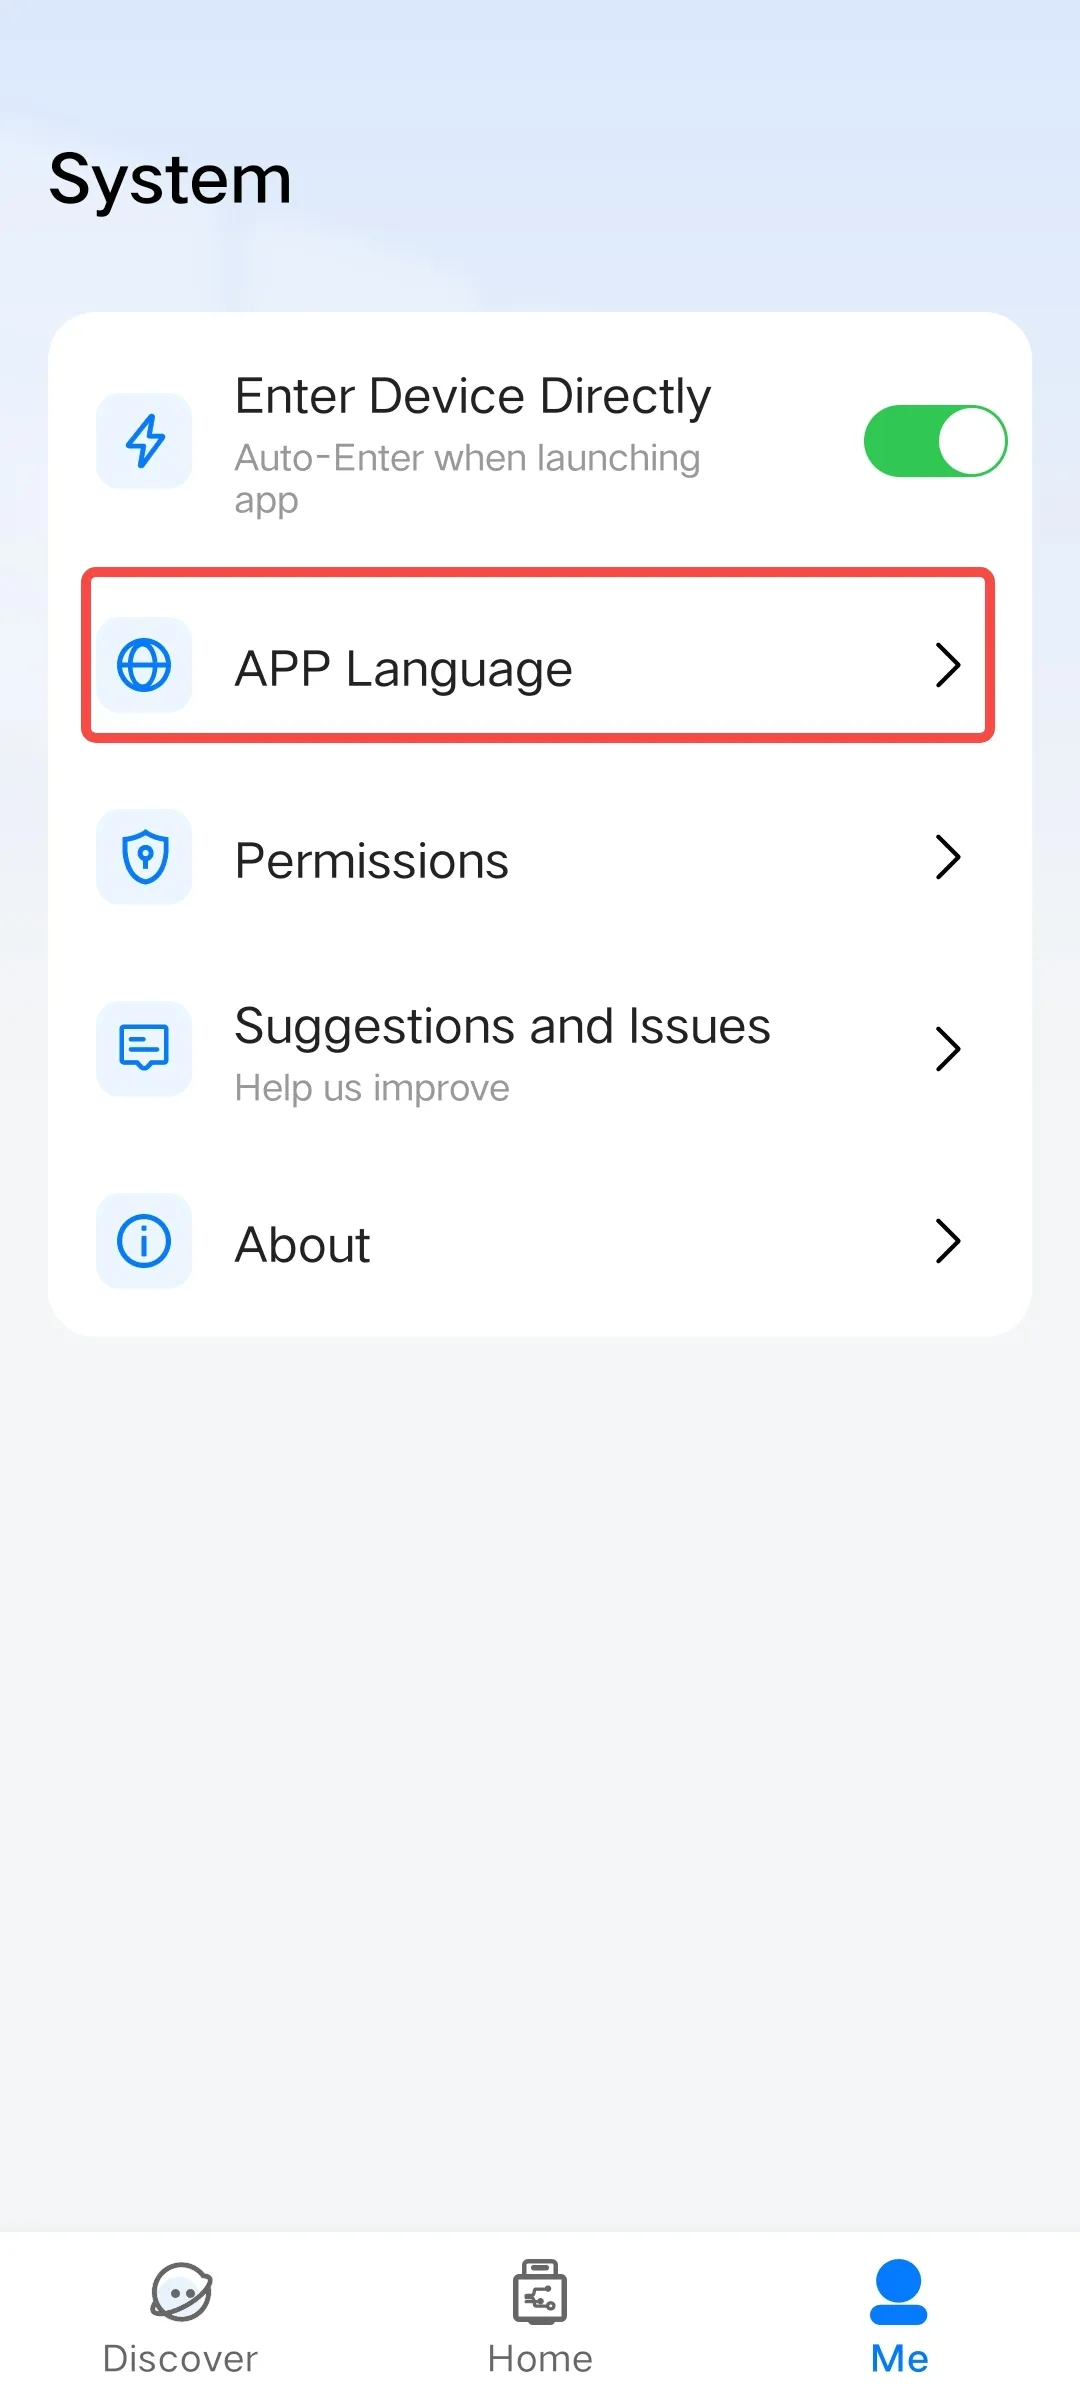
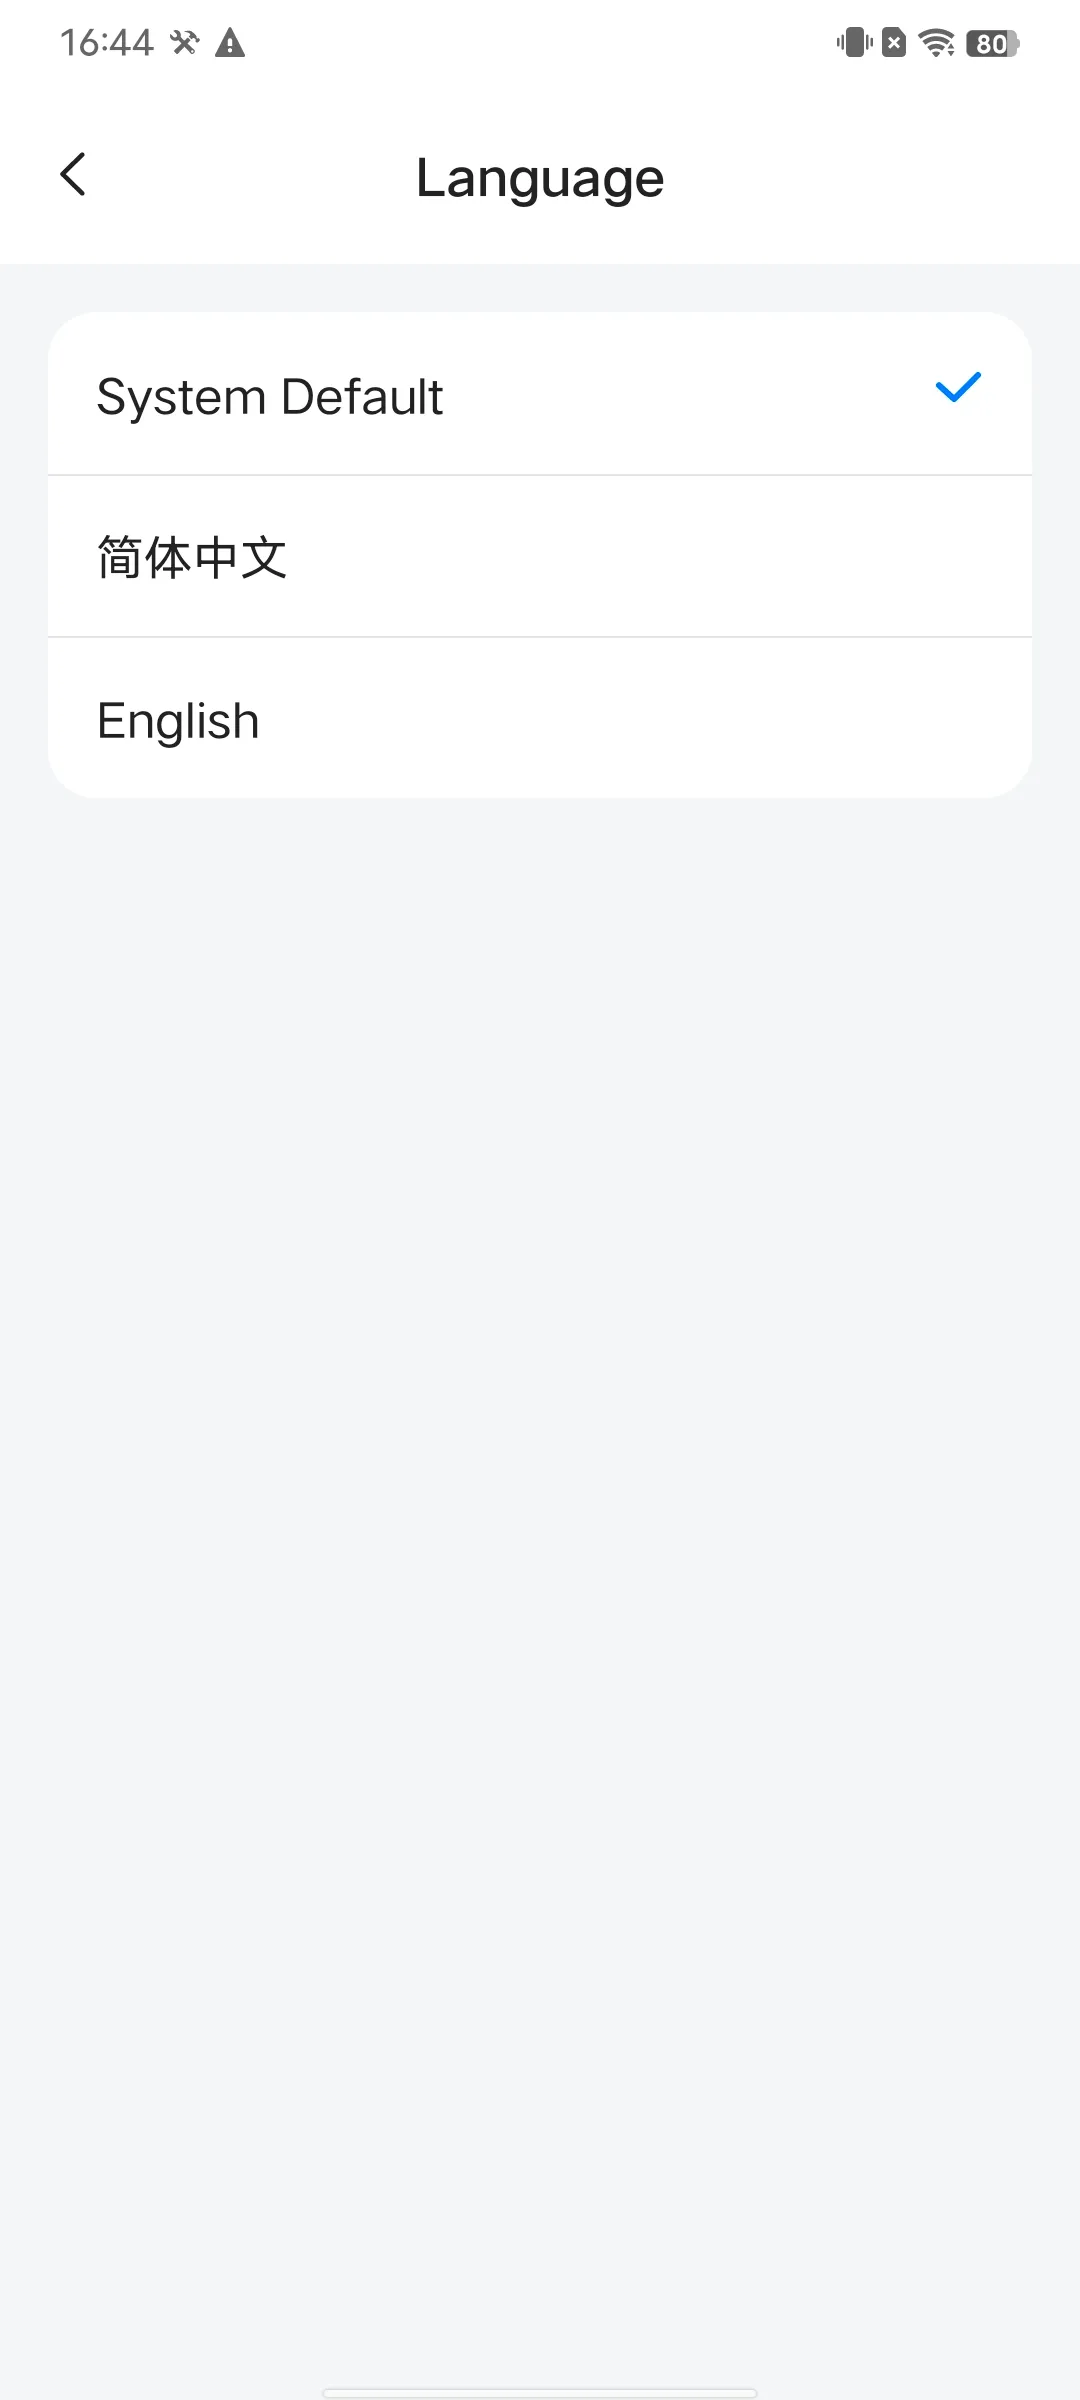
Set APP Language
The PlugOS APP supports multiple languages, and you can select a language according to your preference.
Usage Method:
- Open the PlugOS APP → Navigate to “Me”.
- Click “APP Language”, where you can select “System Default”, “Simplified Chinese”, or “English”.
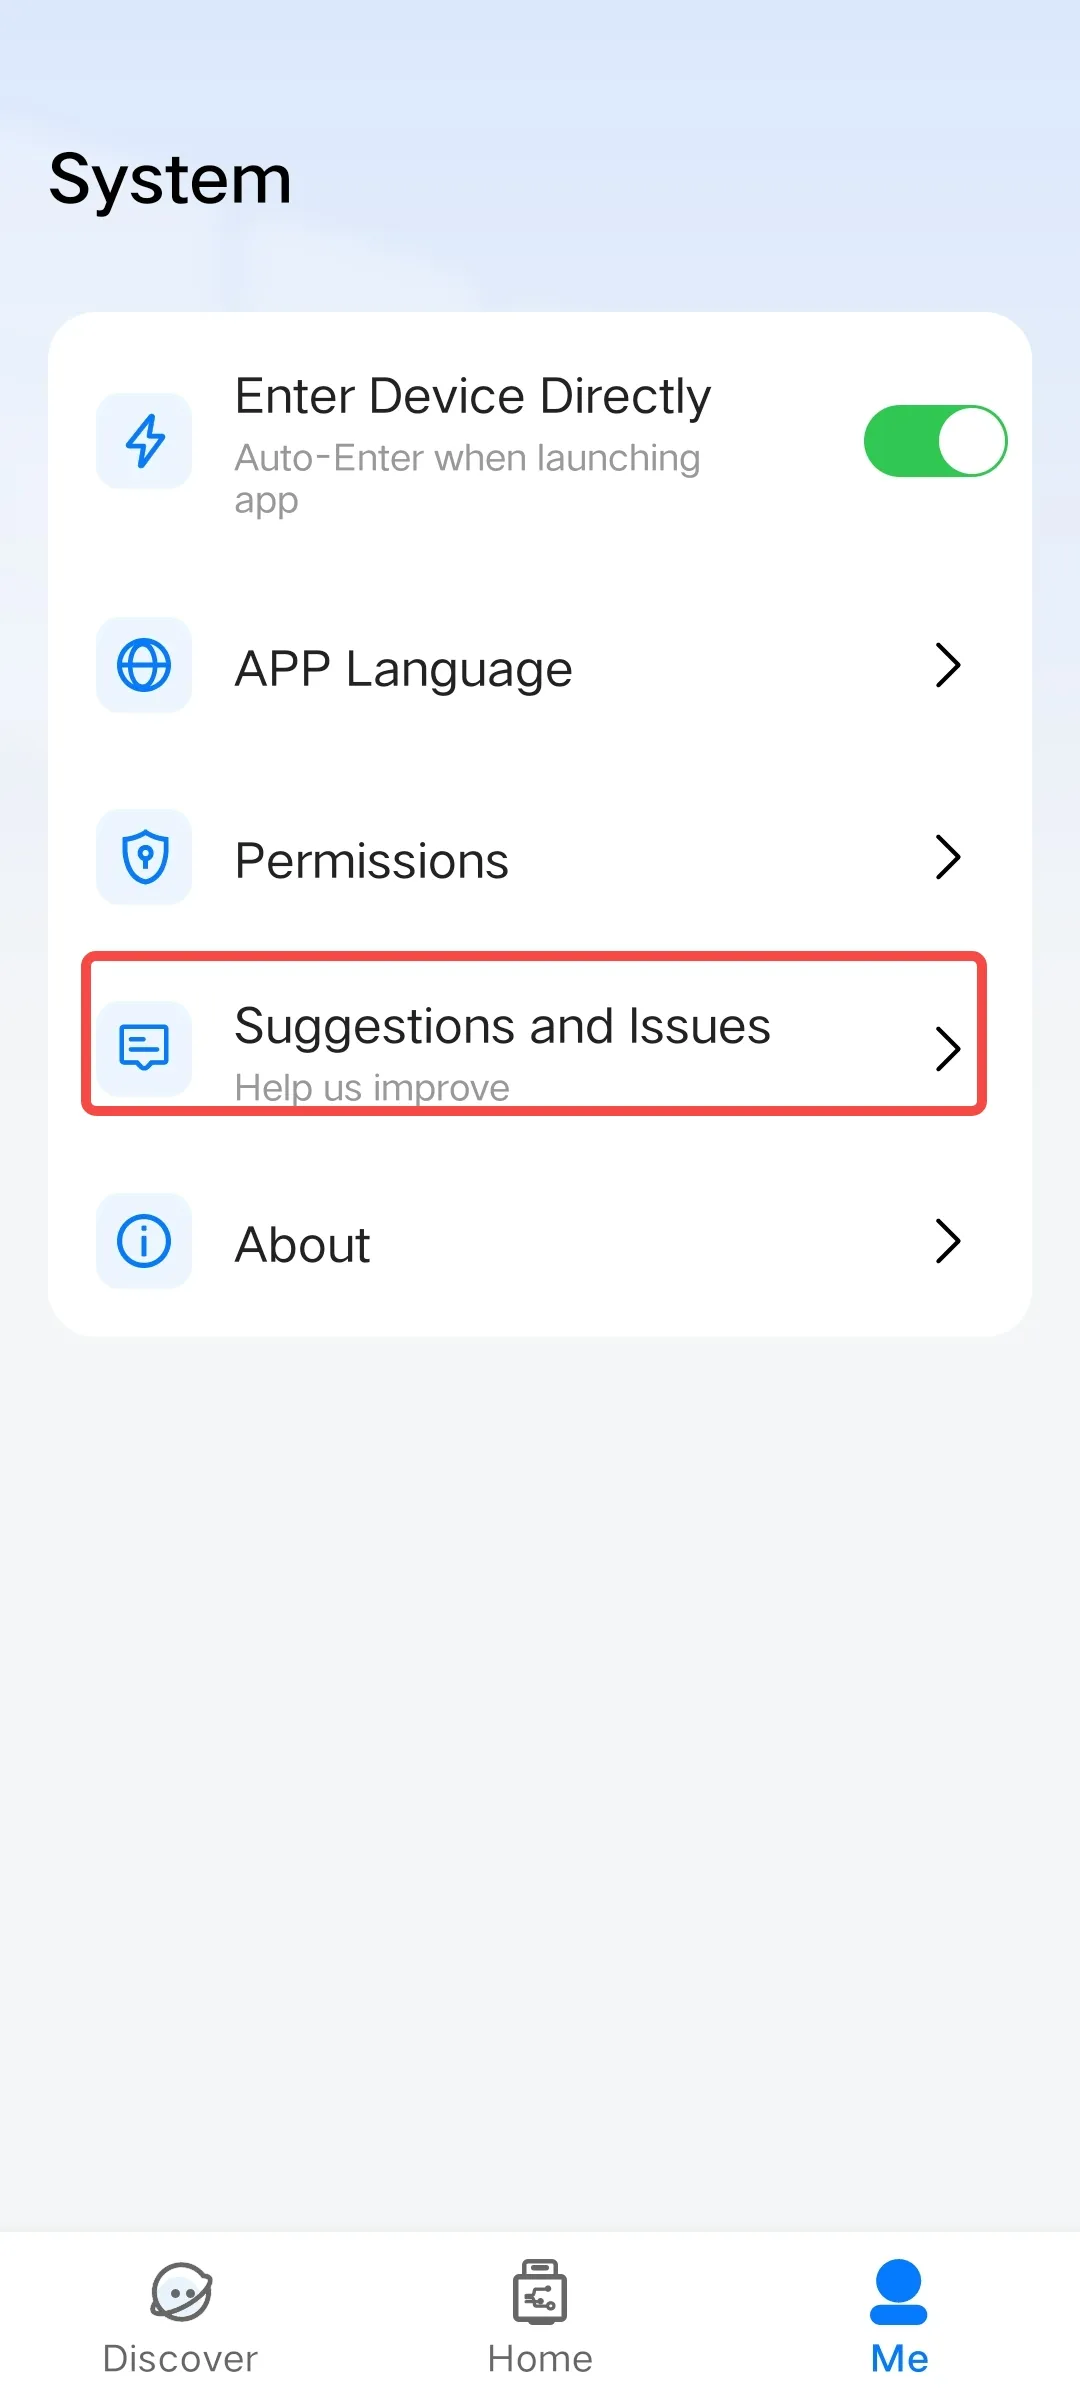
Submit Suggestions or Feedback
During use, if you encounter usage issues or have improvement suggestions, you can provide feedback in a timely manner.
Usage Method:
- Open the PlugOS APP → Navigate to “Me”.
- Click “Suggestions and lssues” → Fill in the feedback content, describe the encountered issues and suggestions, provide contact information, and optionally upload the client (APP) log, upload the device (system) log, and upload problem-related images.
Note: The option to upload the PlugOS device log will only be displayed if you have accessed the system before.

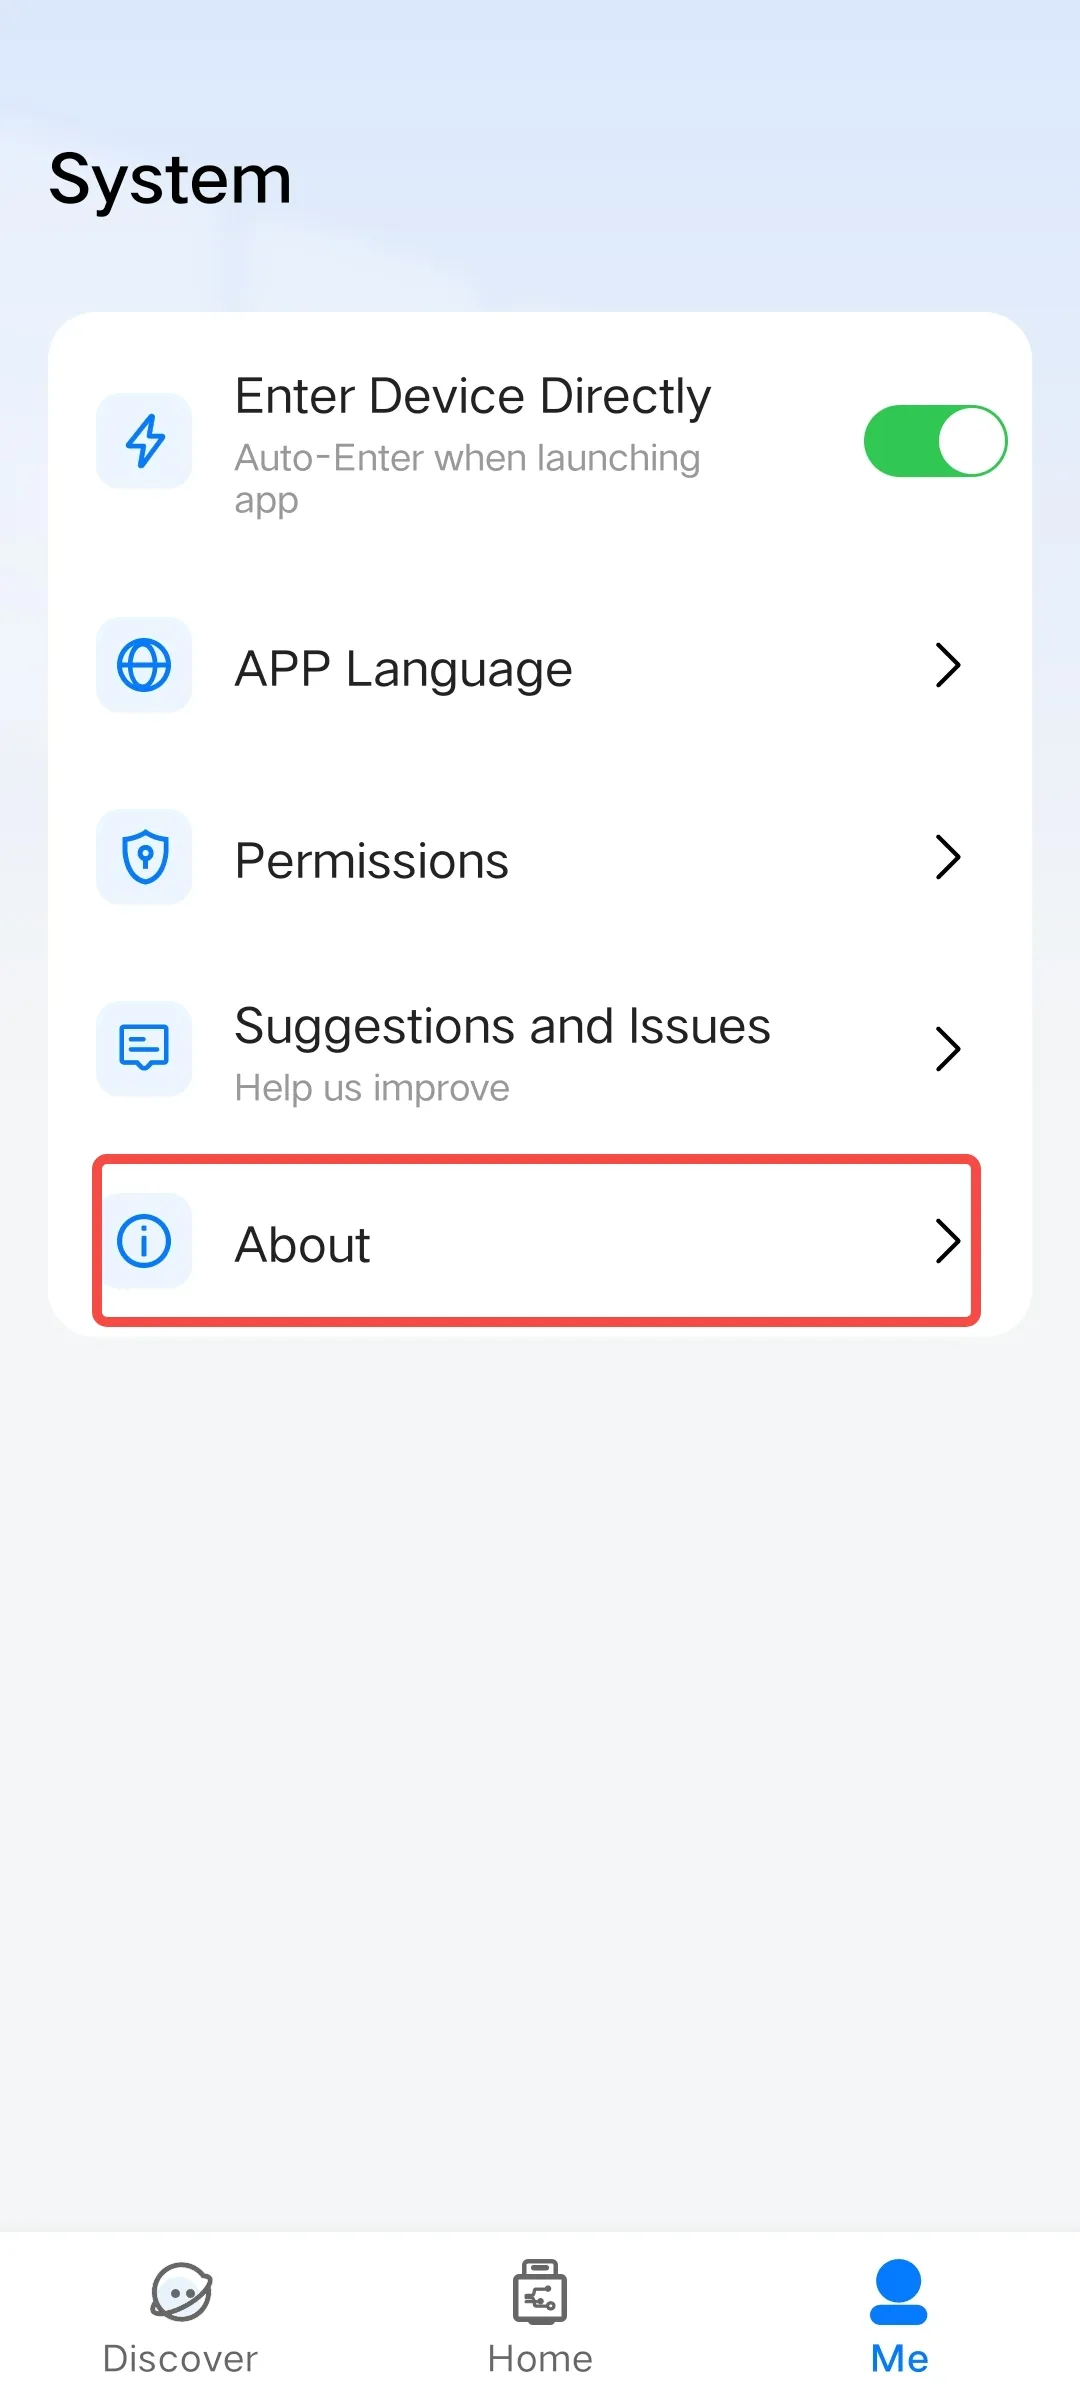
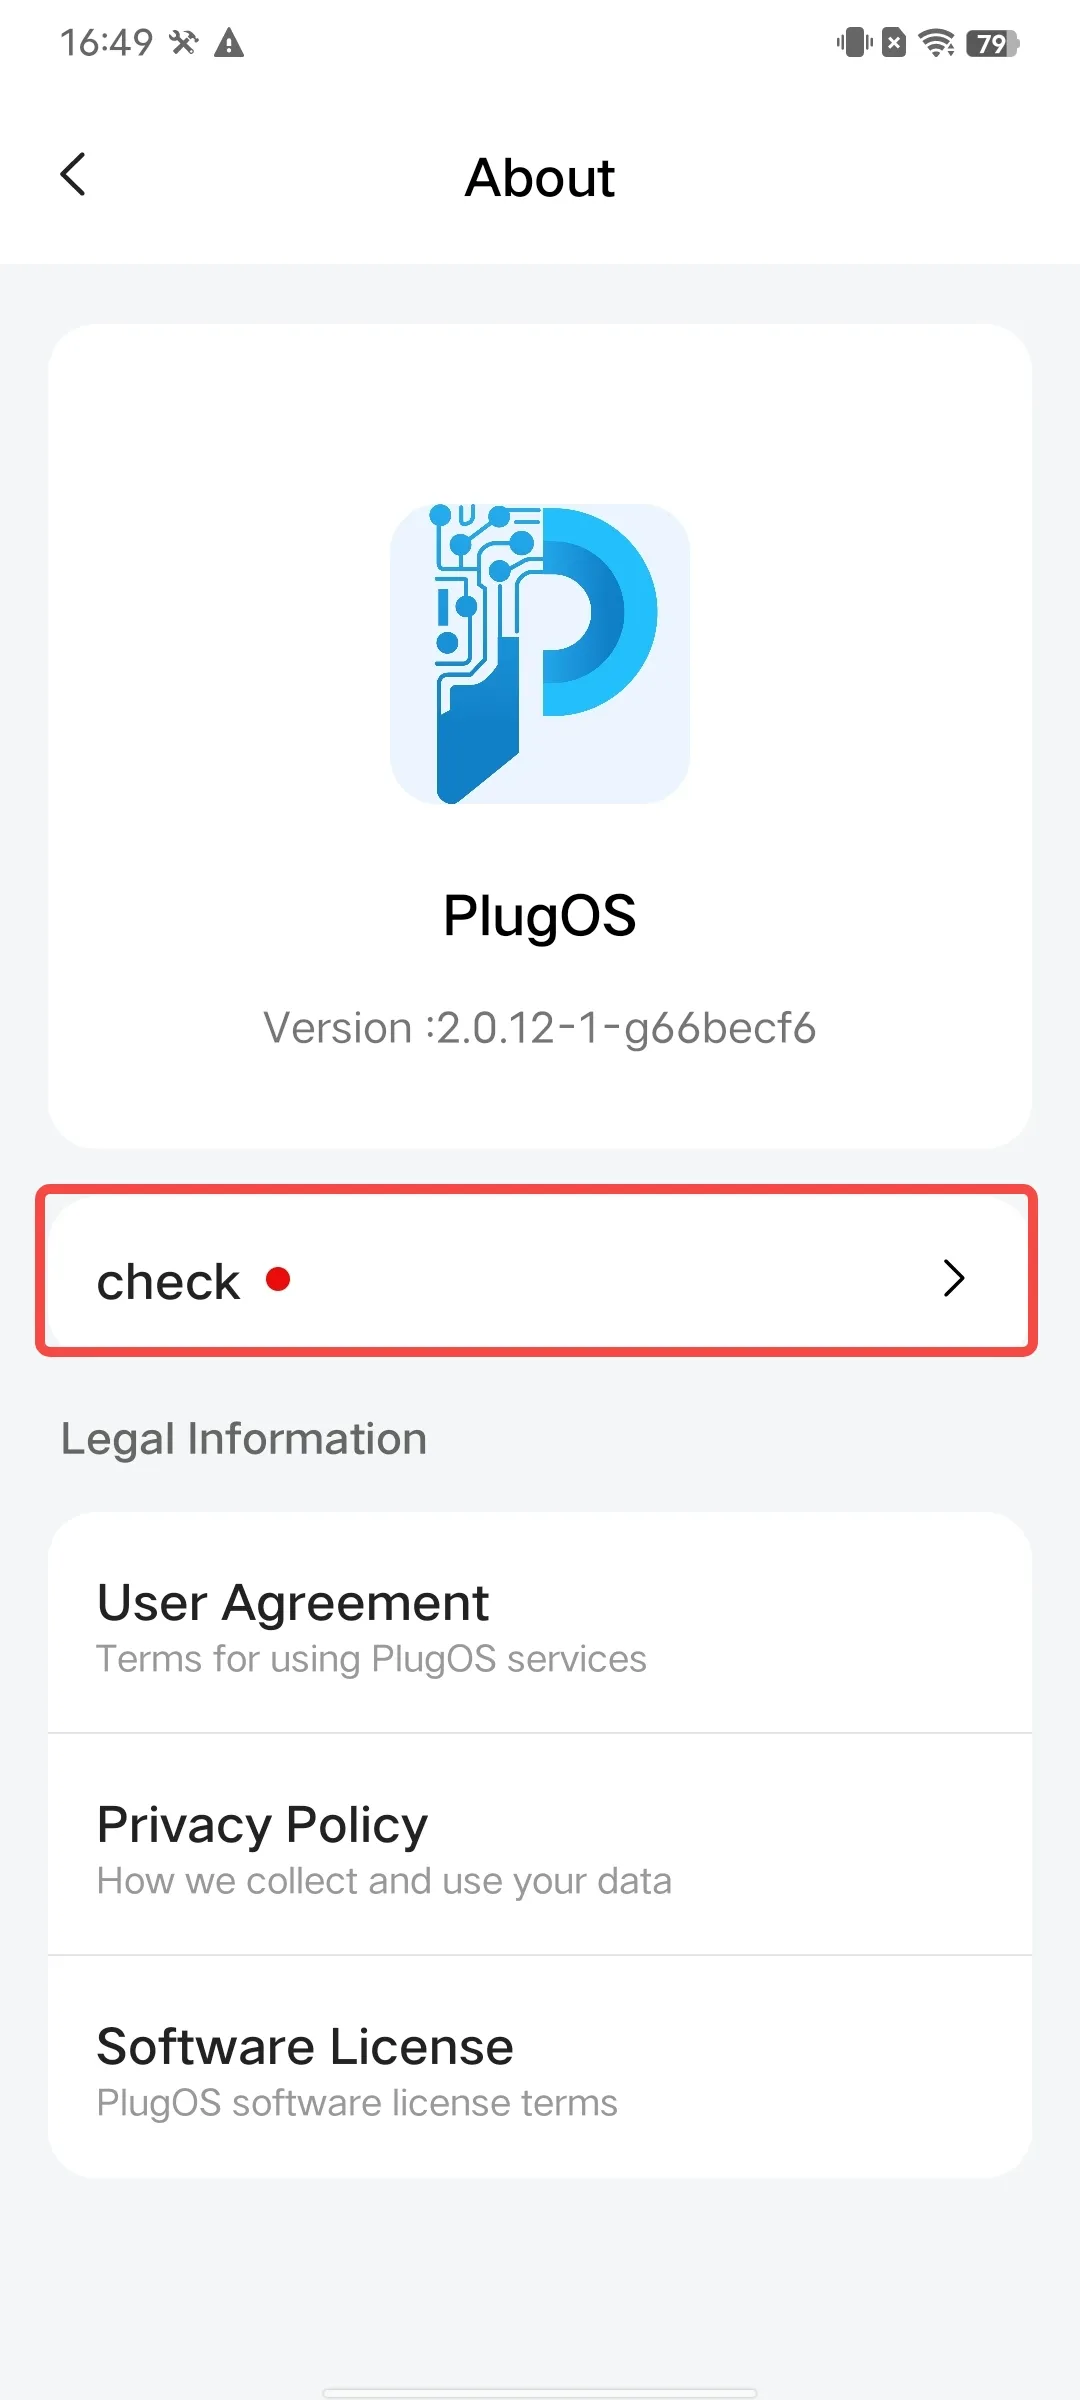
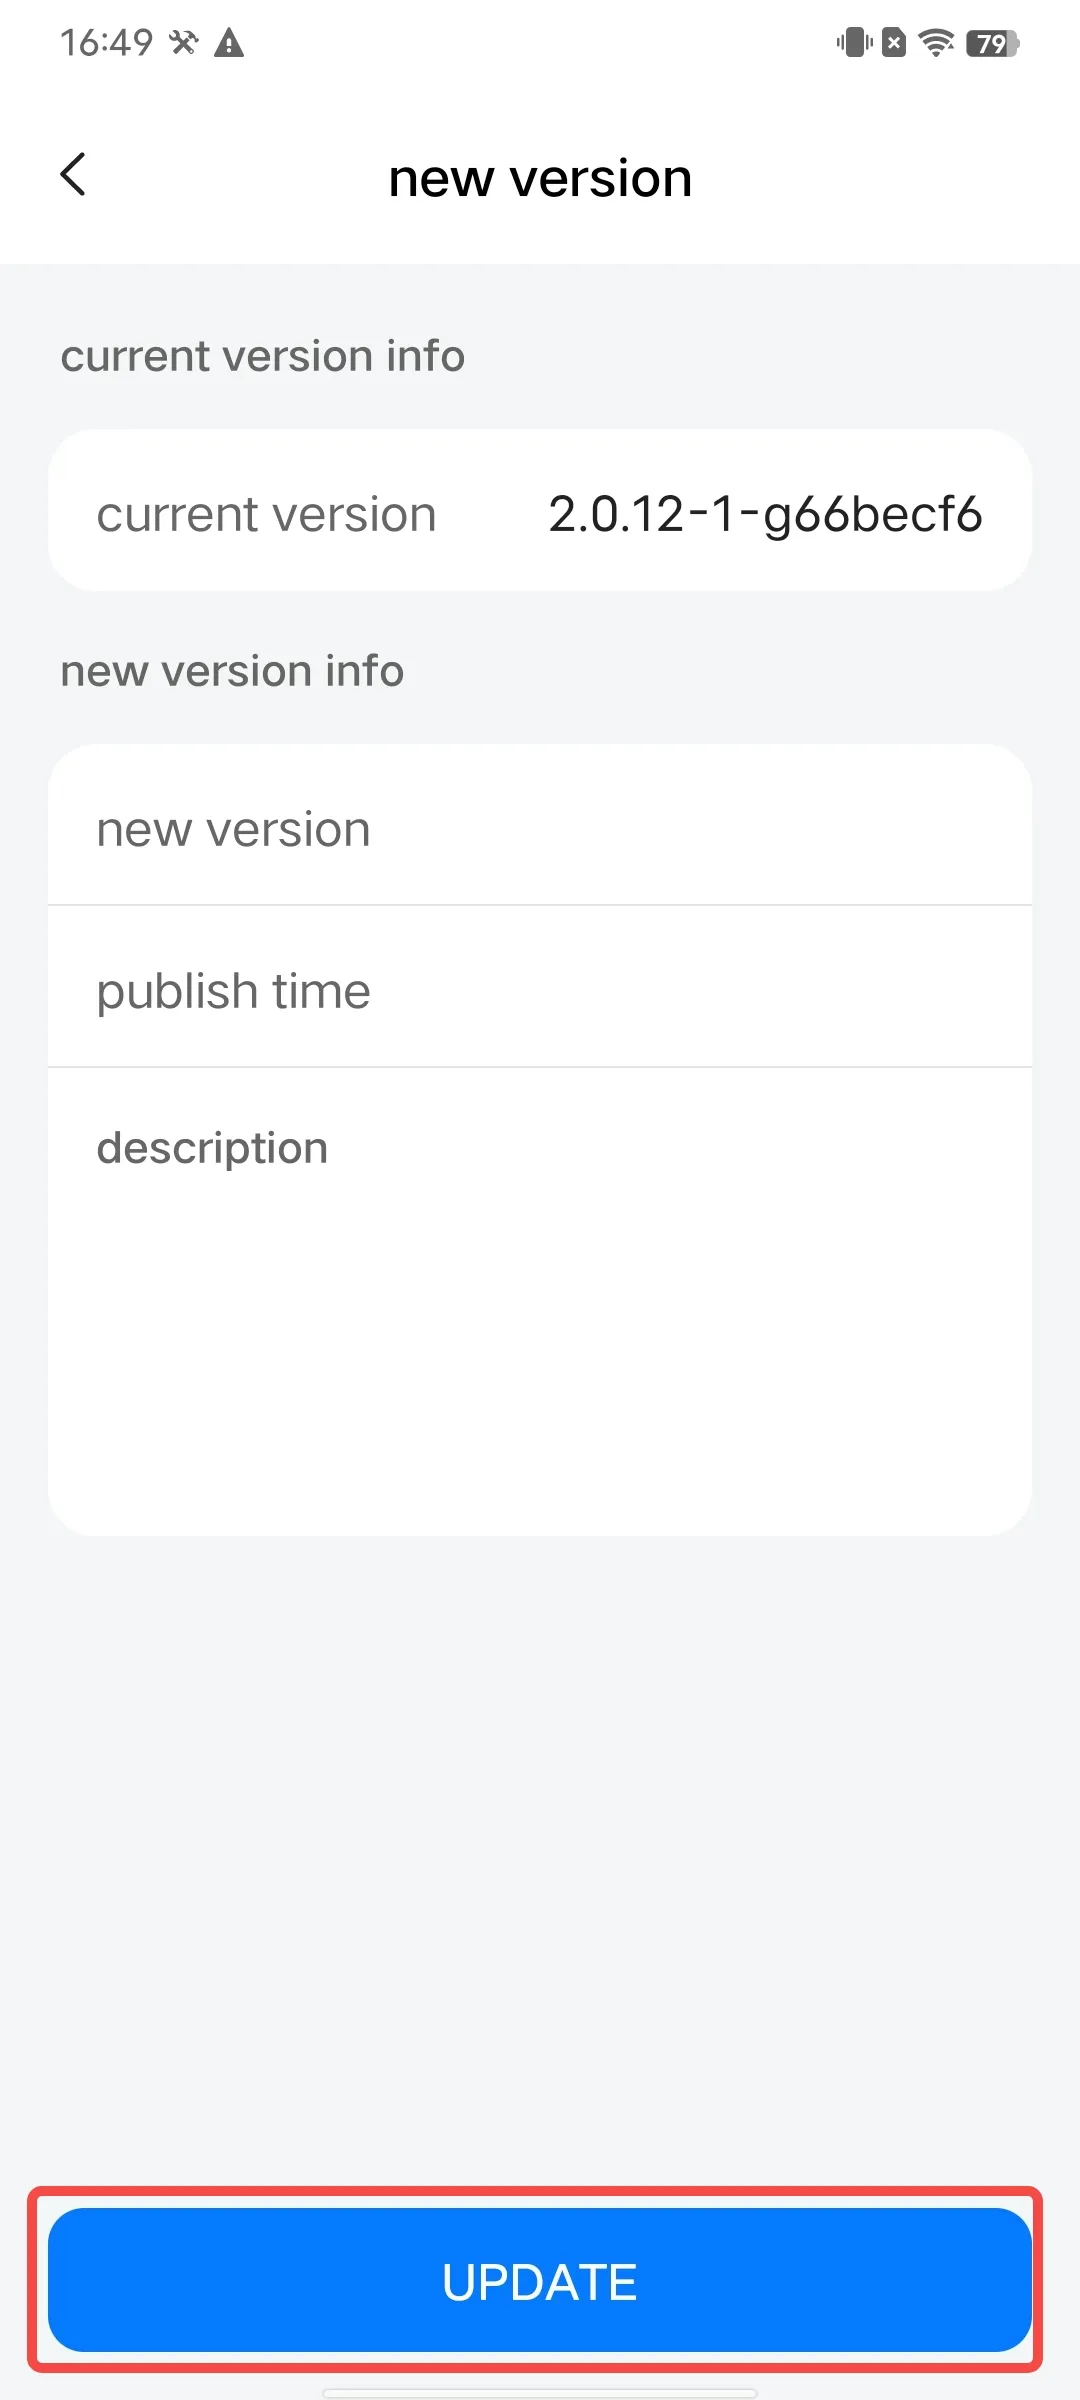
APP Update
To ensure a better user experience and security, the PlugOS APP provides an online update function.
Usage Method:
- Open the PlugOS APP → Navigate to “Me”.
- Click “About” → “Check for New Version”. A “red dot” indicator means a new version is available; you can click “Check for New Version” to view the details of the current update.
- Enter the “New Version” page, where you can view the current version information, new version information, release date, and update content. Click to start the update.
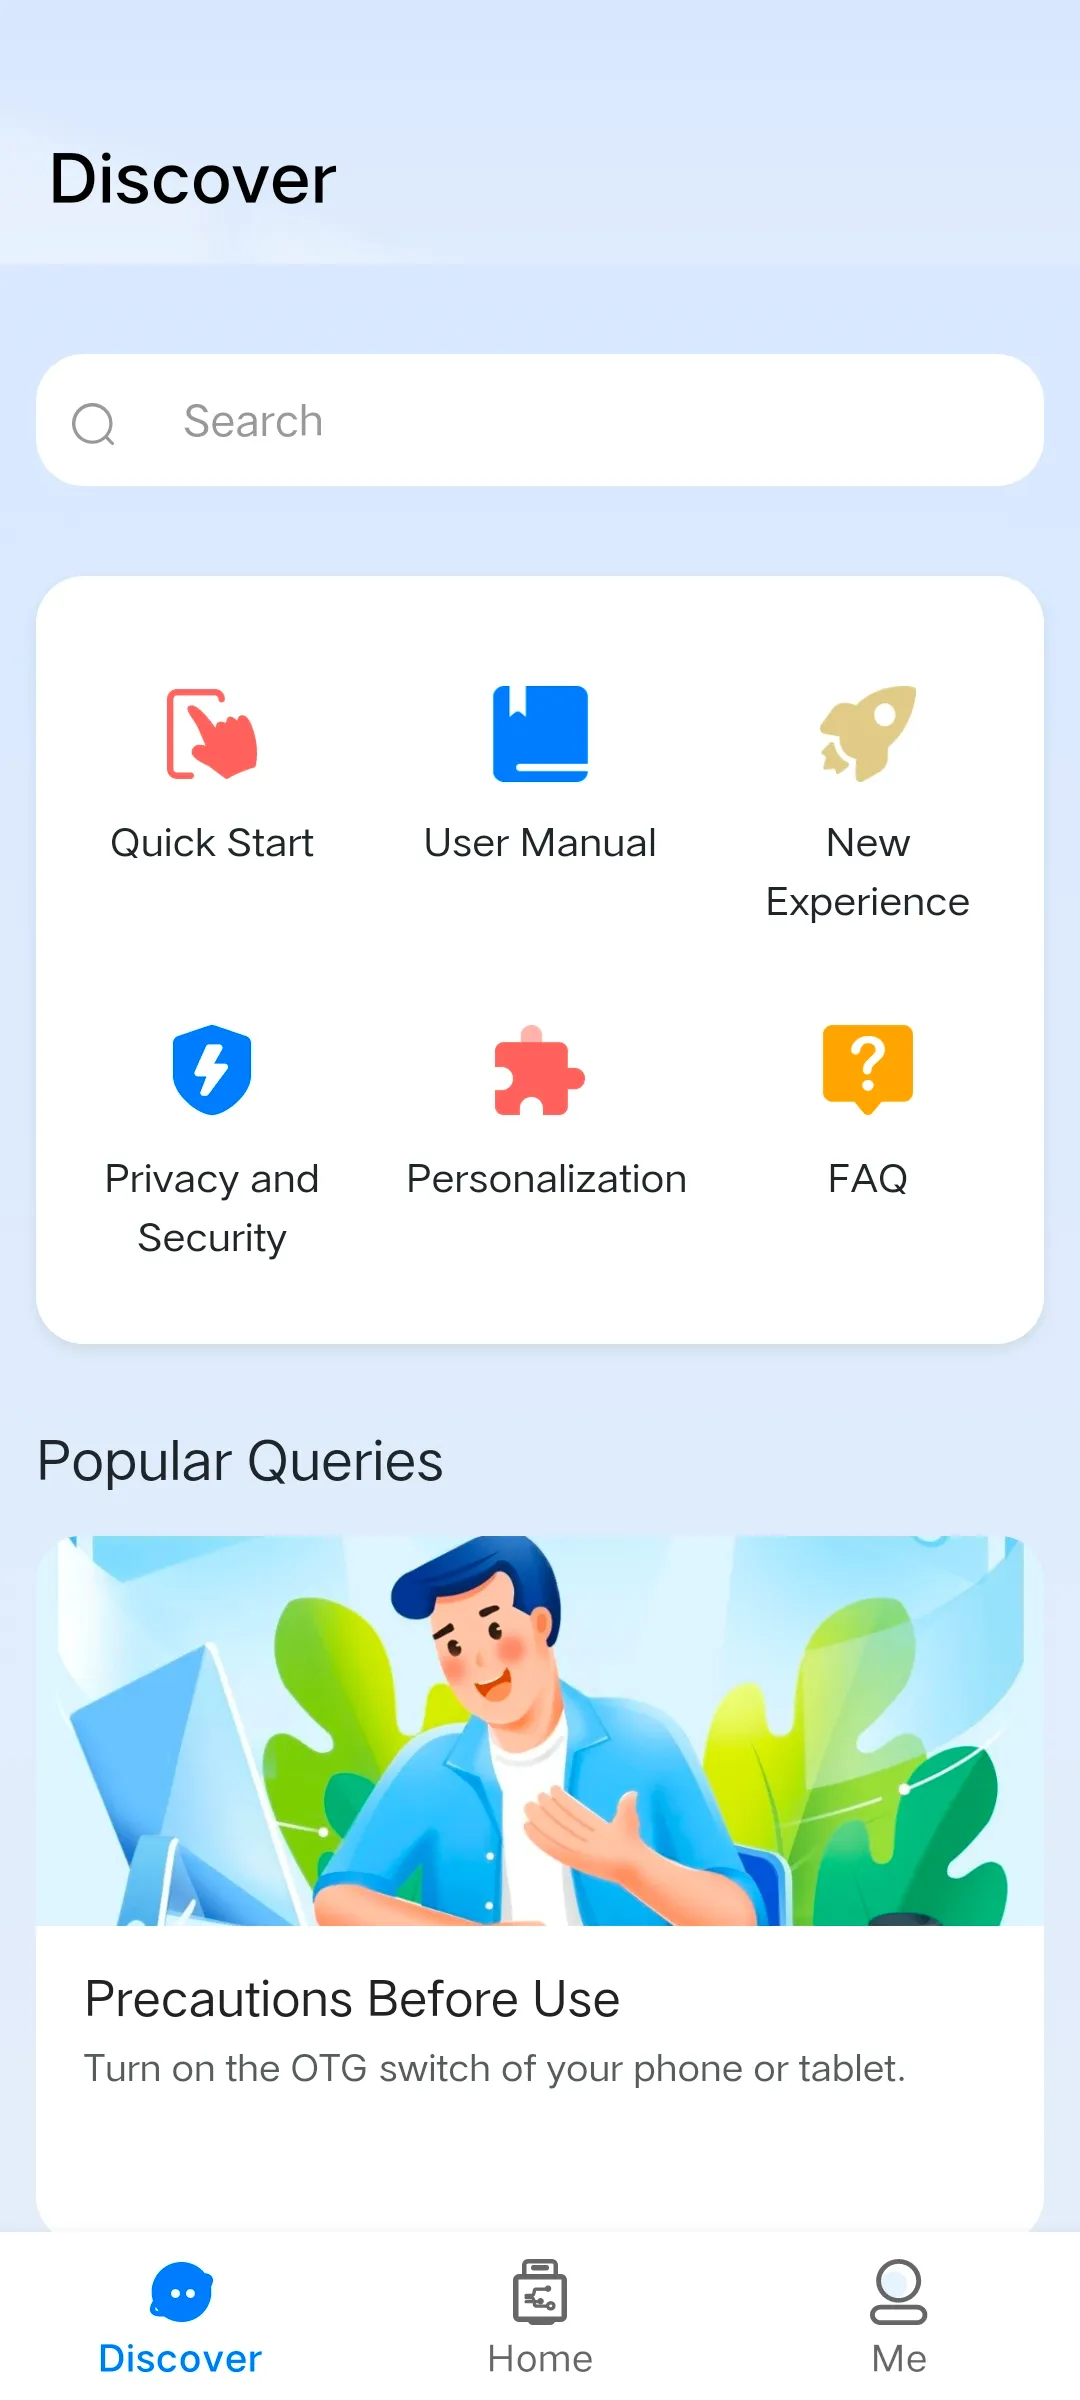
Use the Exploration Feature to Discover More App Tips
The PlugOS APP provides comprehensive usage guides and solutions to common issues. It is recommended to refer to these materials first before use.
Usage Method:
- Open the PlugOS APP → Navigate to “Discover”.
- You can explore the features of the device and the PlugOS APP, including sections such as “Quick Start”, “User Manual”, “New Experience”, “Privacy & Security”, “Personalization”, and “Frequently Asked Questions (FAQs)”. You can also view more popular queries.
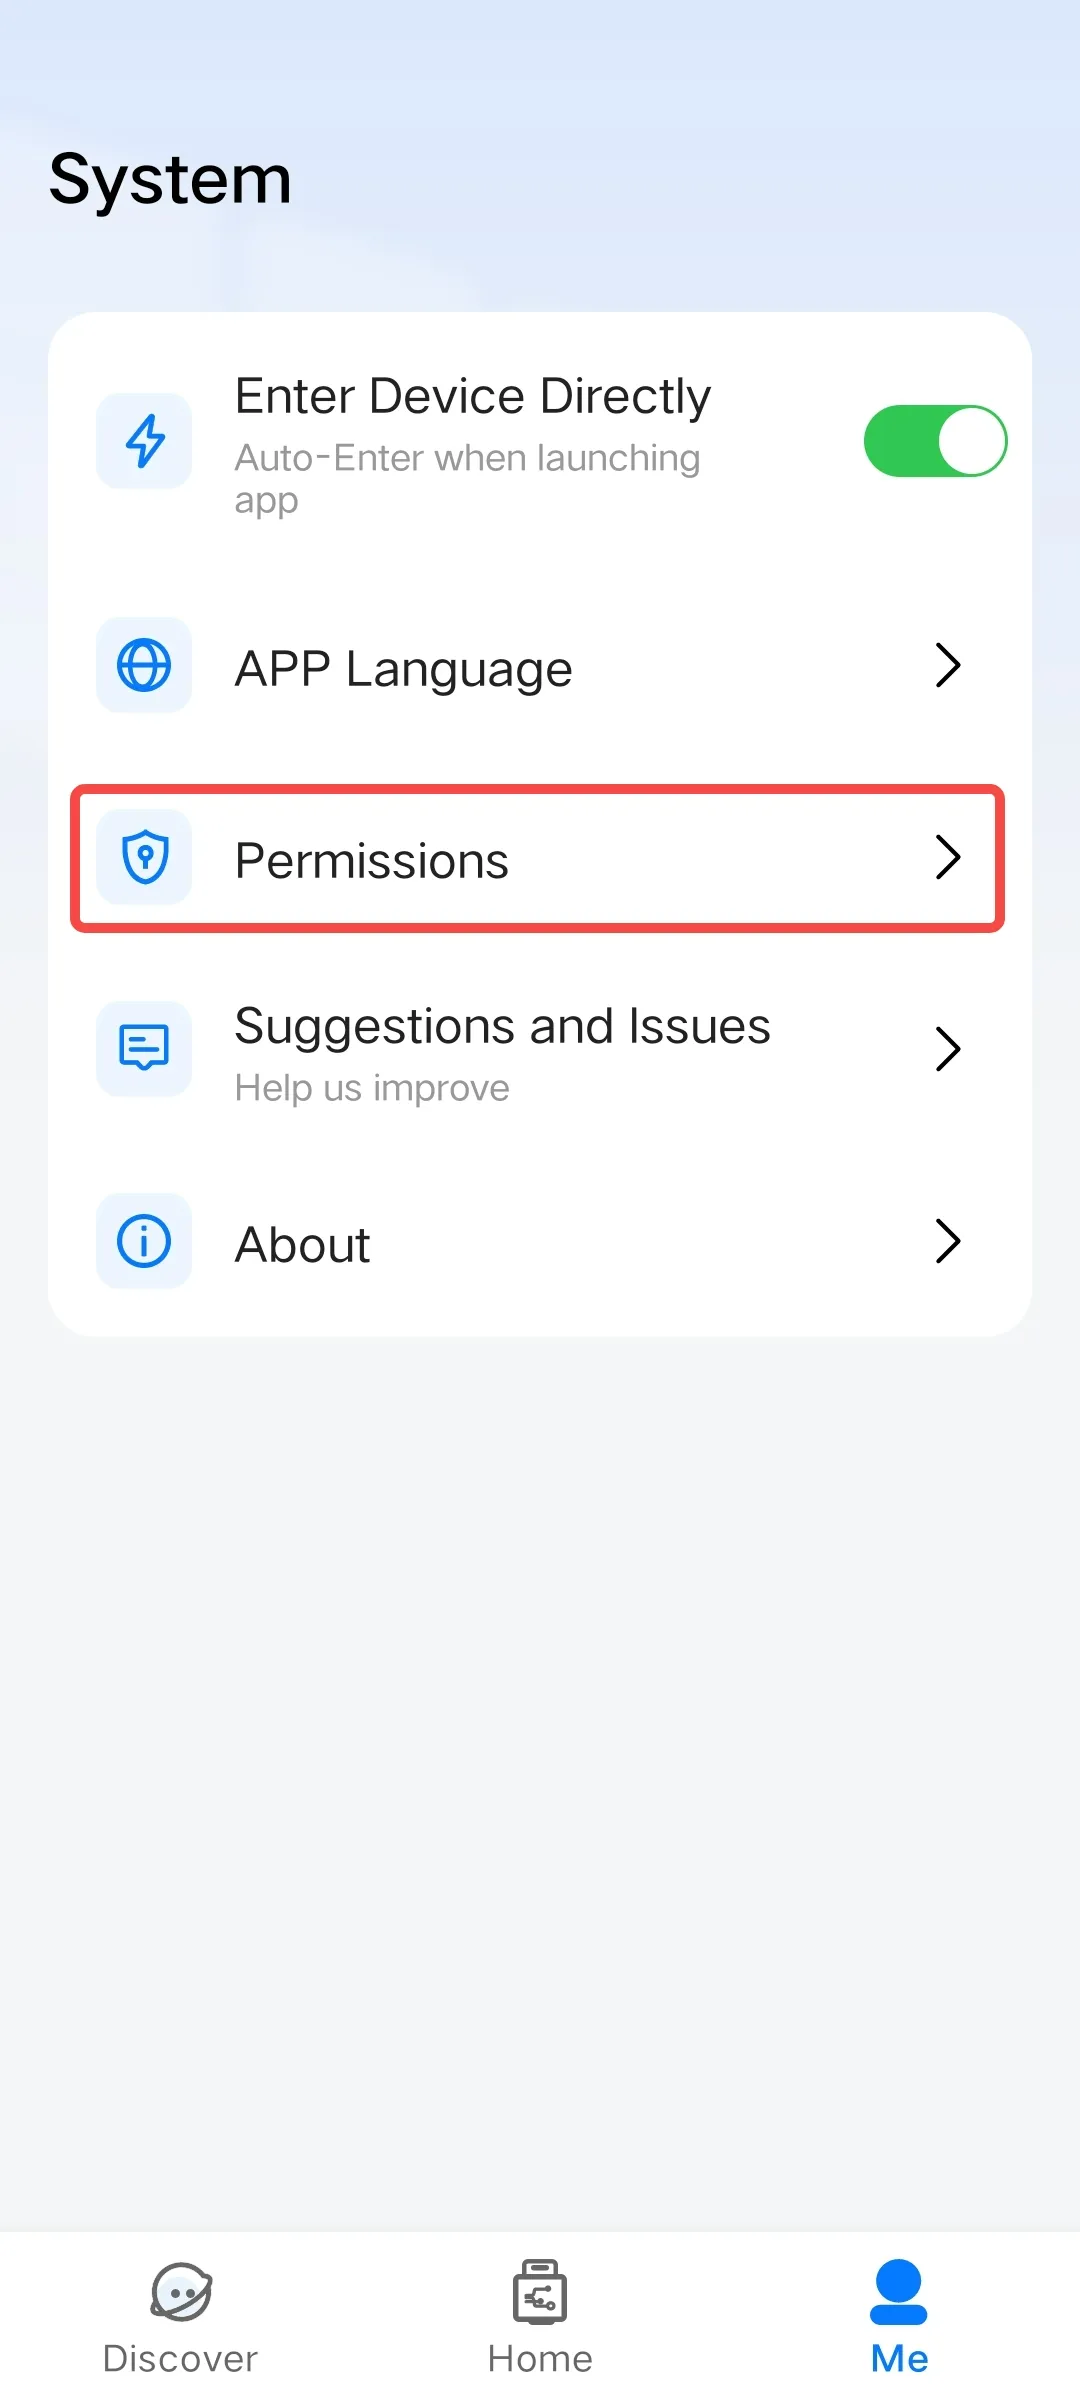
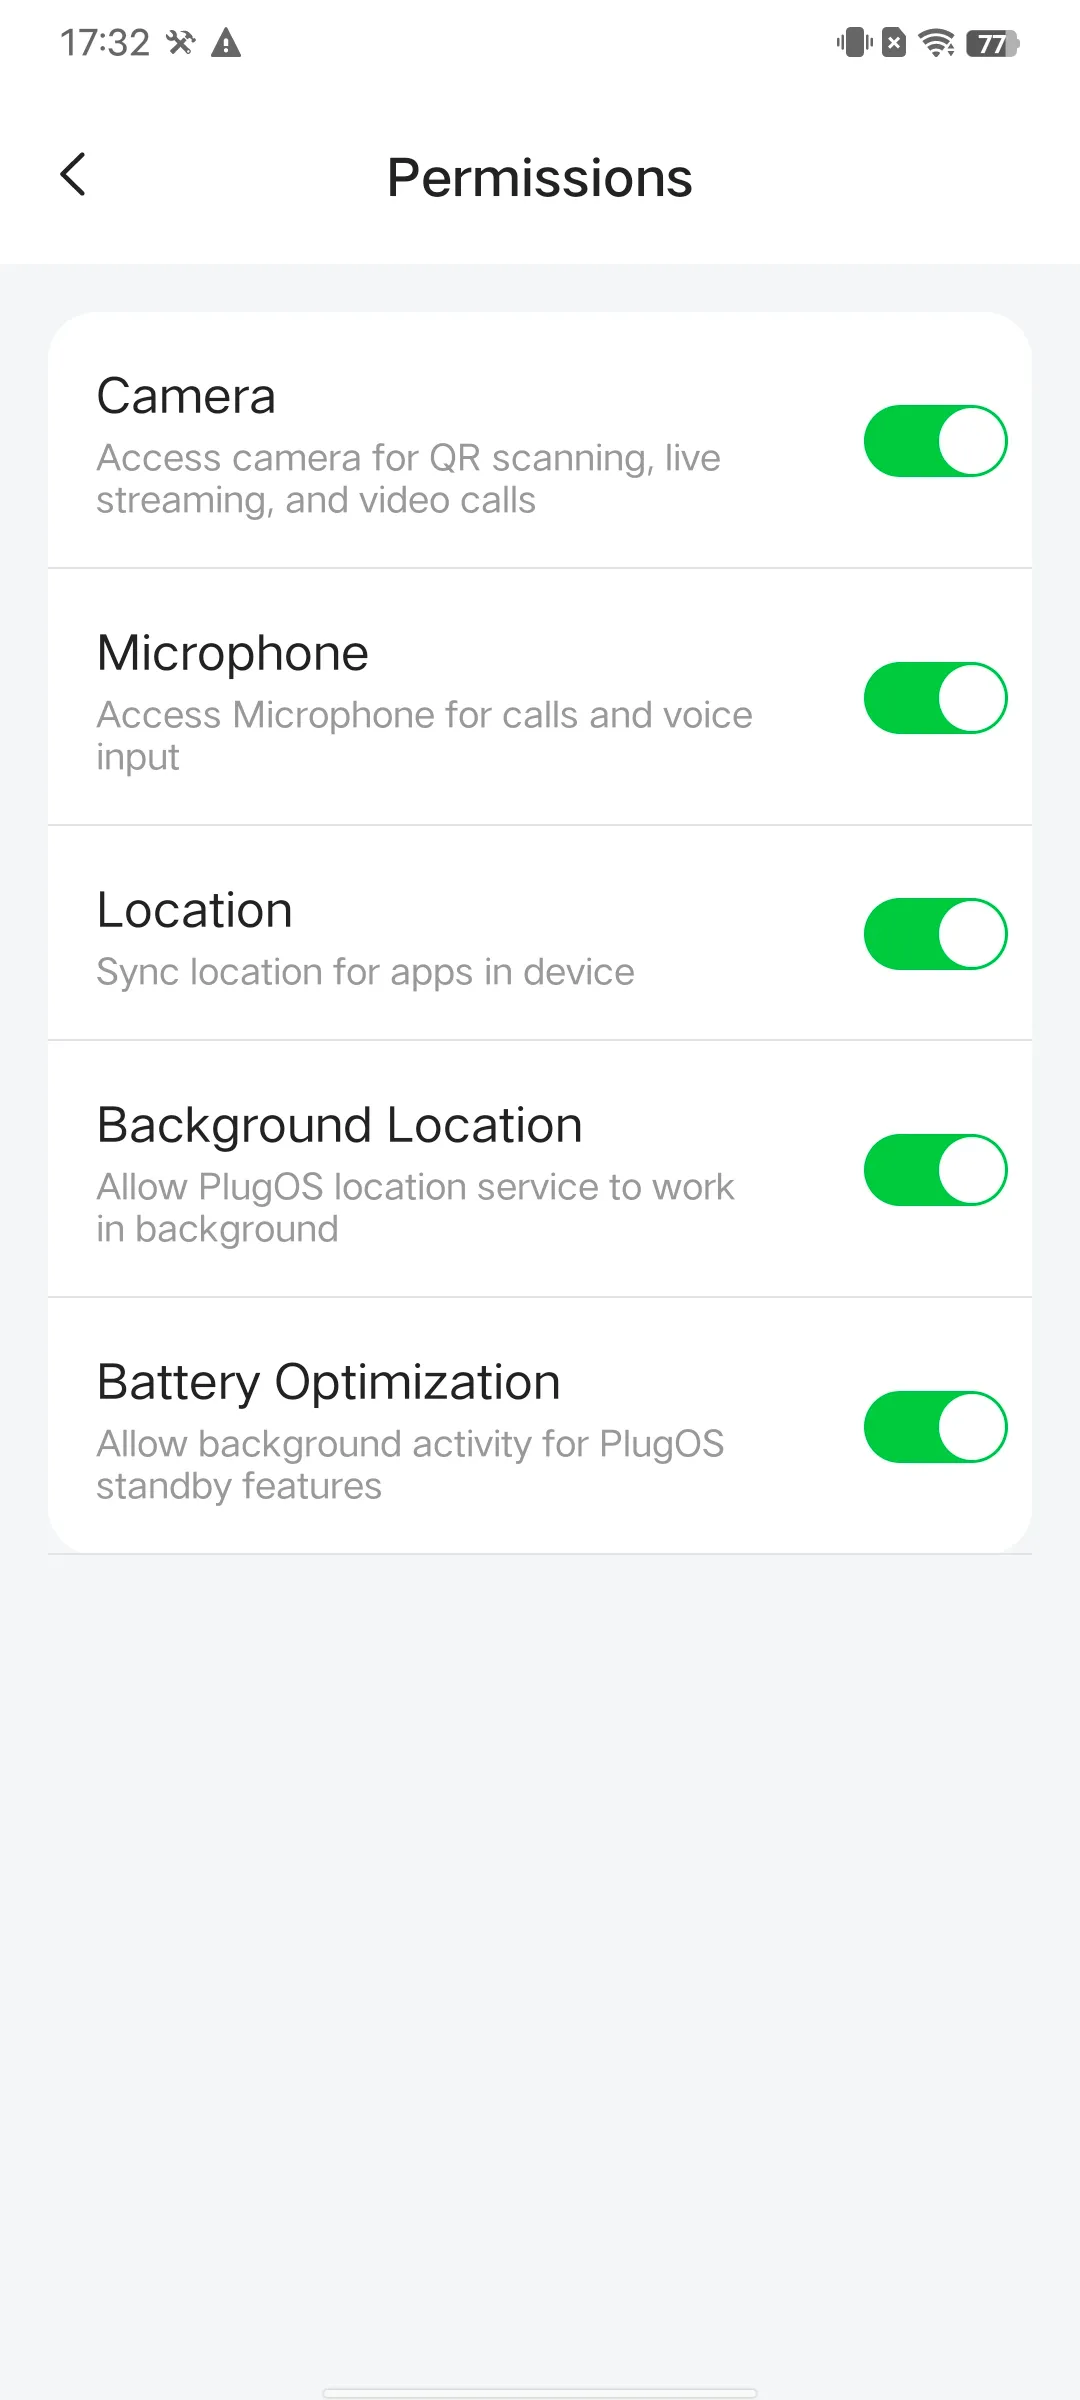
APP Permission Settings
When using the PlugOS APP, it needs to request permissions based on the functions being used. For functions that cannot be used due to improper permission settings, you need to enable the required permissions manually.
Usage Method:
- Open the PlugOS APP → Navigate to “Me”.
- Click “Permission” → Enter the “Permission Settings” interface, where you can configure permissions for Camera, Microphone, Location, and Background Location.
Background Activity Settings Guide
To ensure your PlugOS application works continuously and stably, please follow these settings according to your phone brand. The names of settings may vary slightly between different models. If you cannot find the exact same option, please select a similar function.
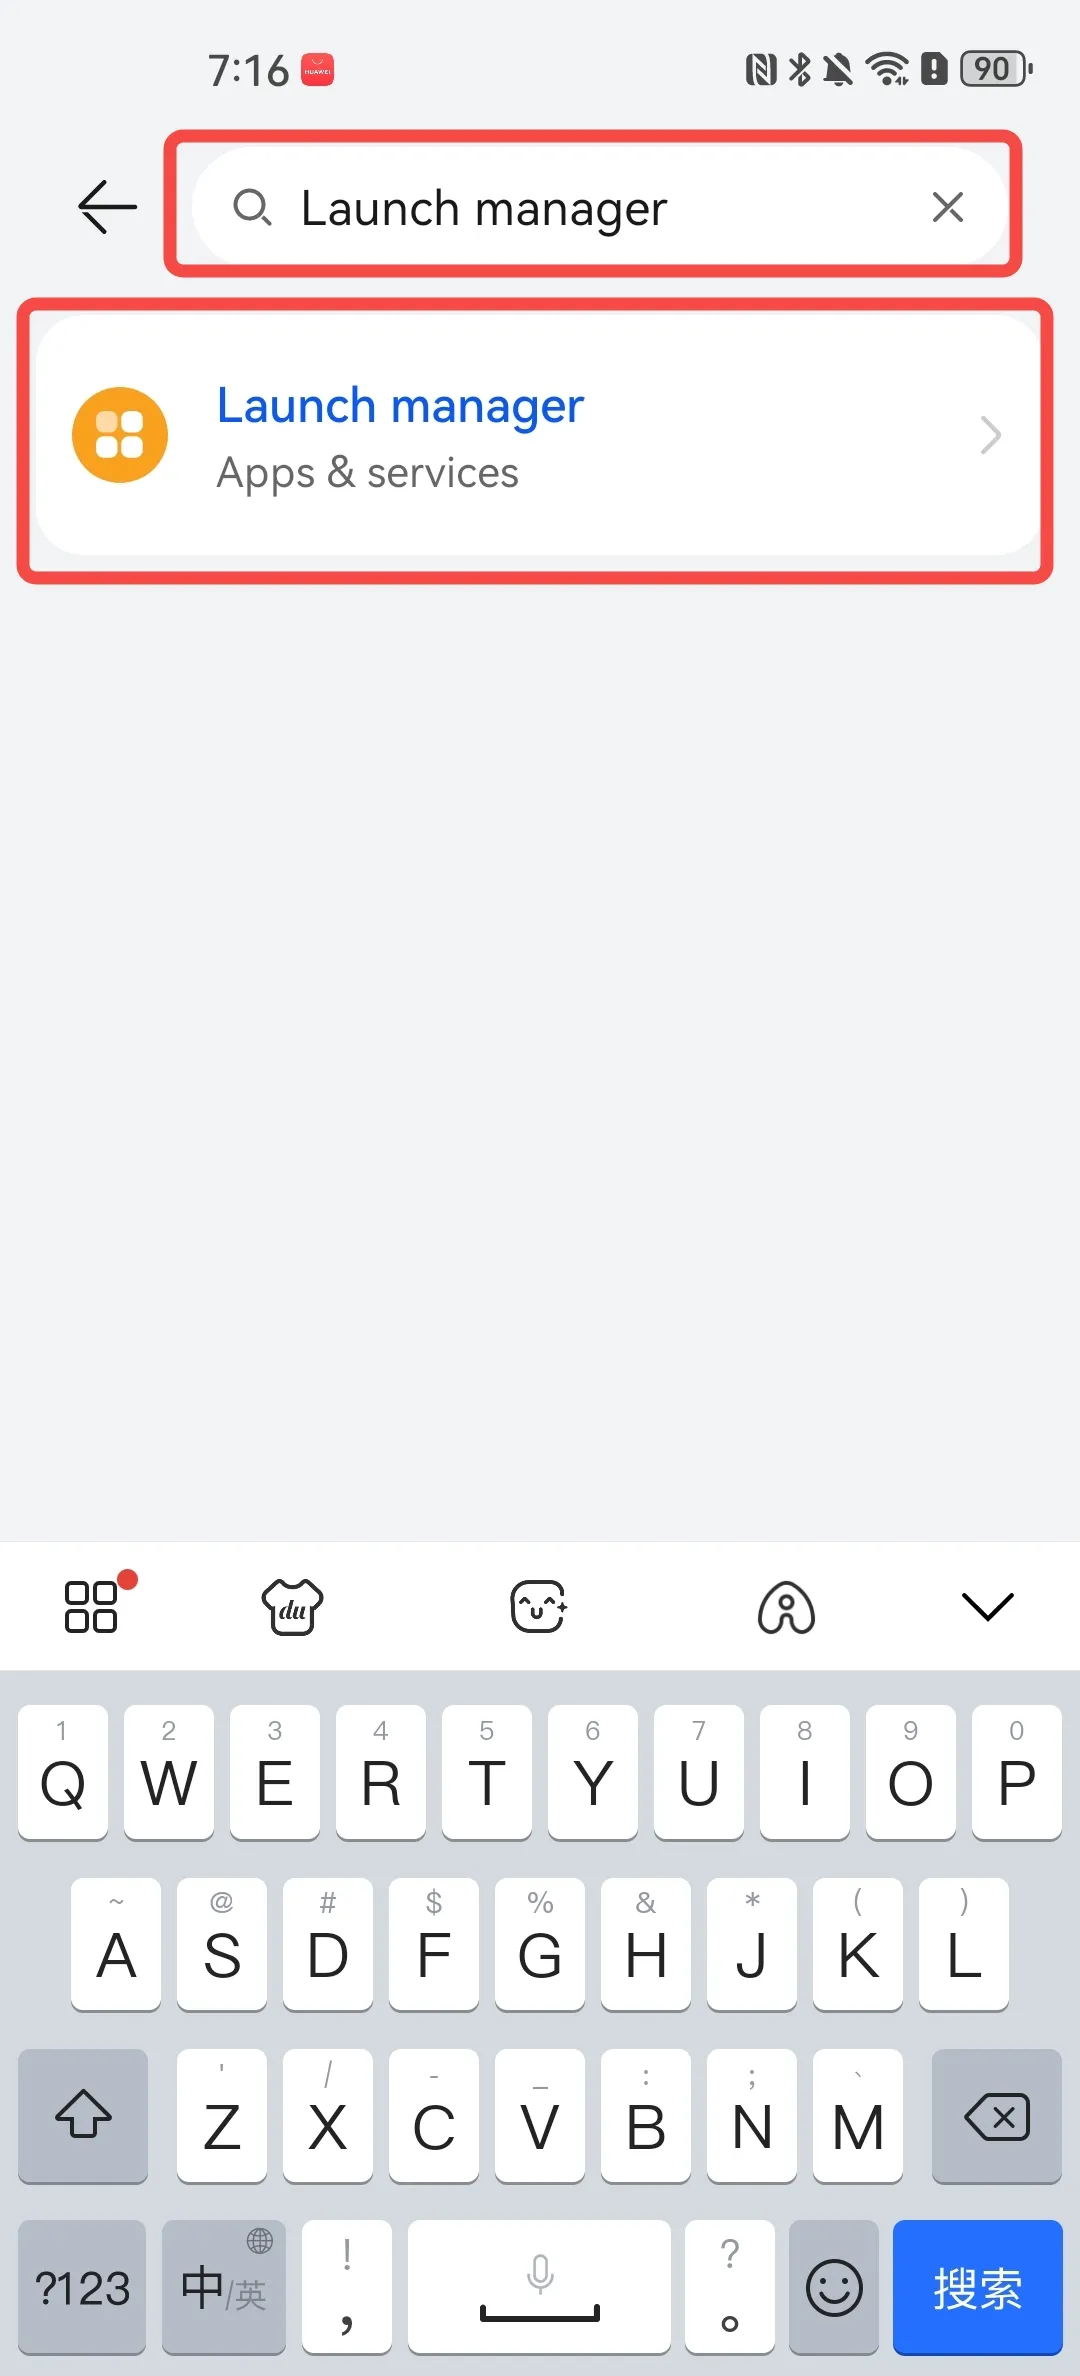
1. Huawei/Honor Phones
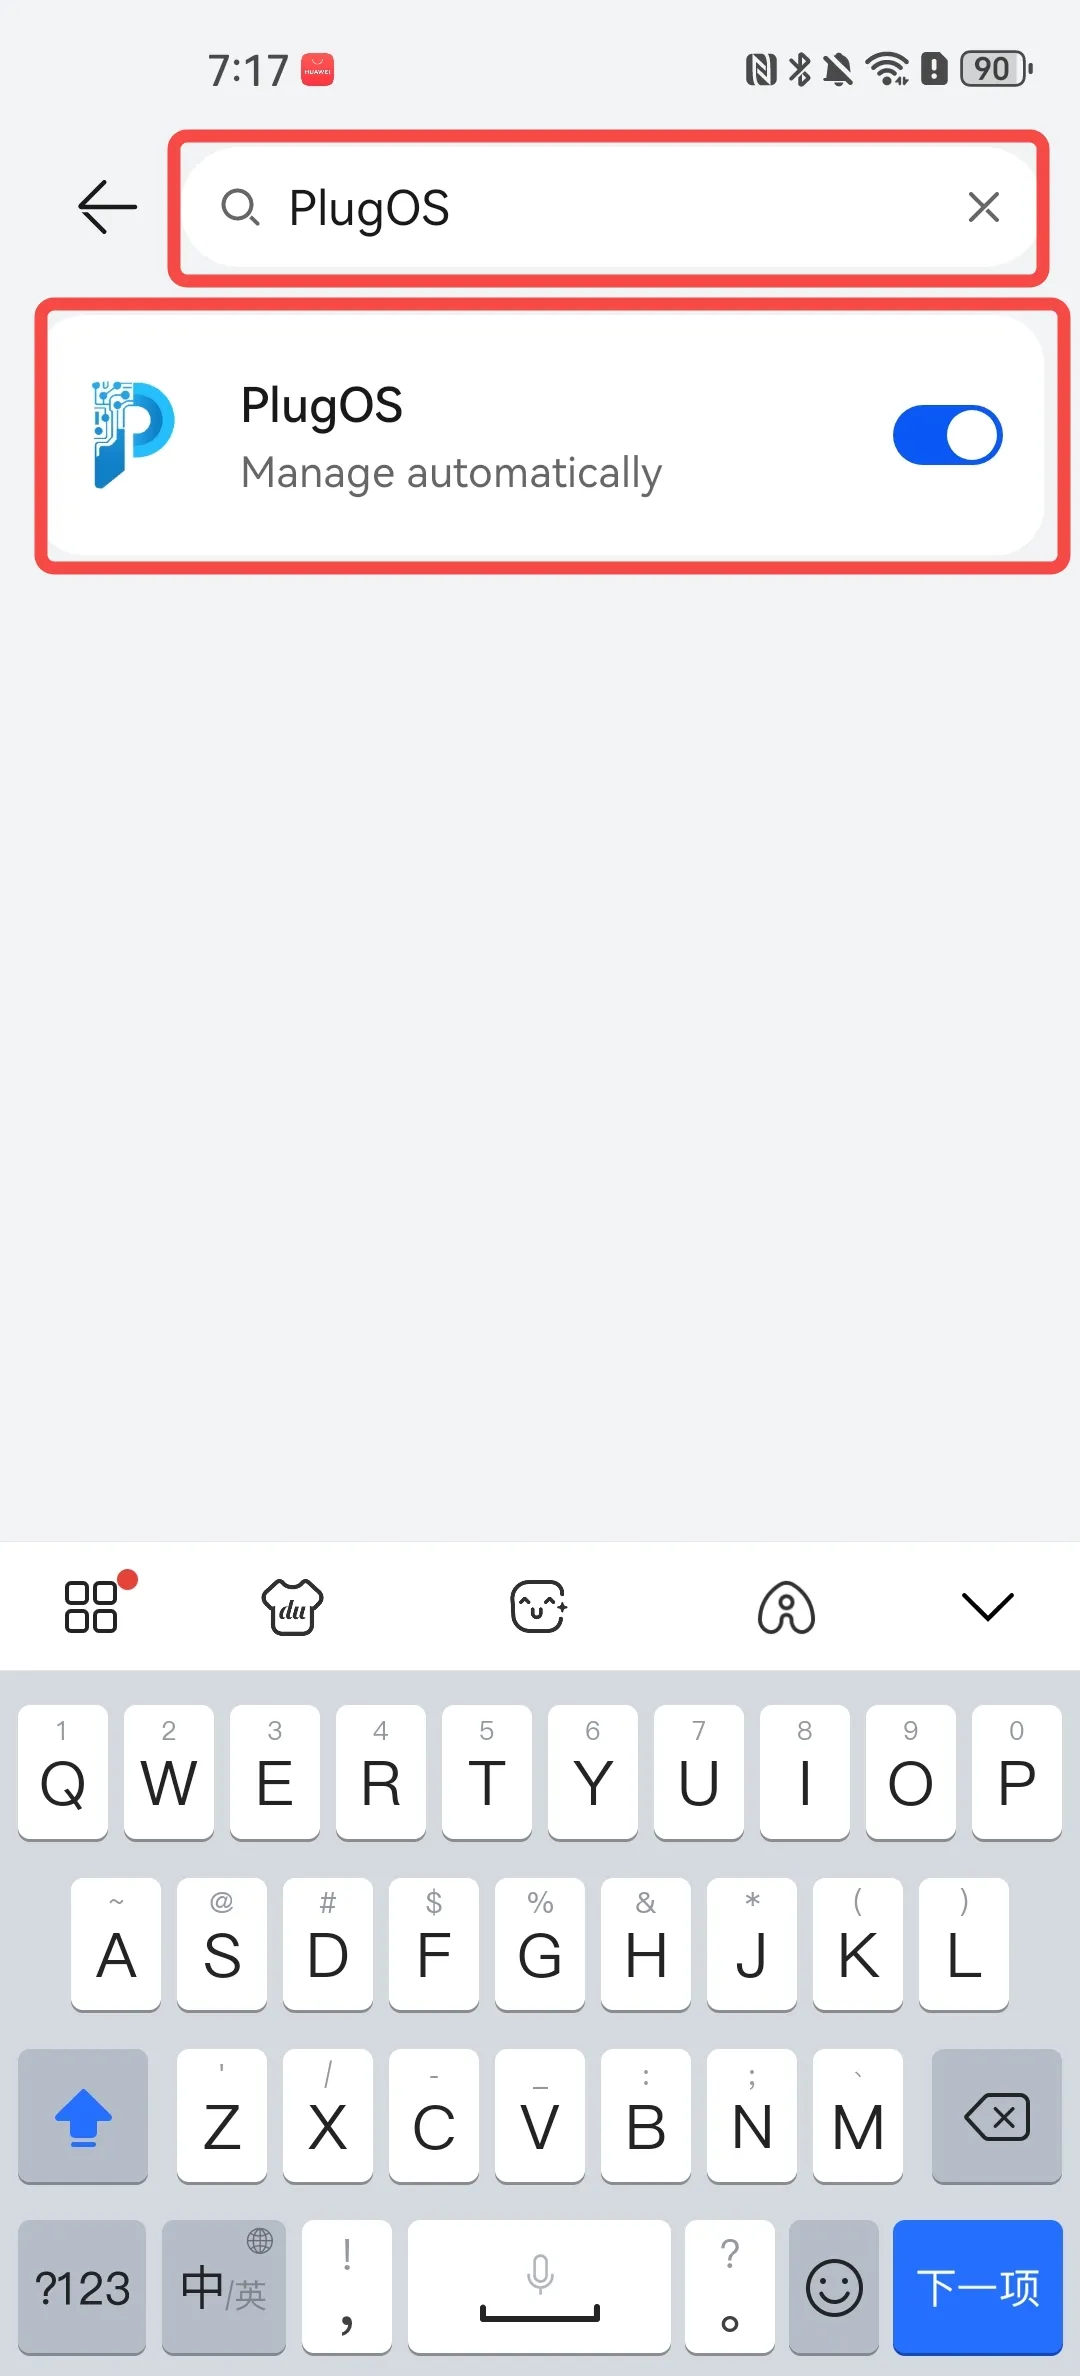
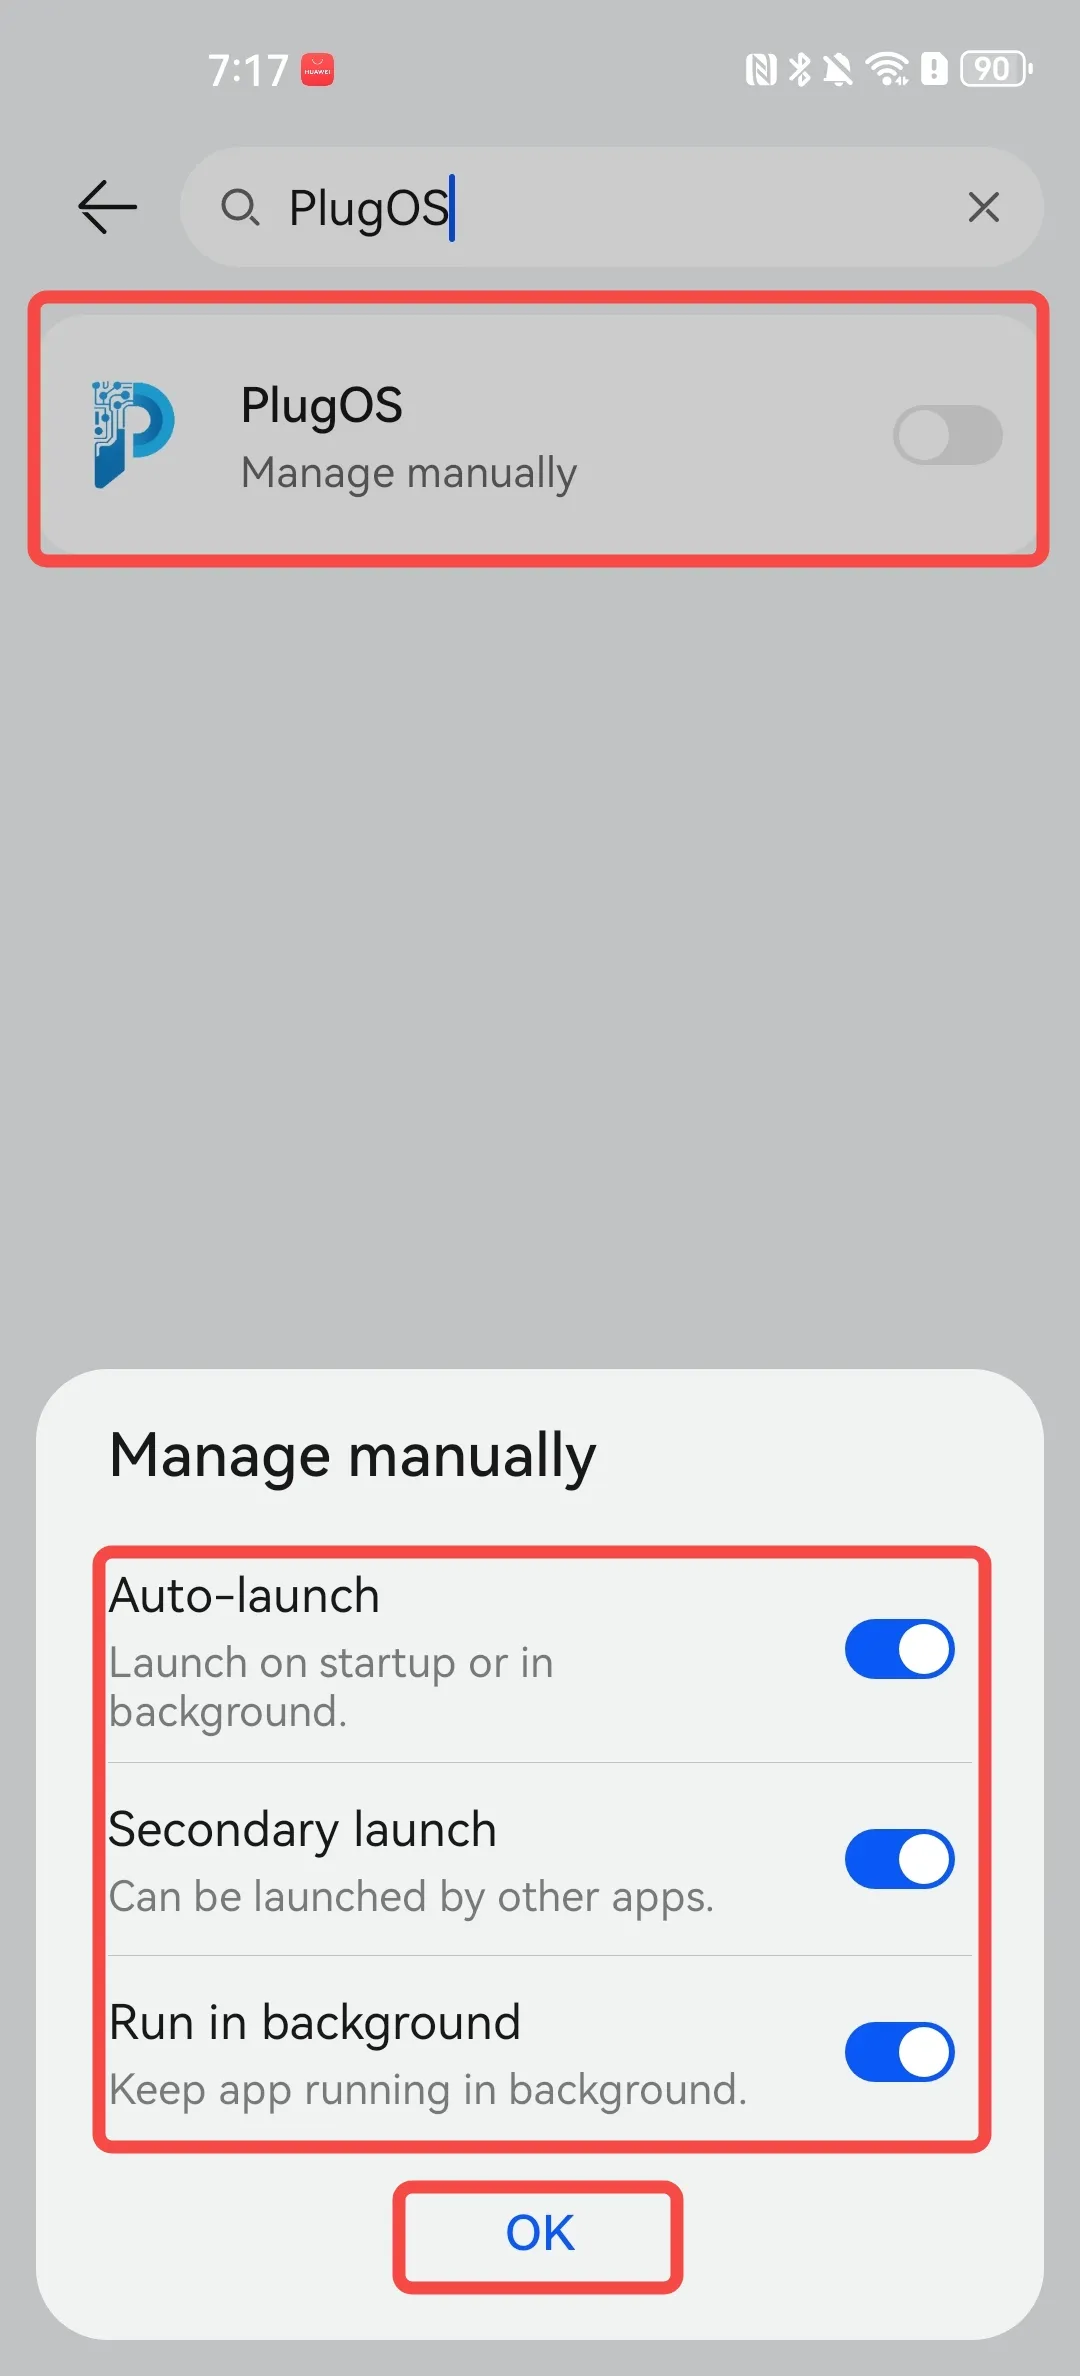
- Enable app auto-launch Open 【Settings】→ Search for “Launch manager” at the top → Find “PlugOS” and tap to enter → Disable automatic management → Tap to enable 【Auto-launch】【Secondary launch】【Run in background】→ Tap “OK”
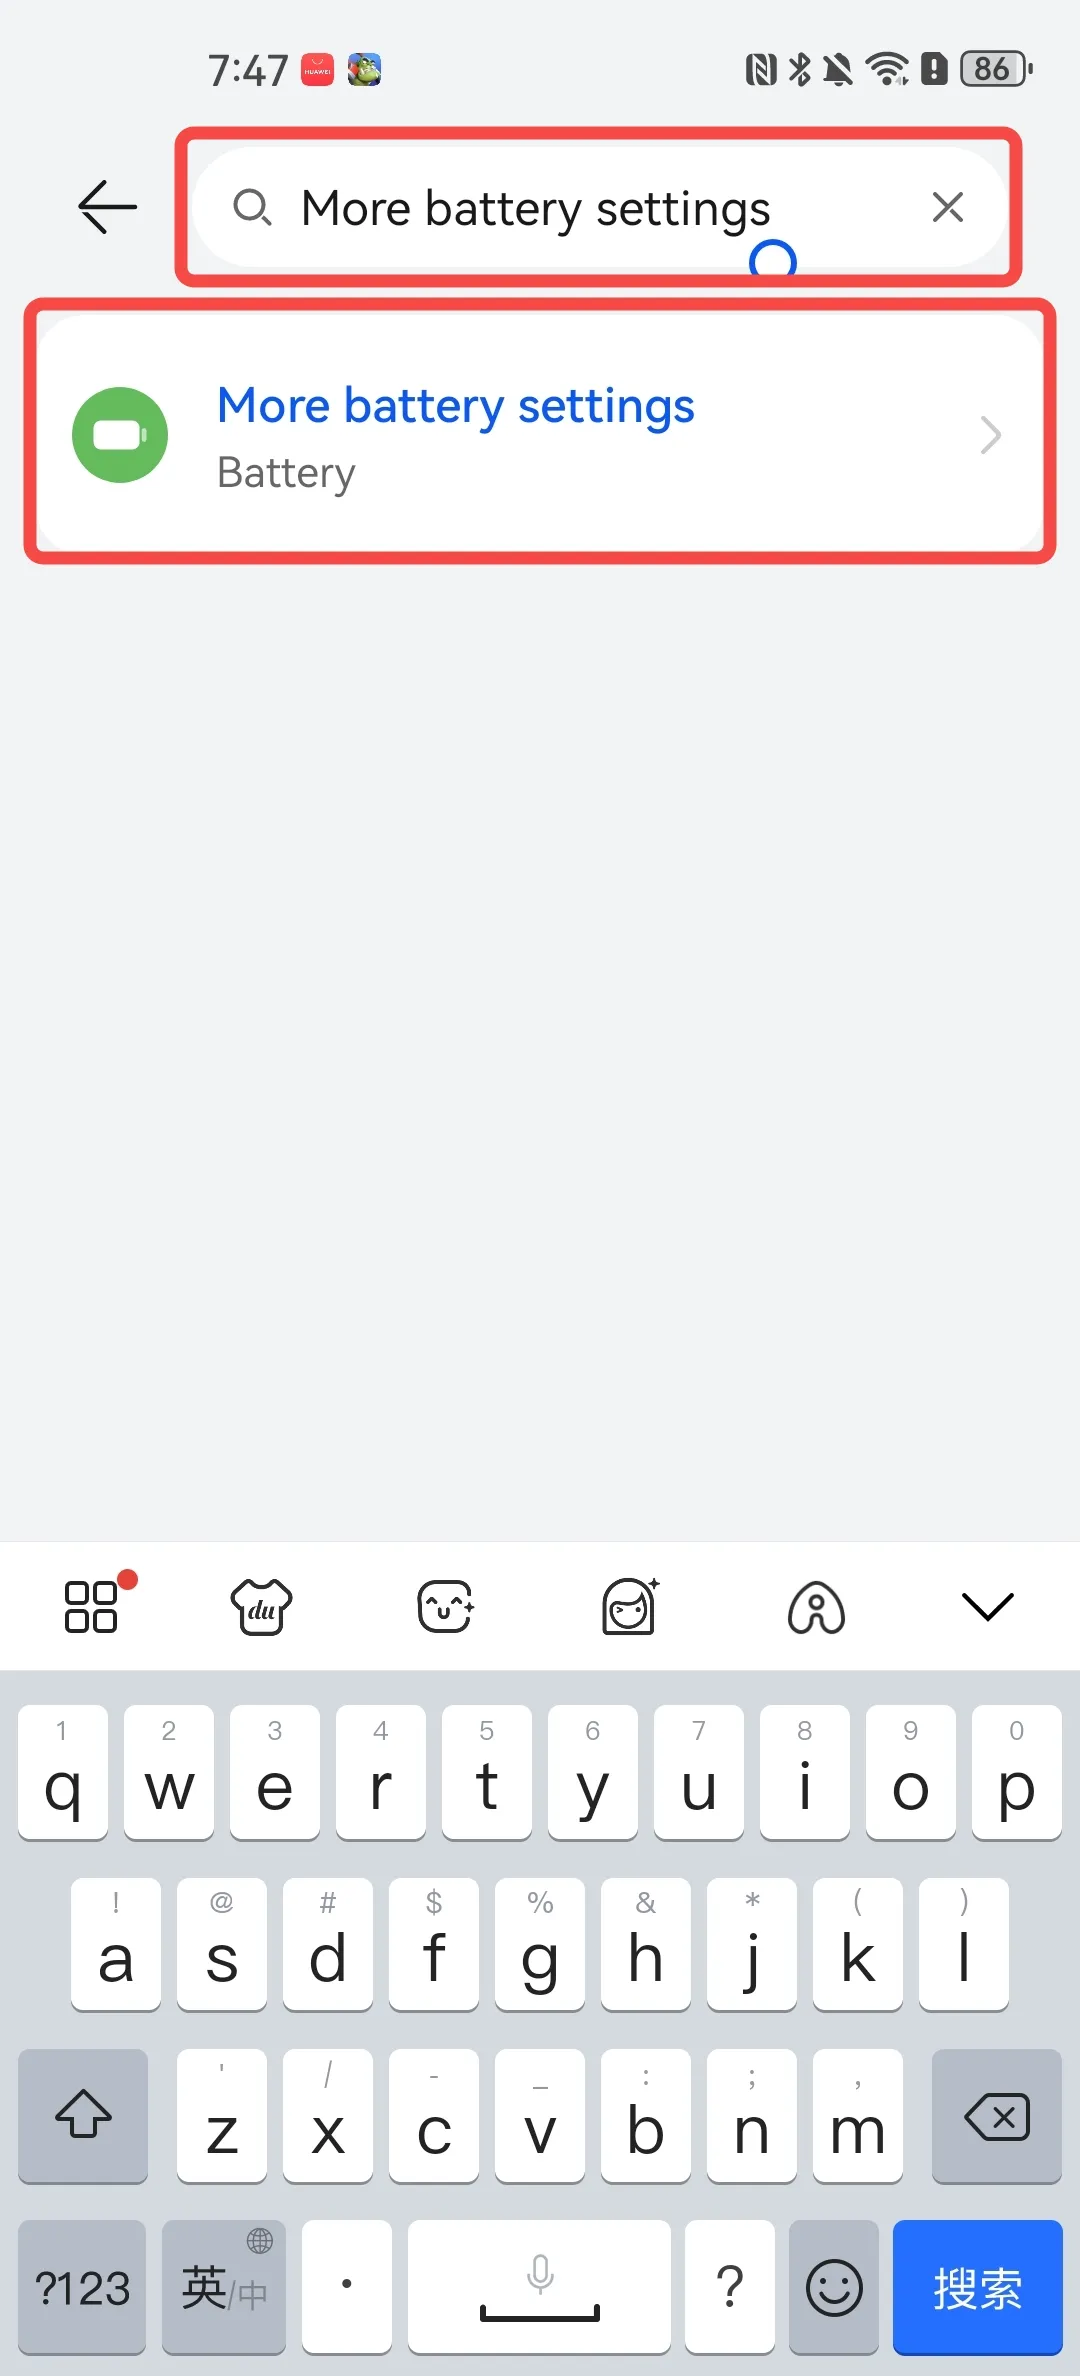
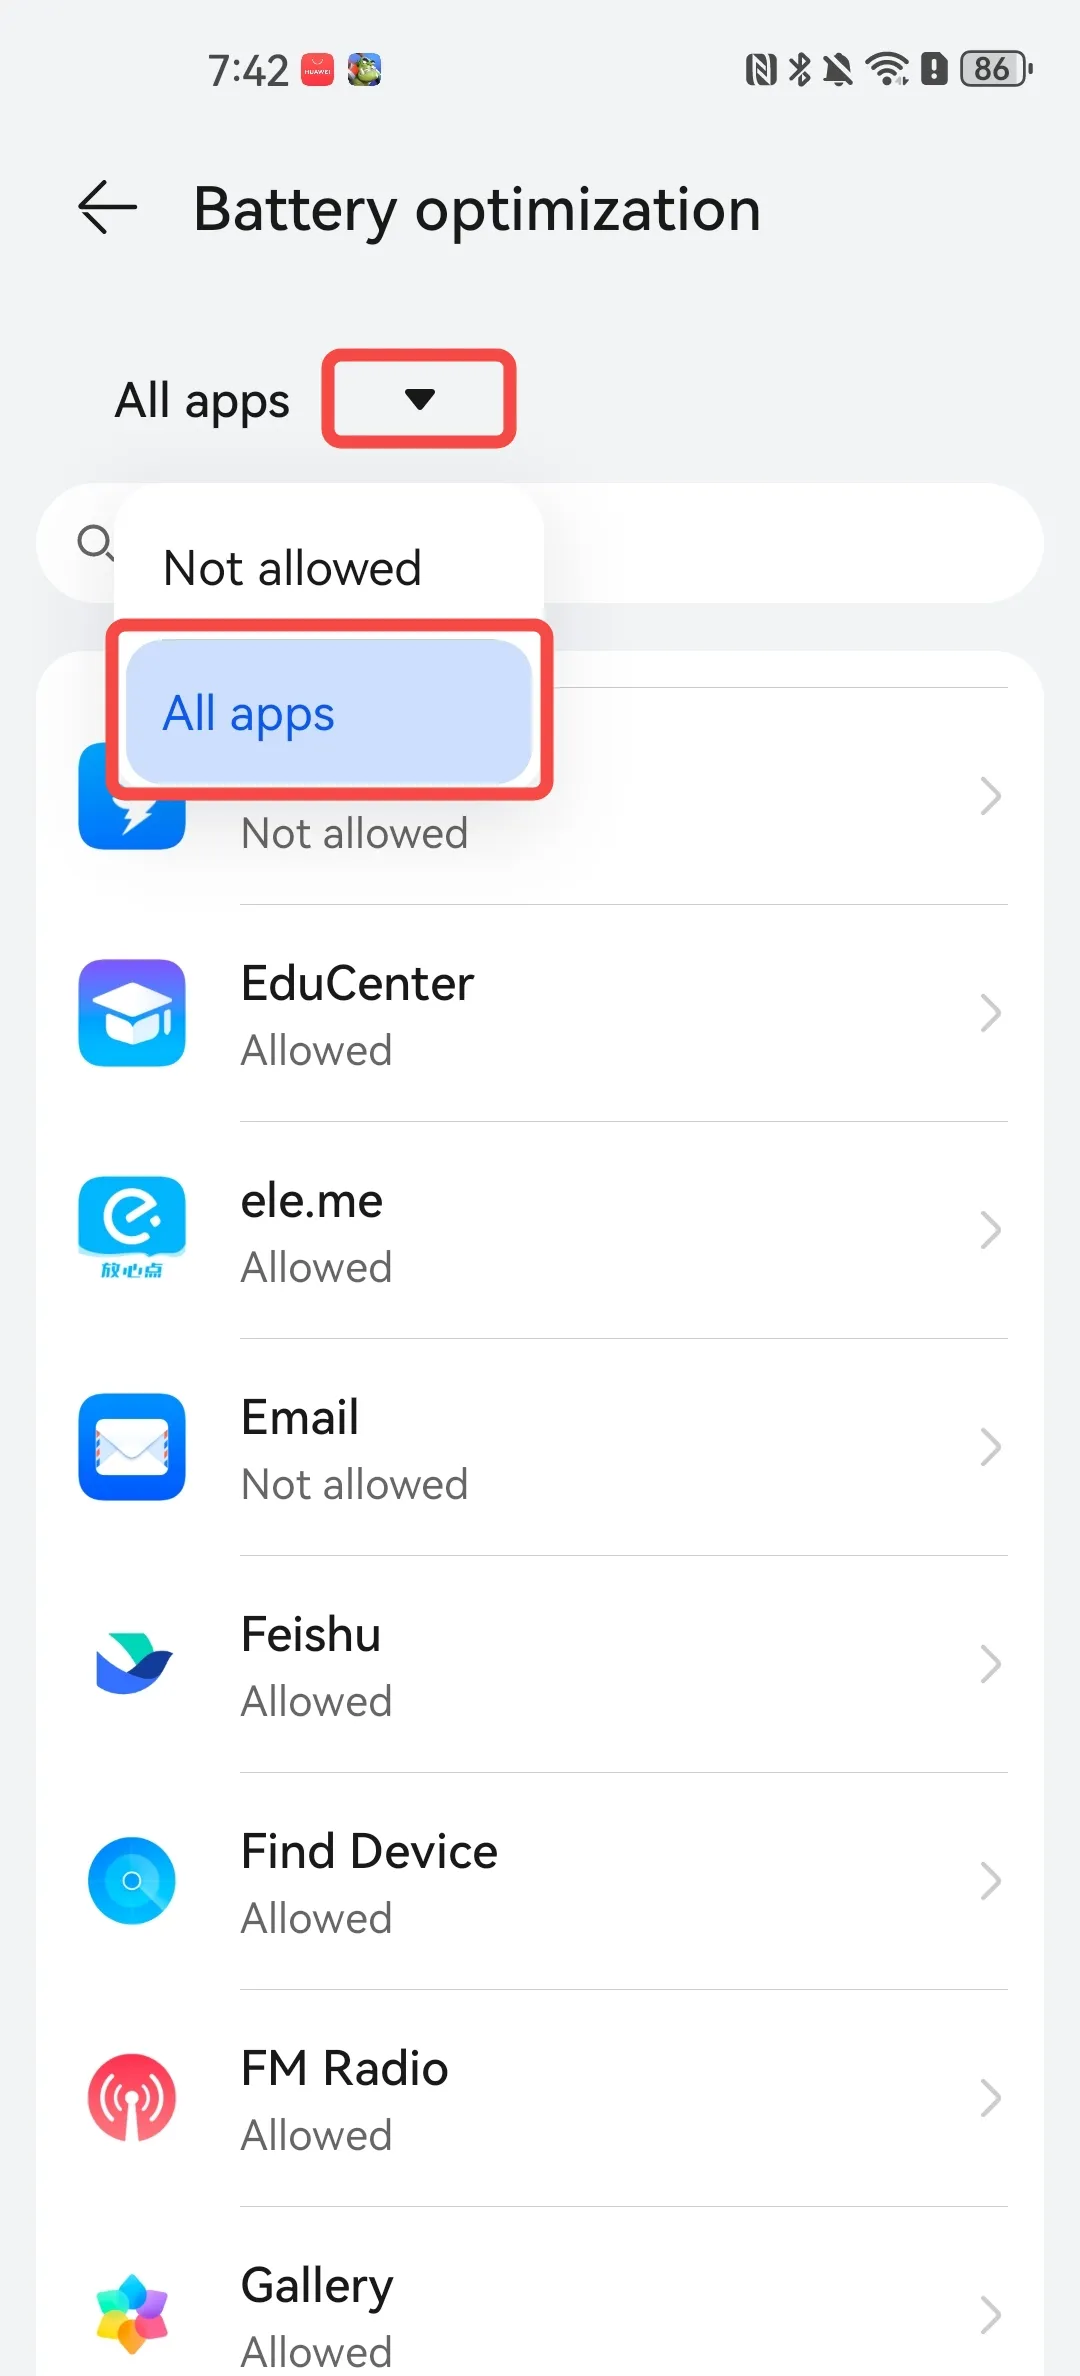
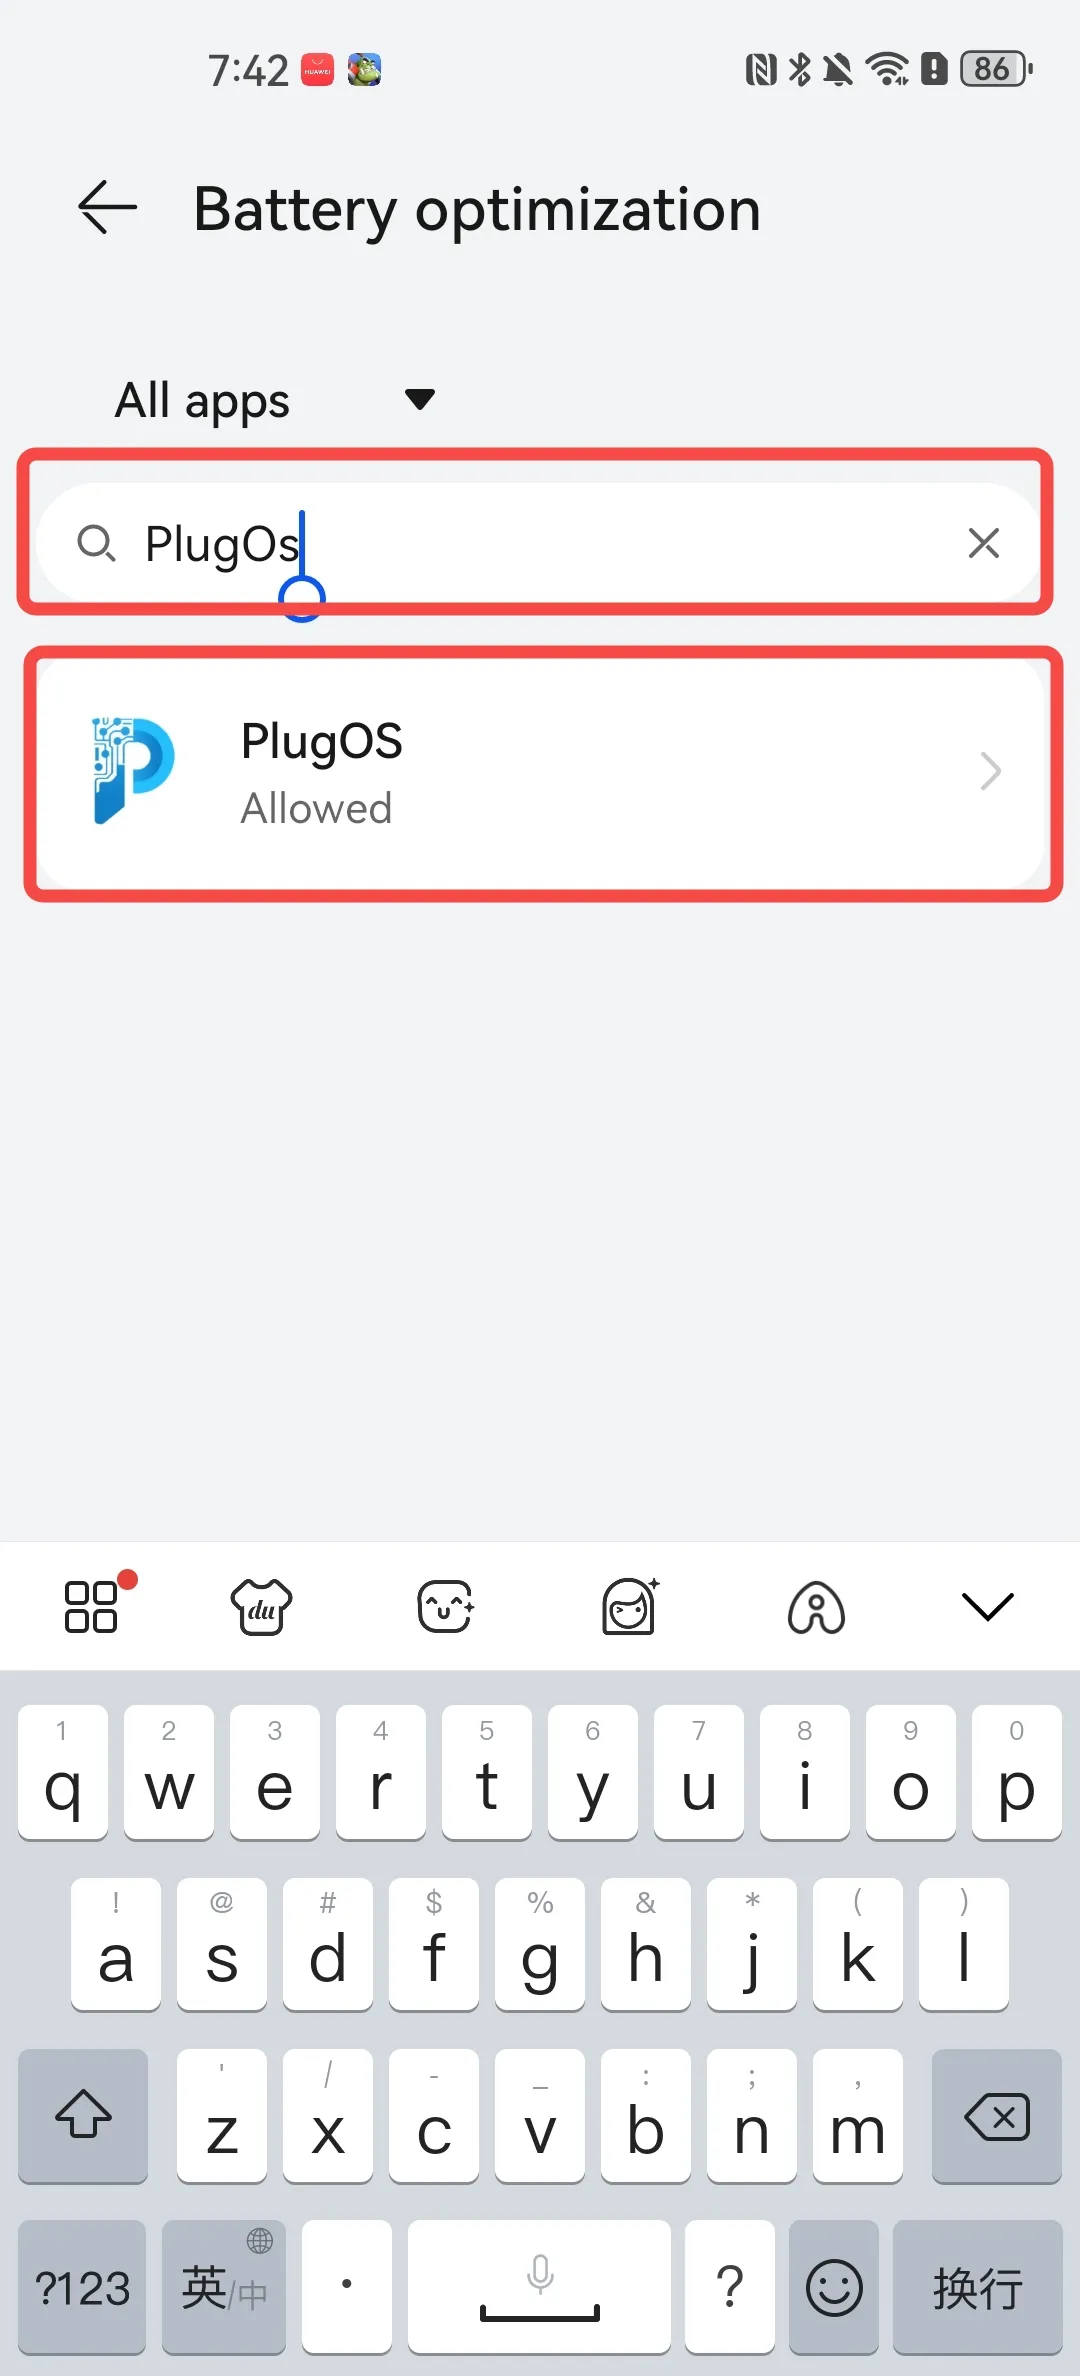
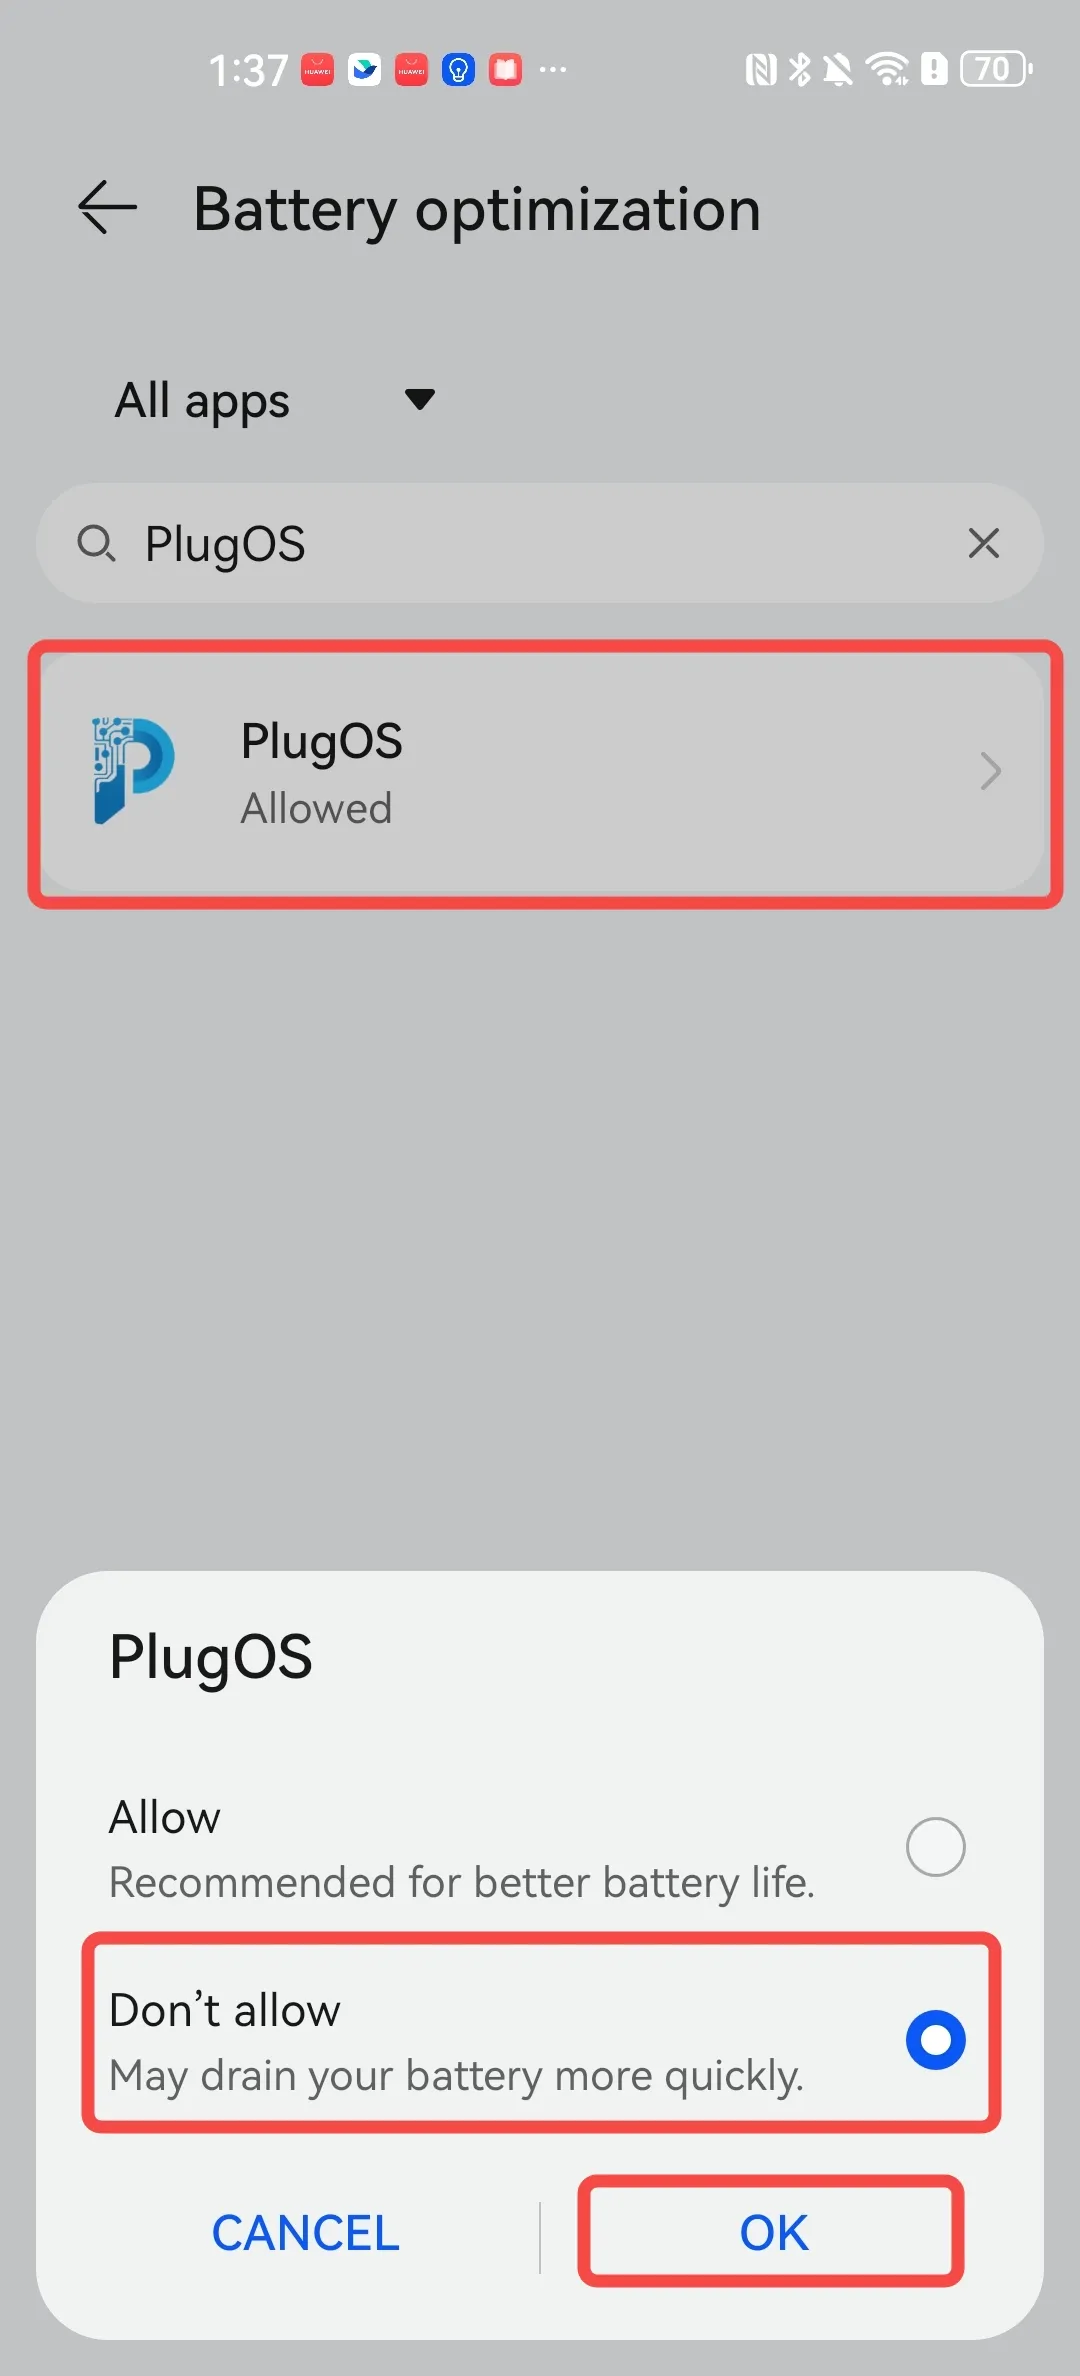
- Disable battery optimization Open 【Settings】→ Search for “More battery settings” → Tap “Top filter button” and select “All apps” → Find “PlugOS” and tap to enter → Select “Don’t allow” → Tap “OK”
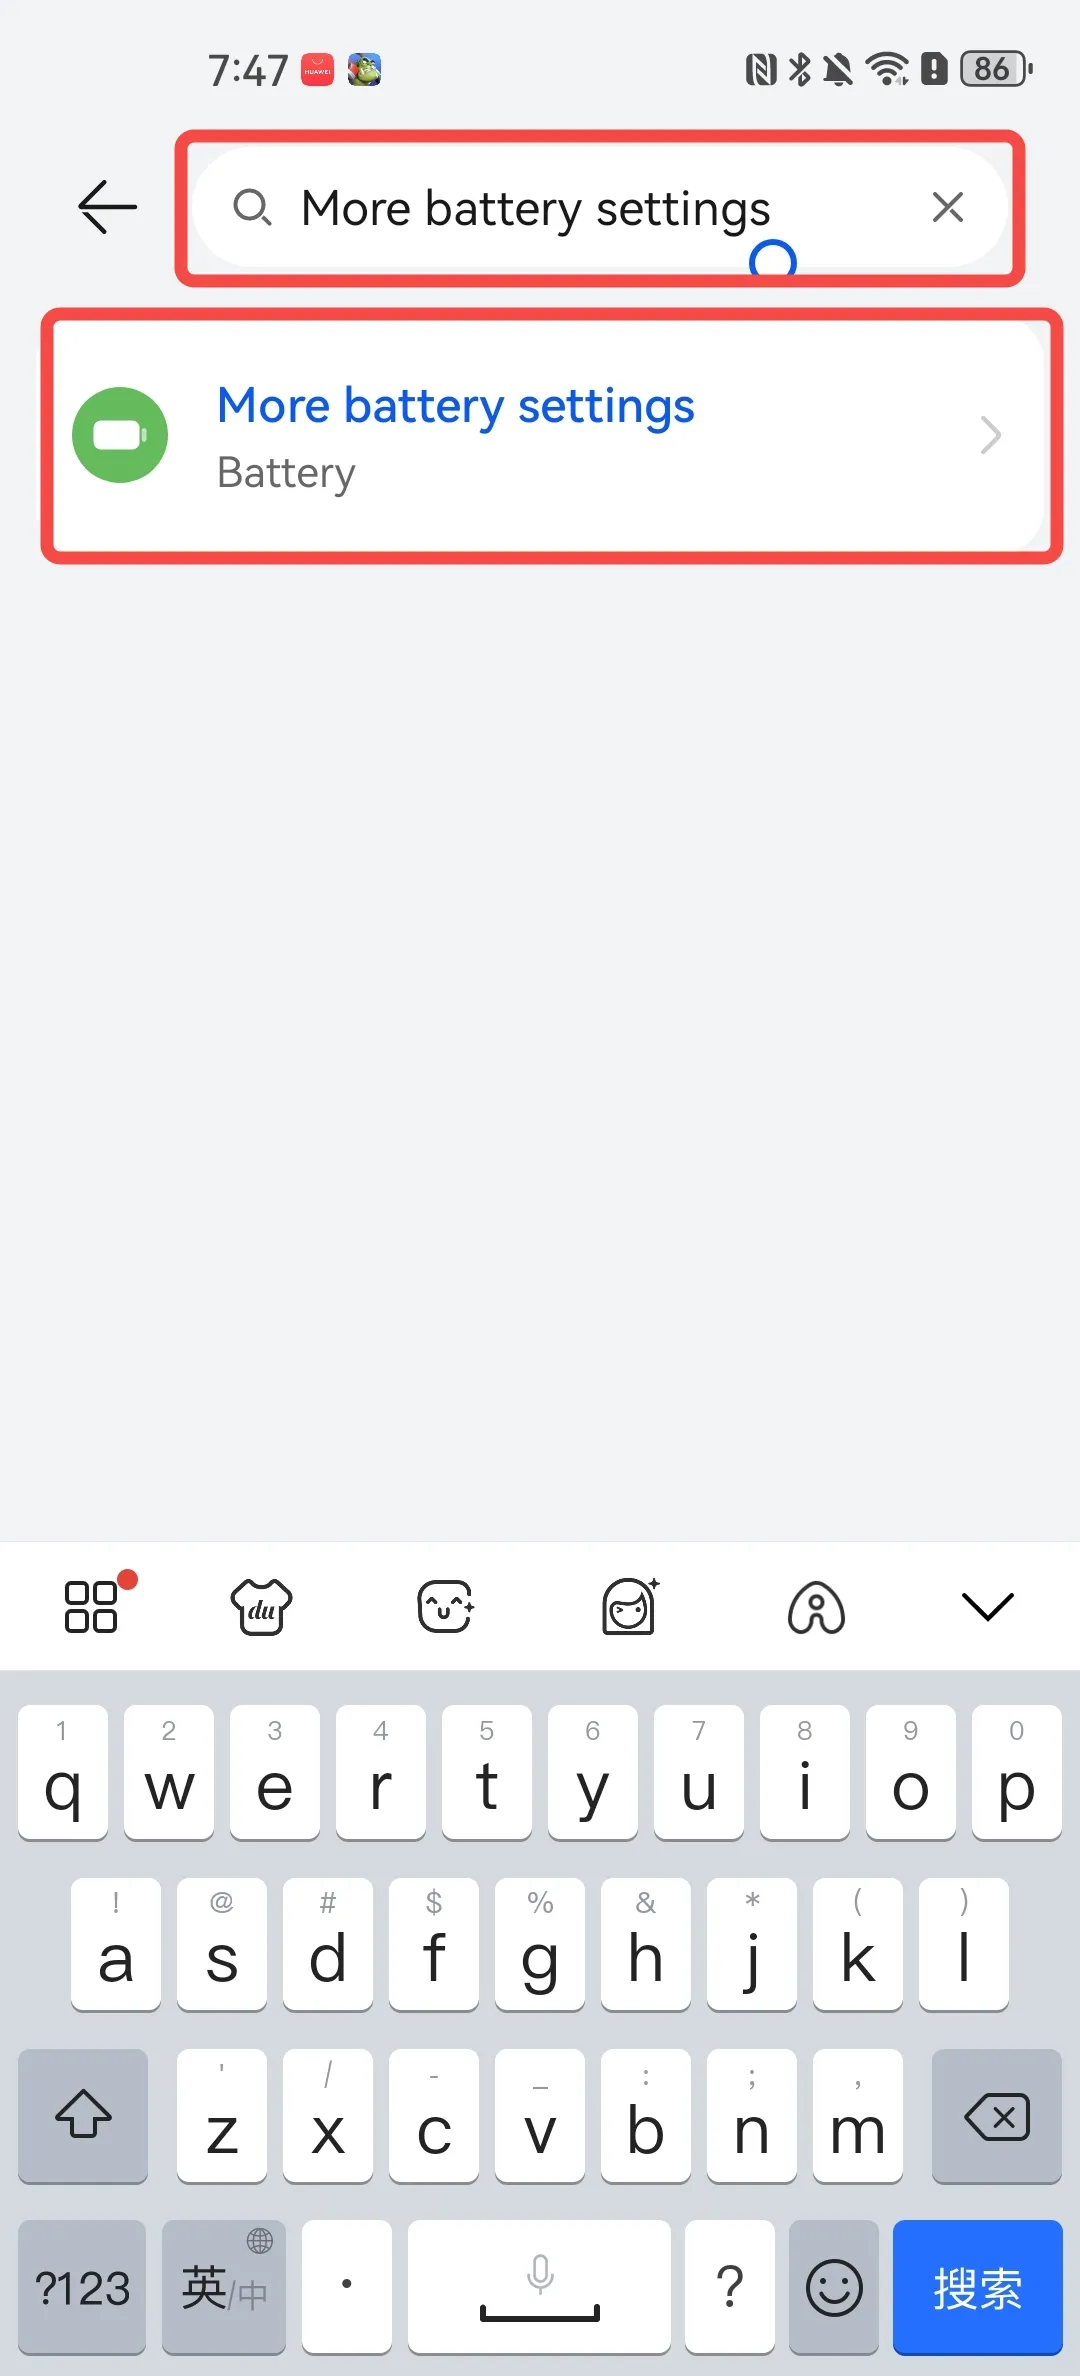
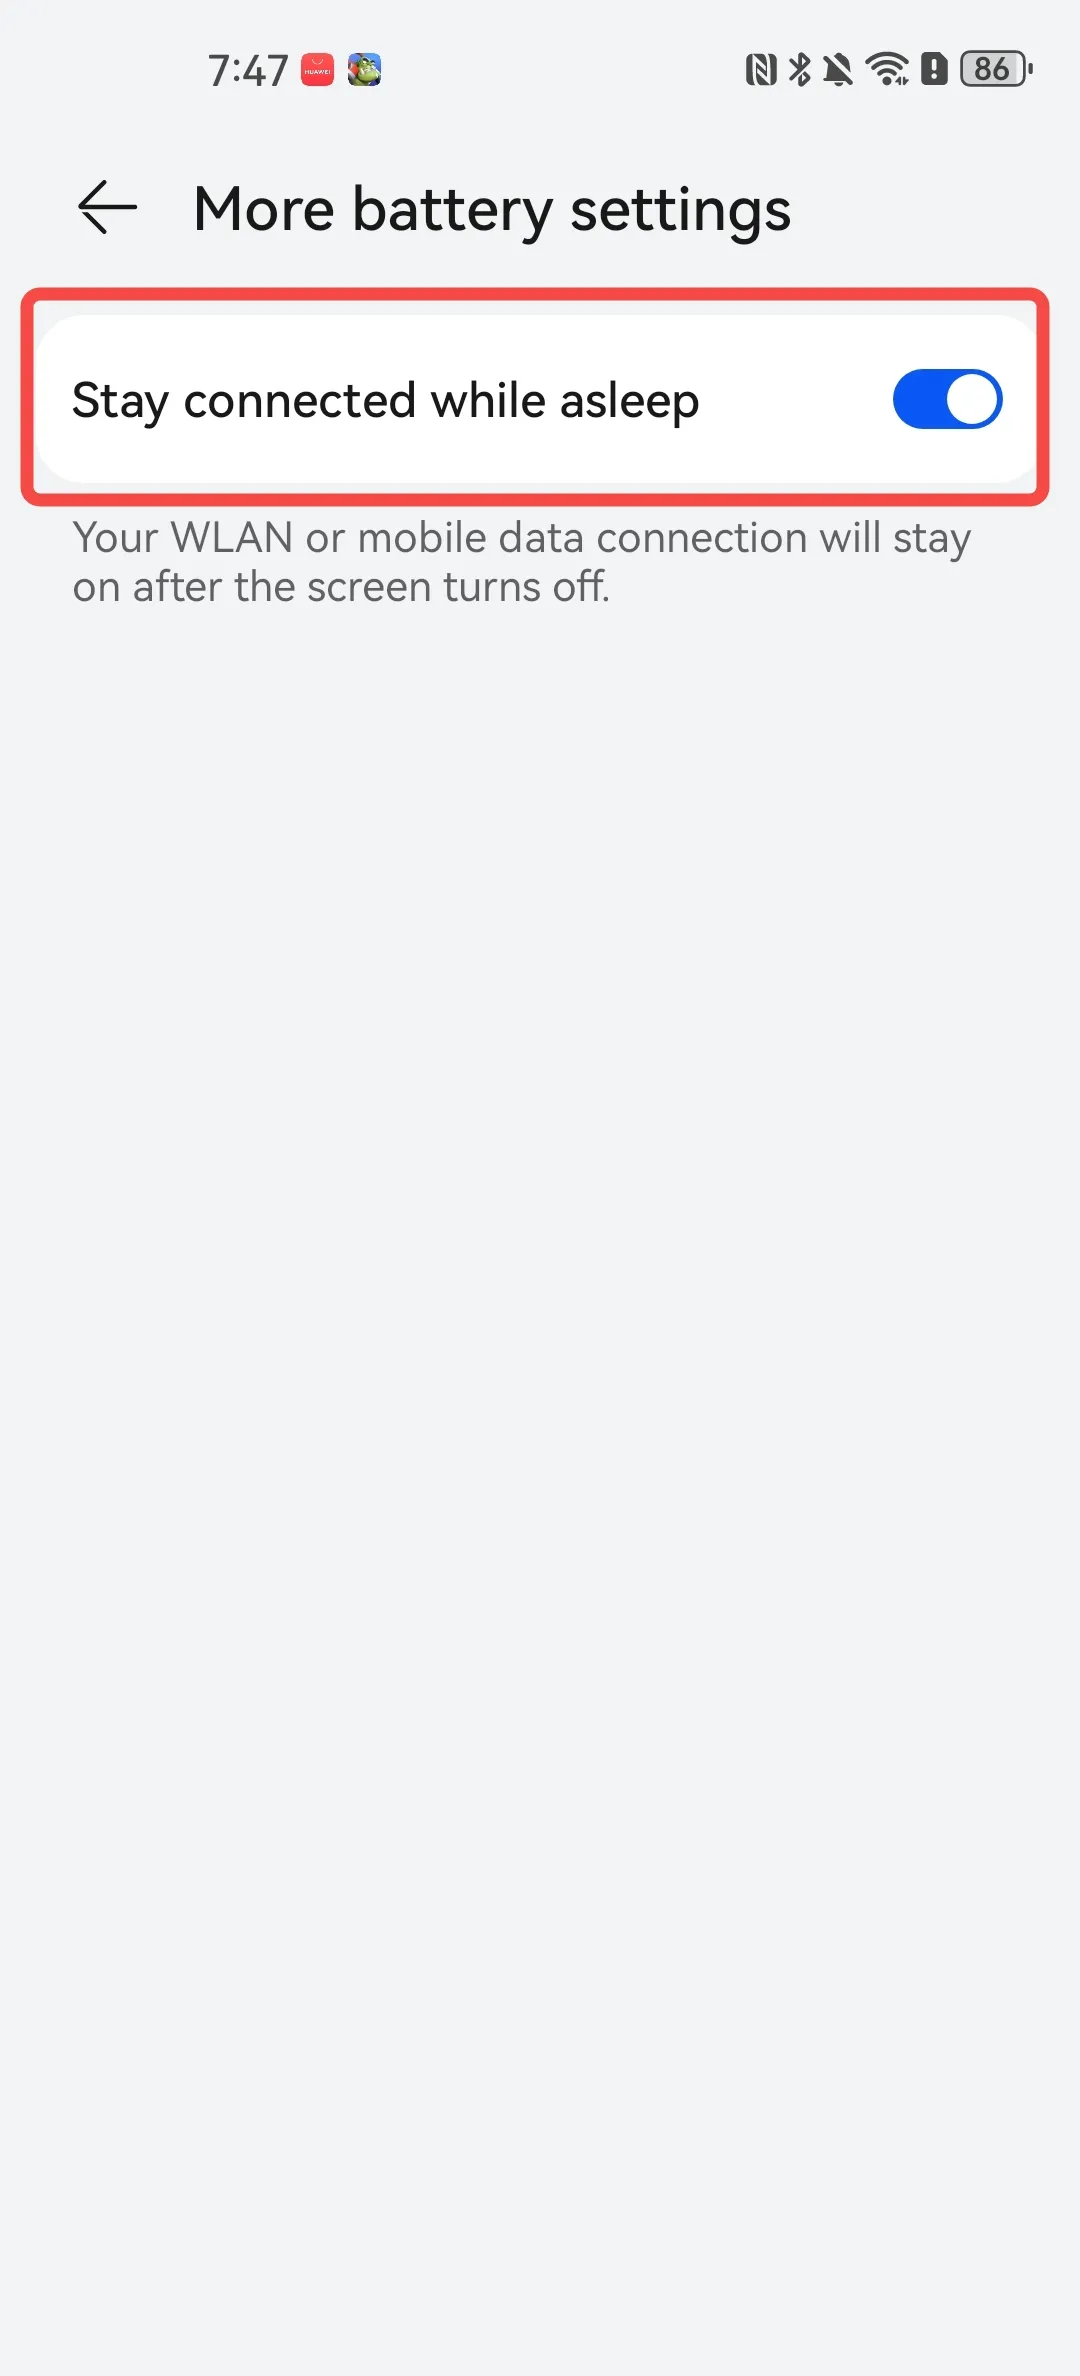
- Maintain network connection during sleep Open 【Settings】→ Search for “More battery settings” → Tap to enable “Stay connected when screen is off”
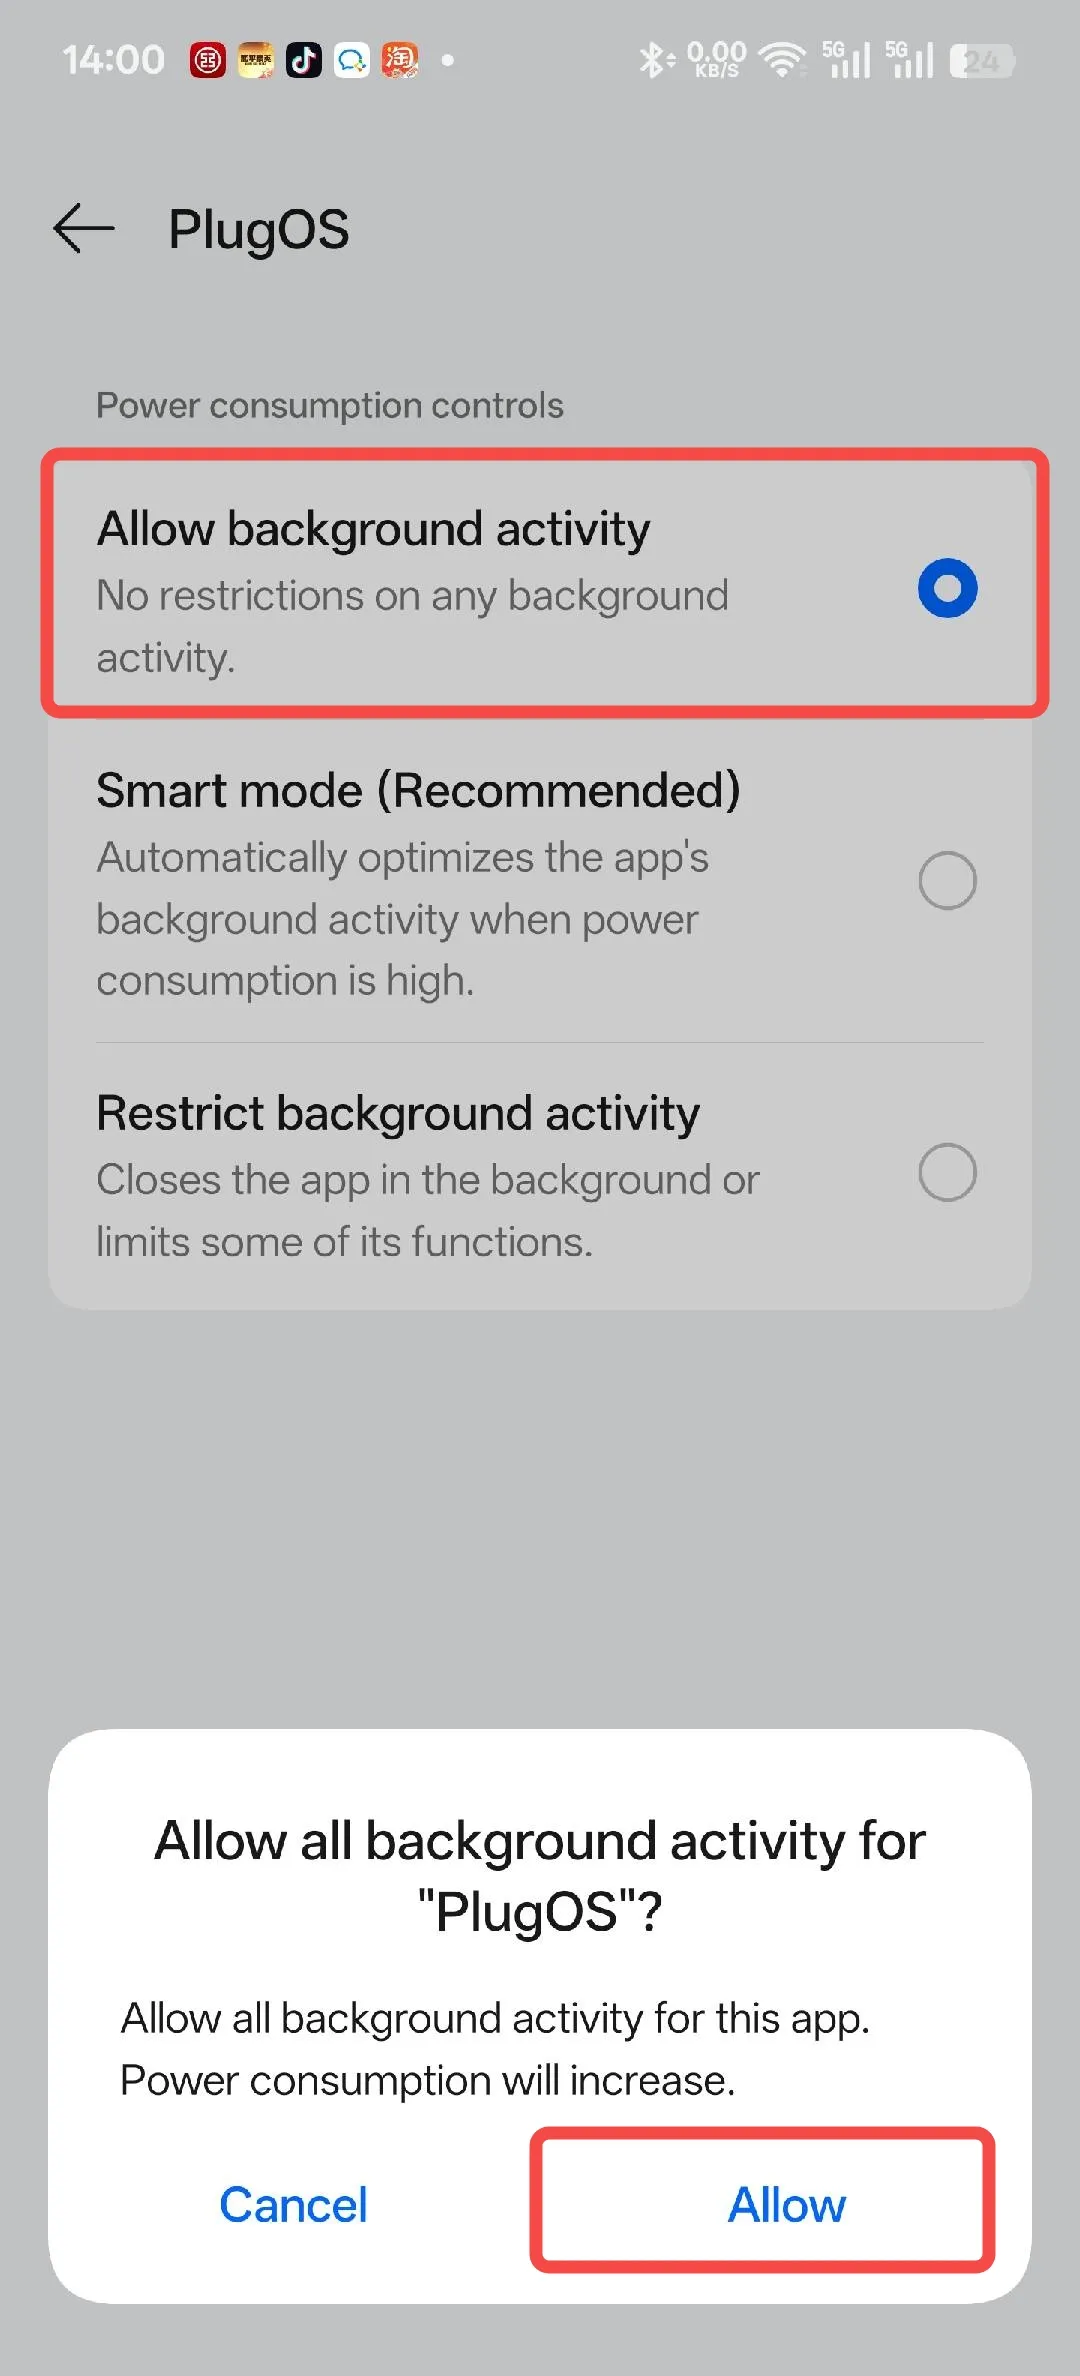
2. OPPO/OnePlus Phones
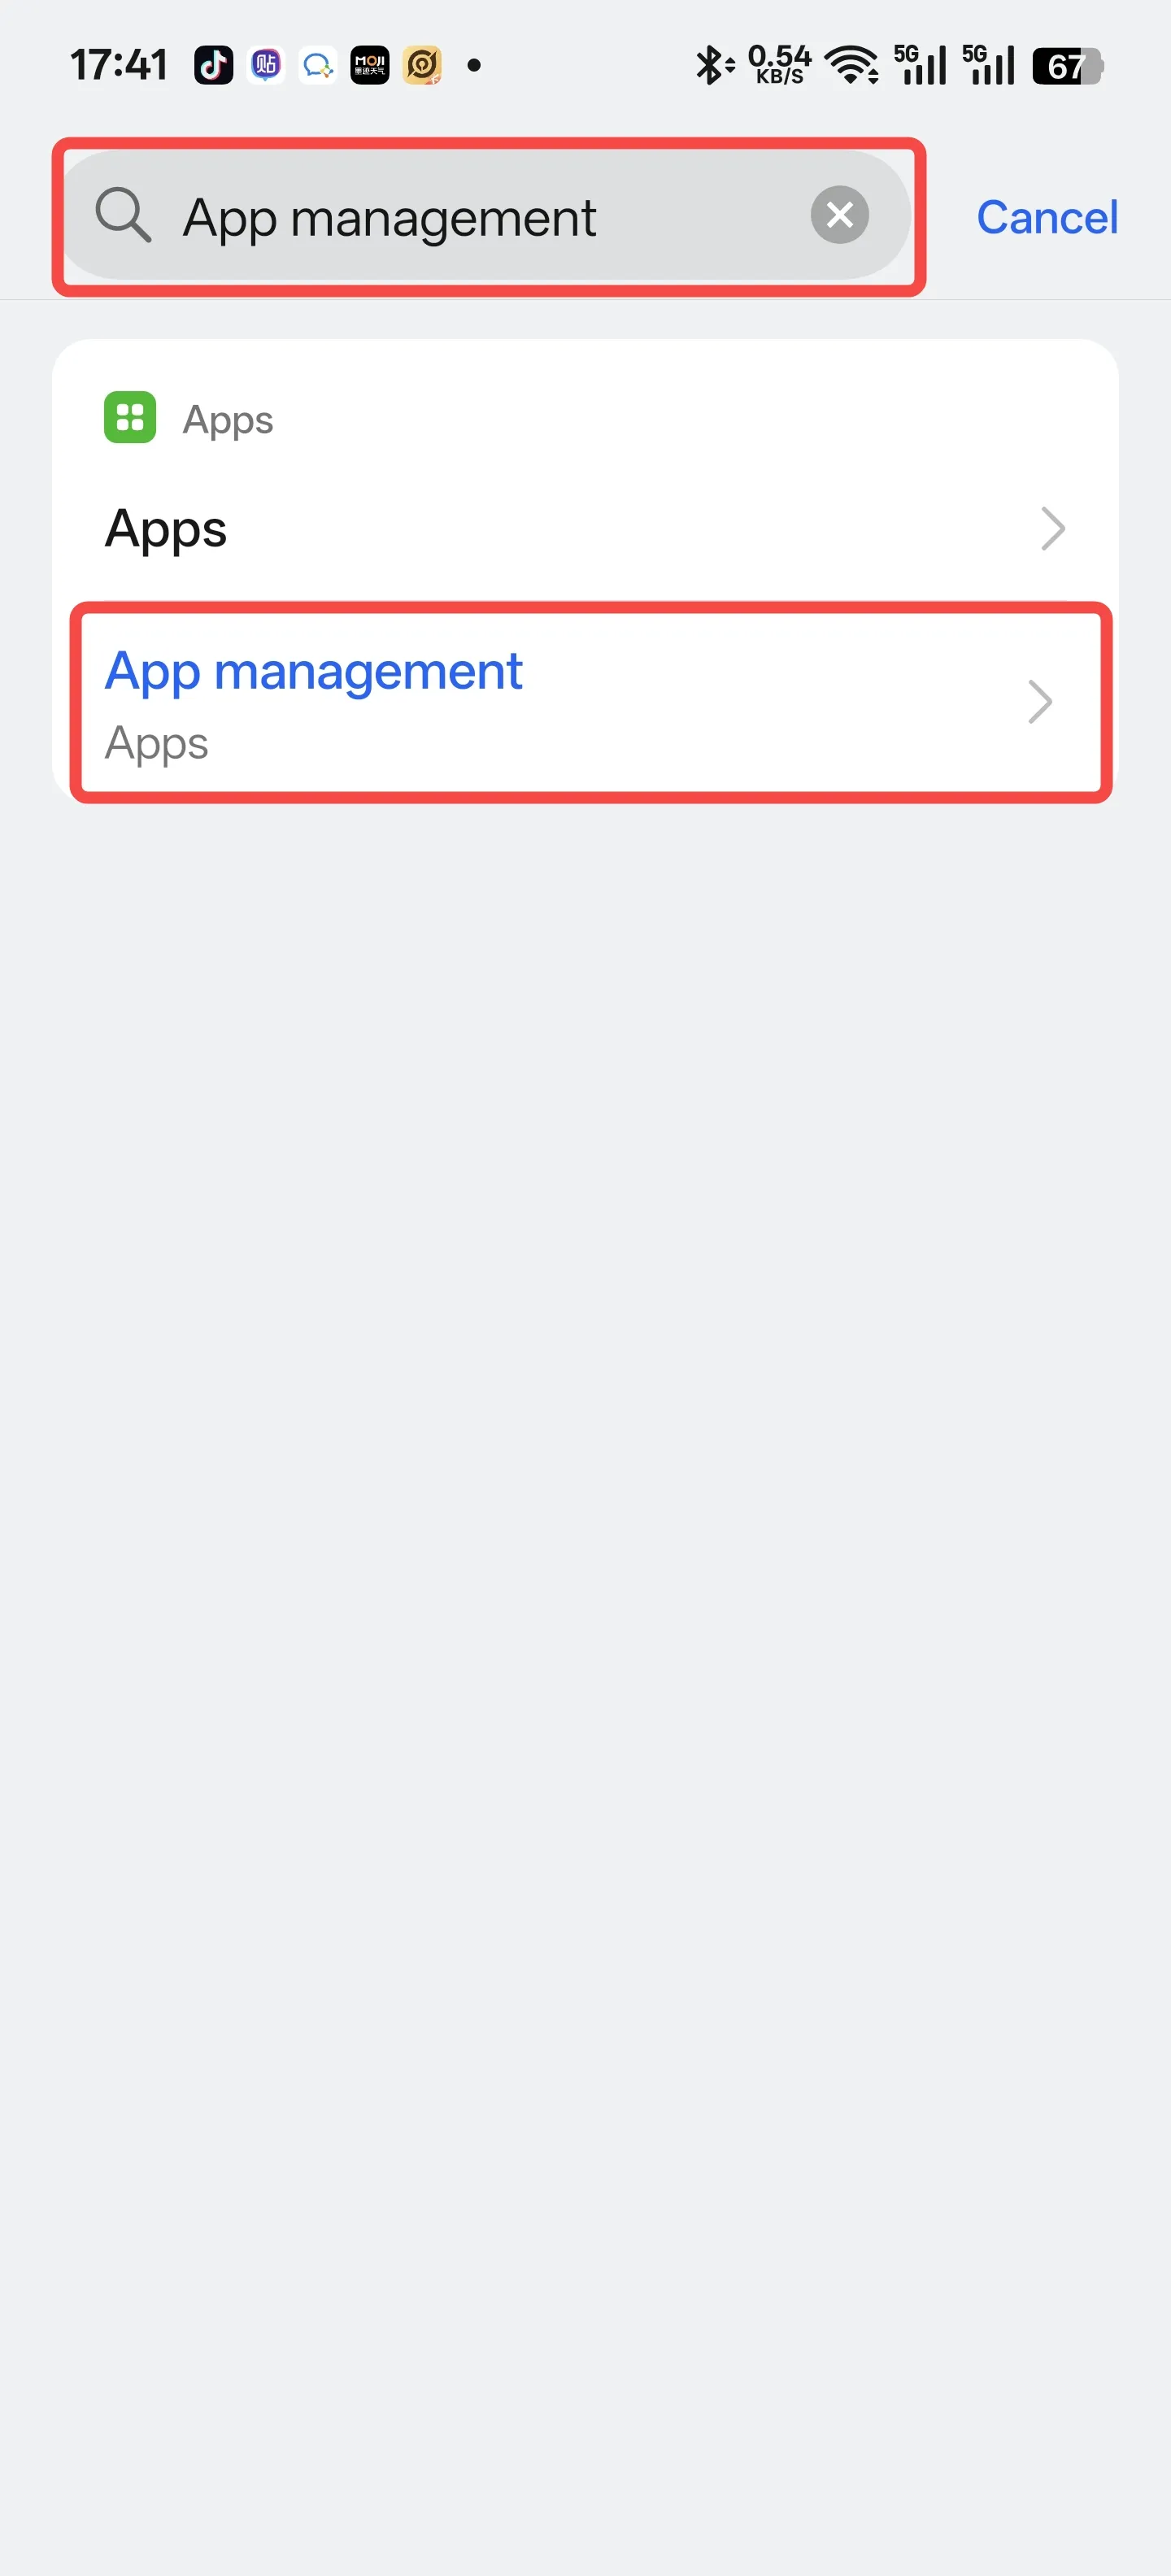
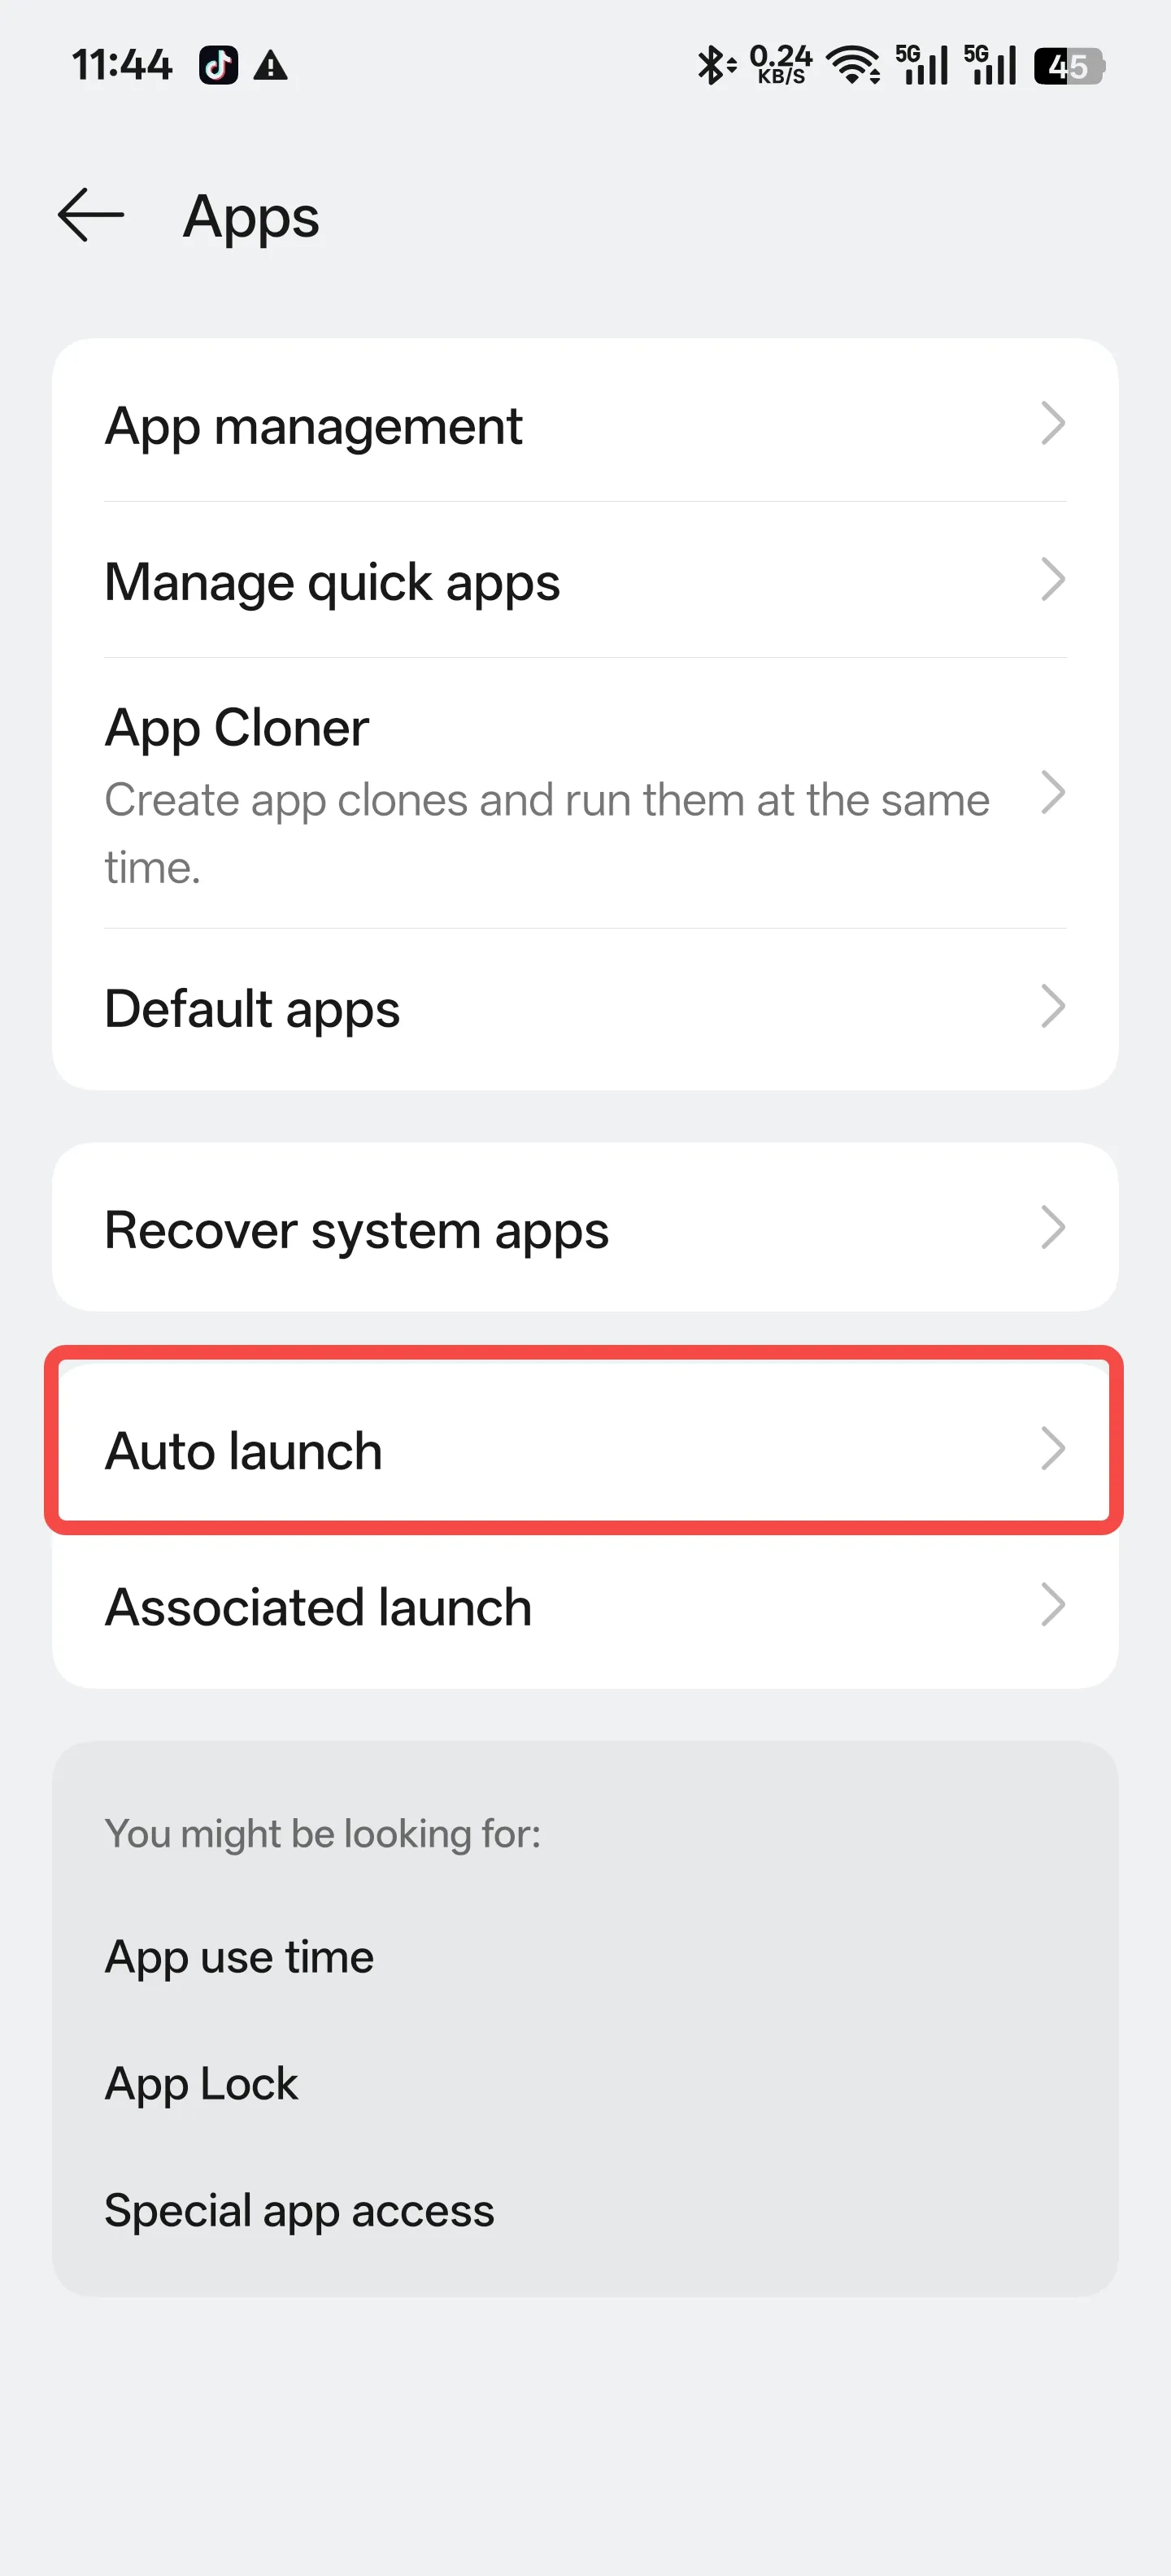
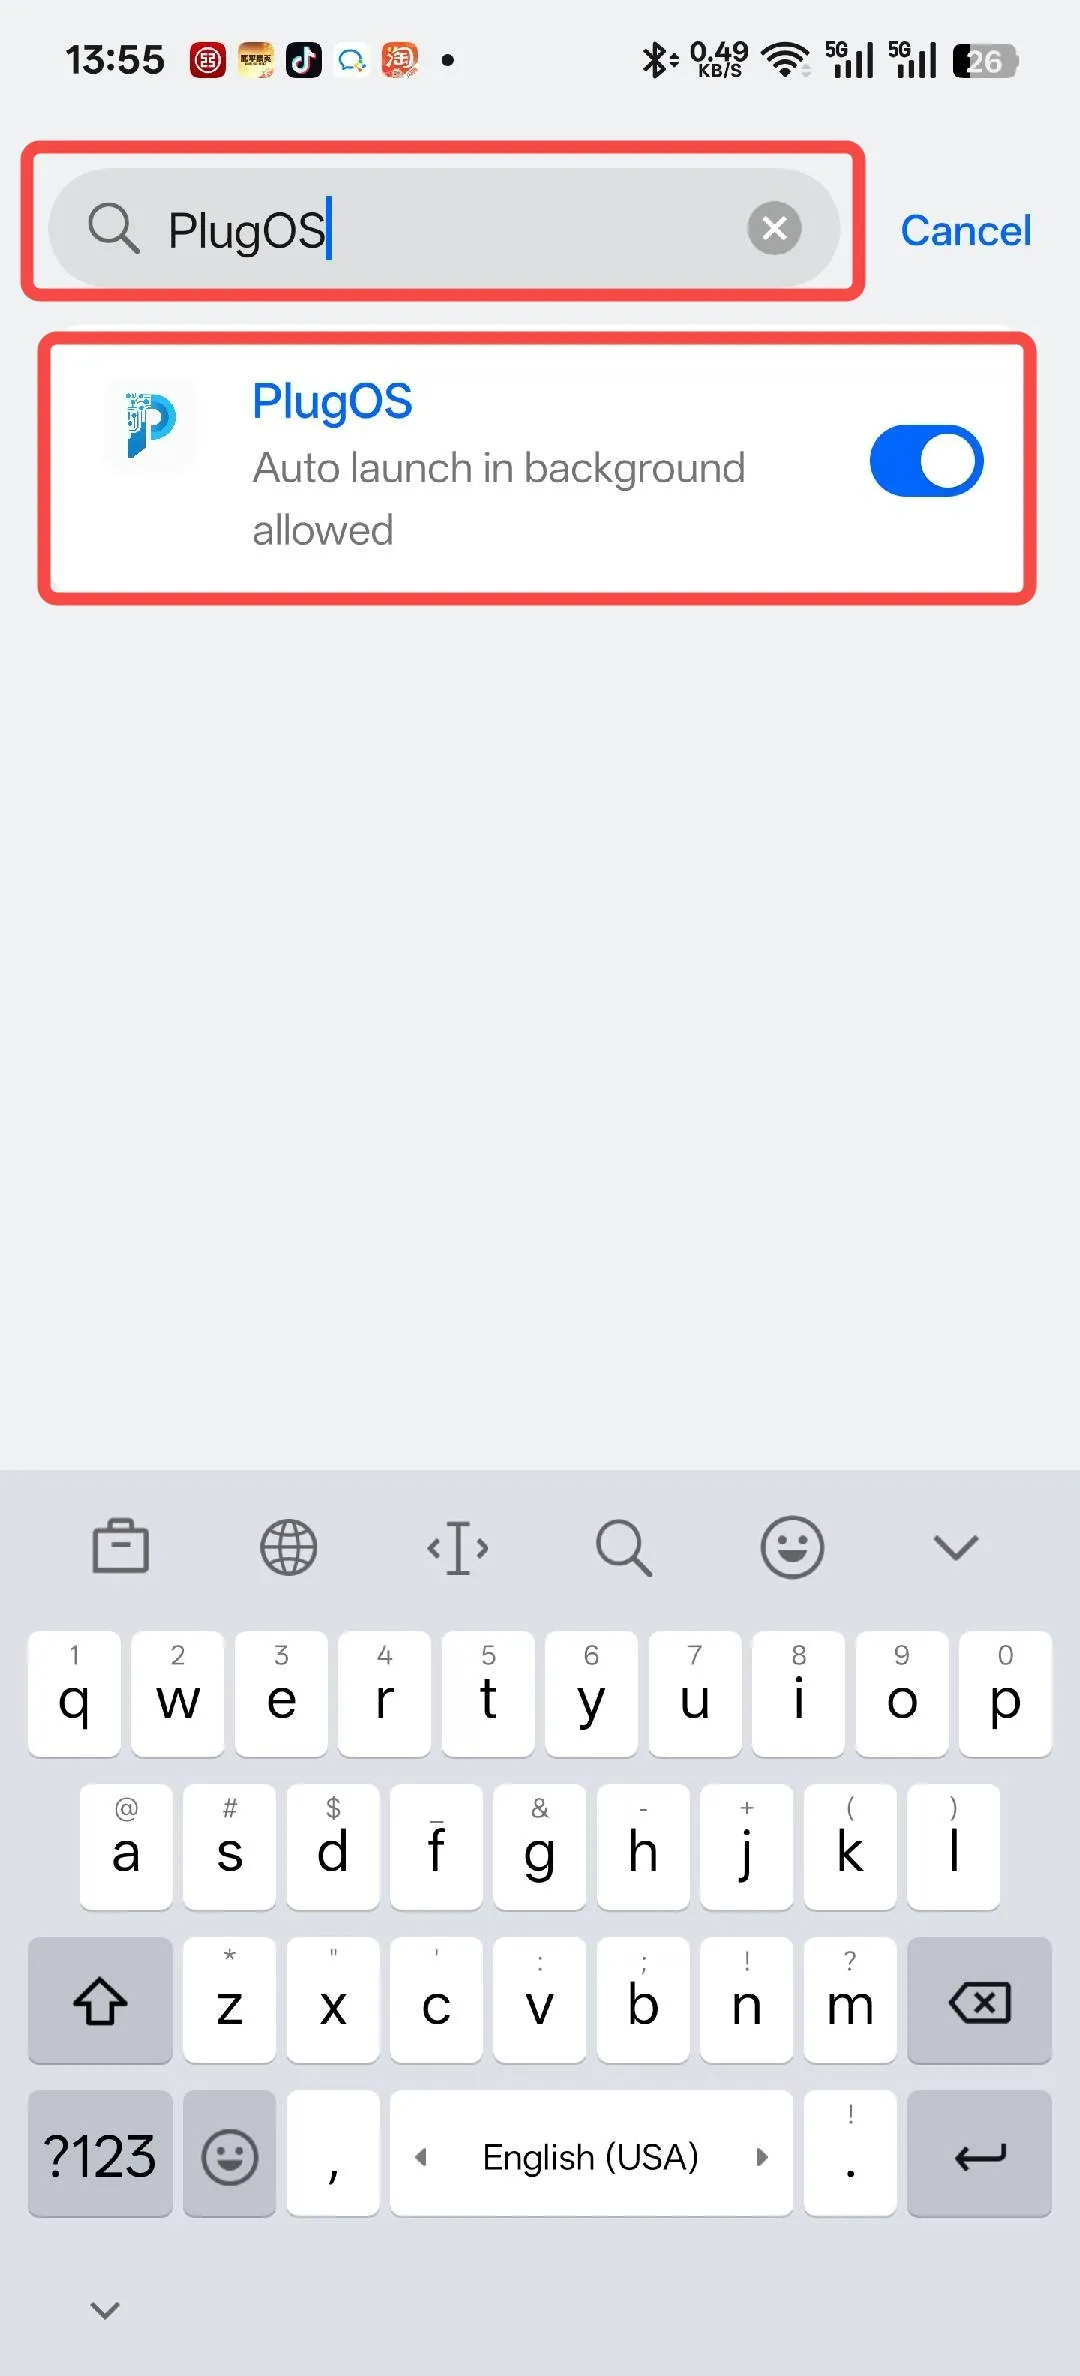
- Enable auto-launch permission Open 【Settings】→ Search for “App management” → Tap to enter “Auto launch” → Find “PlugOS” and tap to enter → Tap to enable “Auto launch in background allowed”
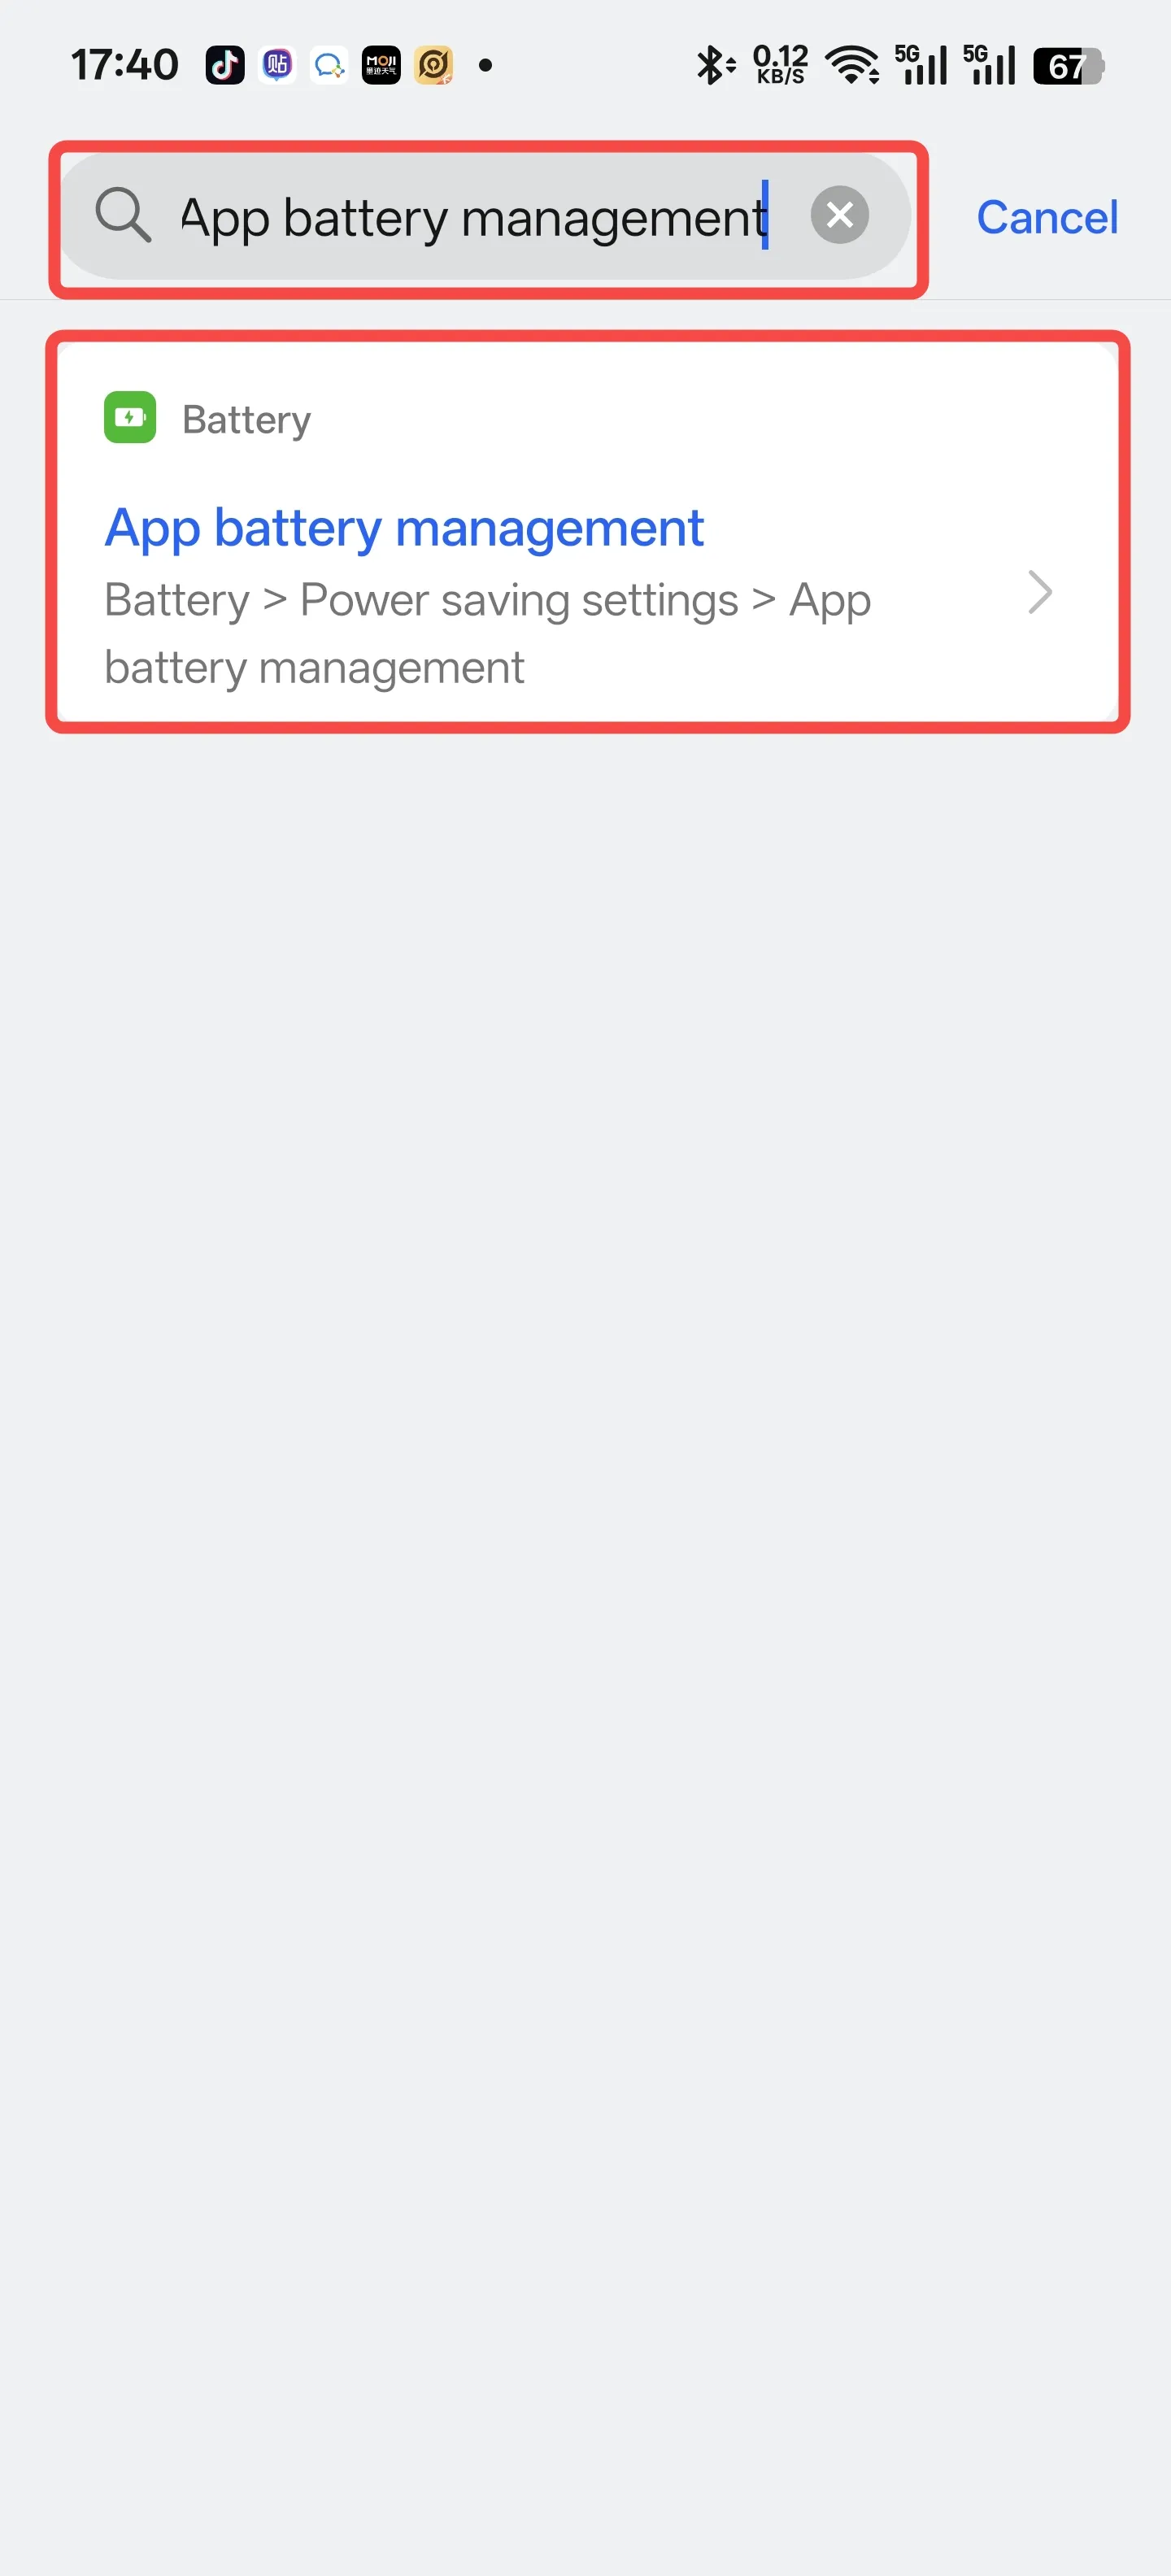
- Allow background high power consumption Open 【Settings】→ Search for “APP battery management” → Find “PlugOS” and tap to enter → Select “Allow background activity” → Tap “Allow”
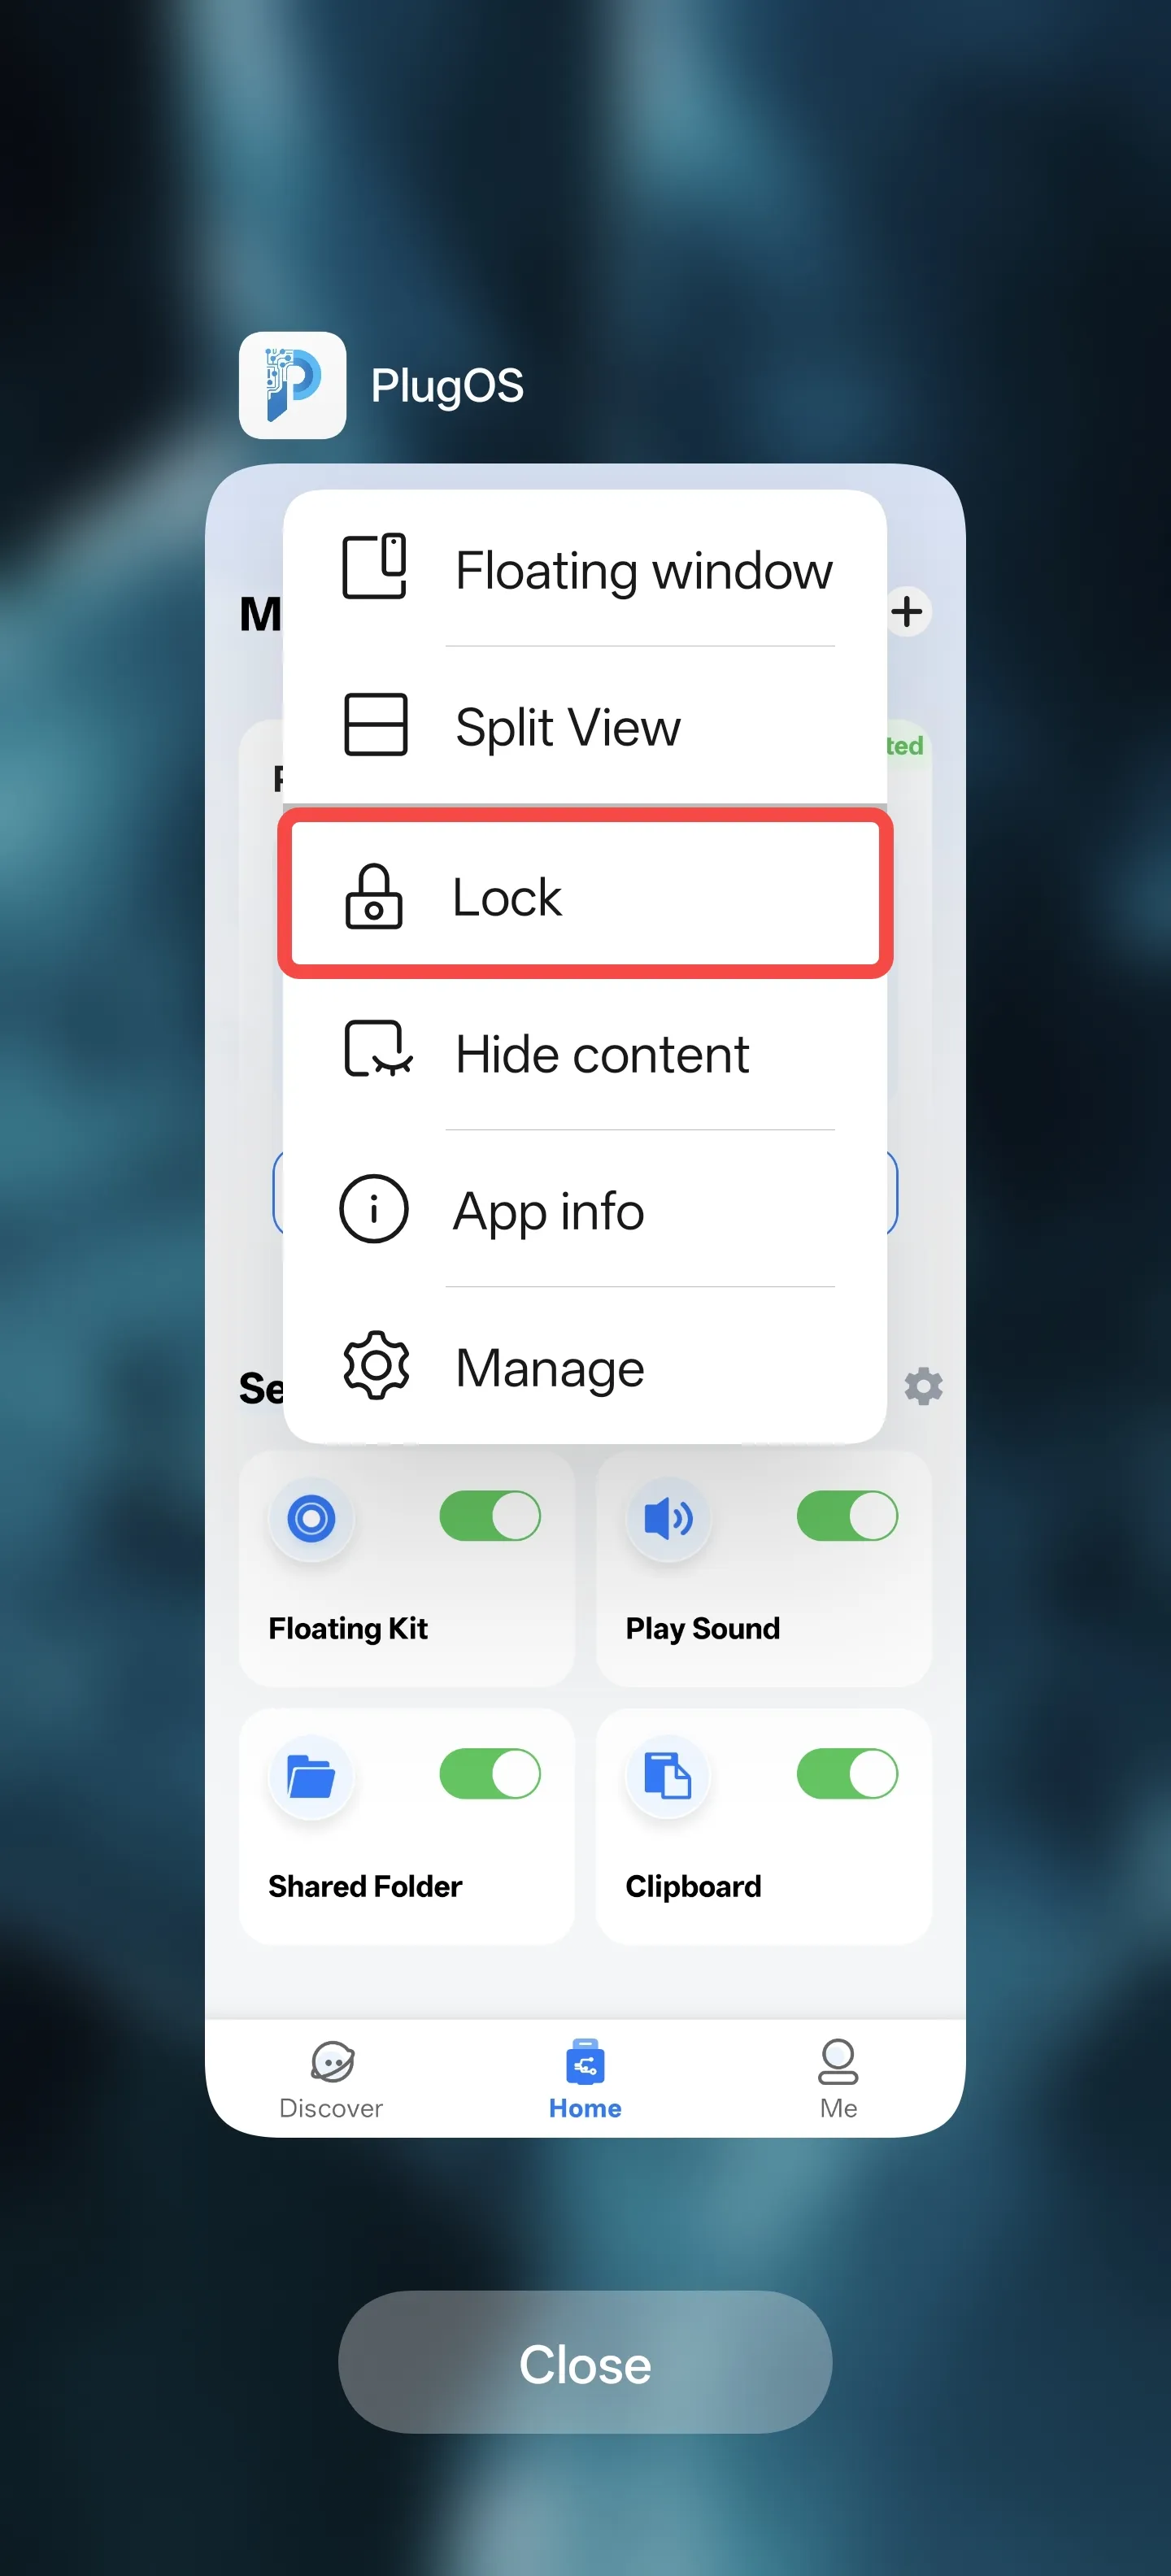
- Lock app in background Swipe up from the bottom of the screen to open the recent apps screen → Tap the icon above “PlugOS” → Tap “Lock”
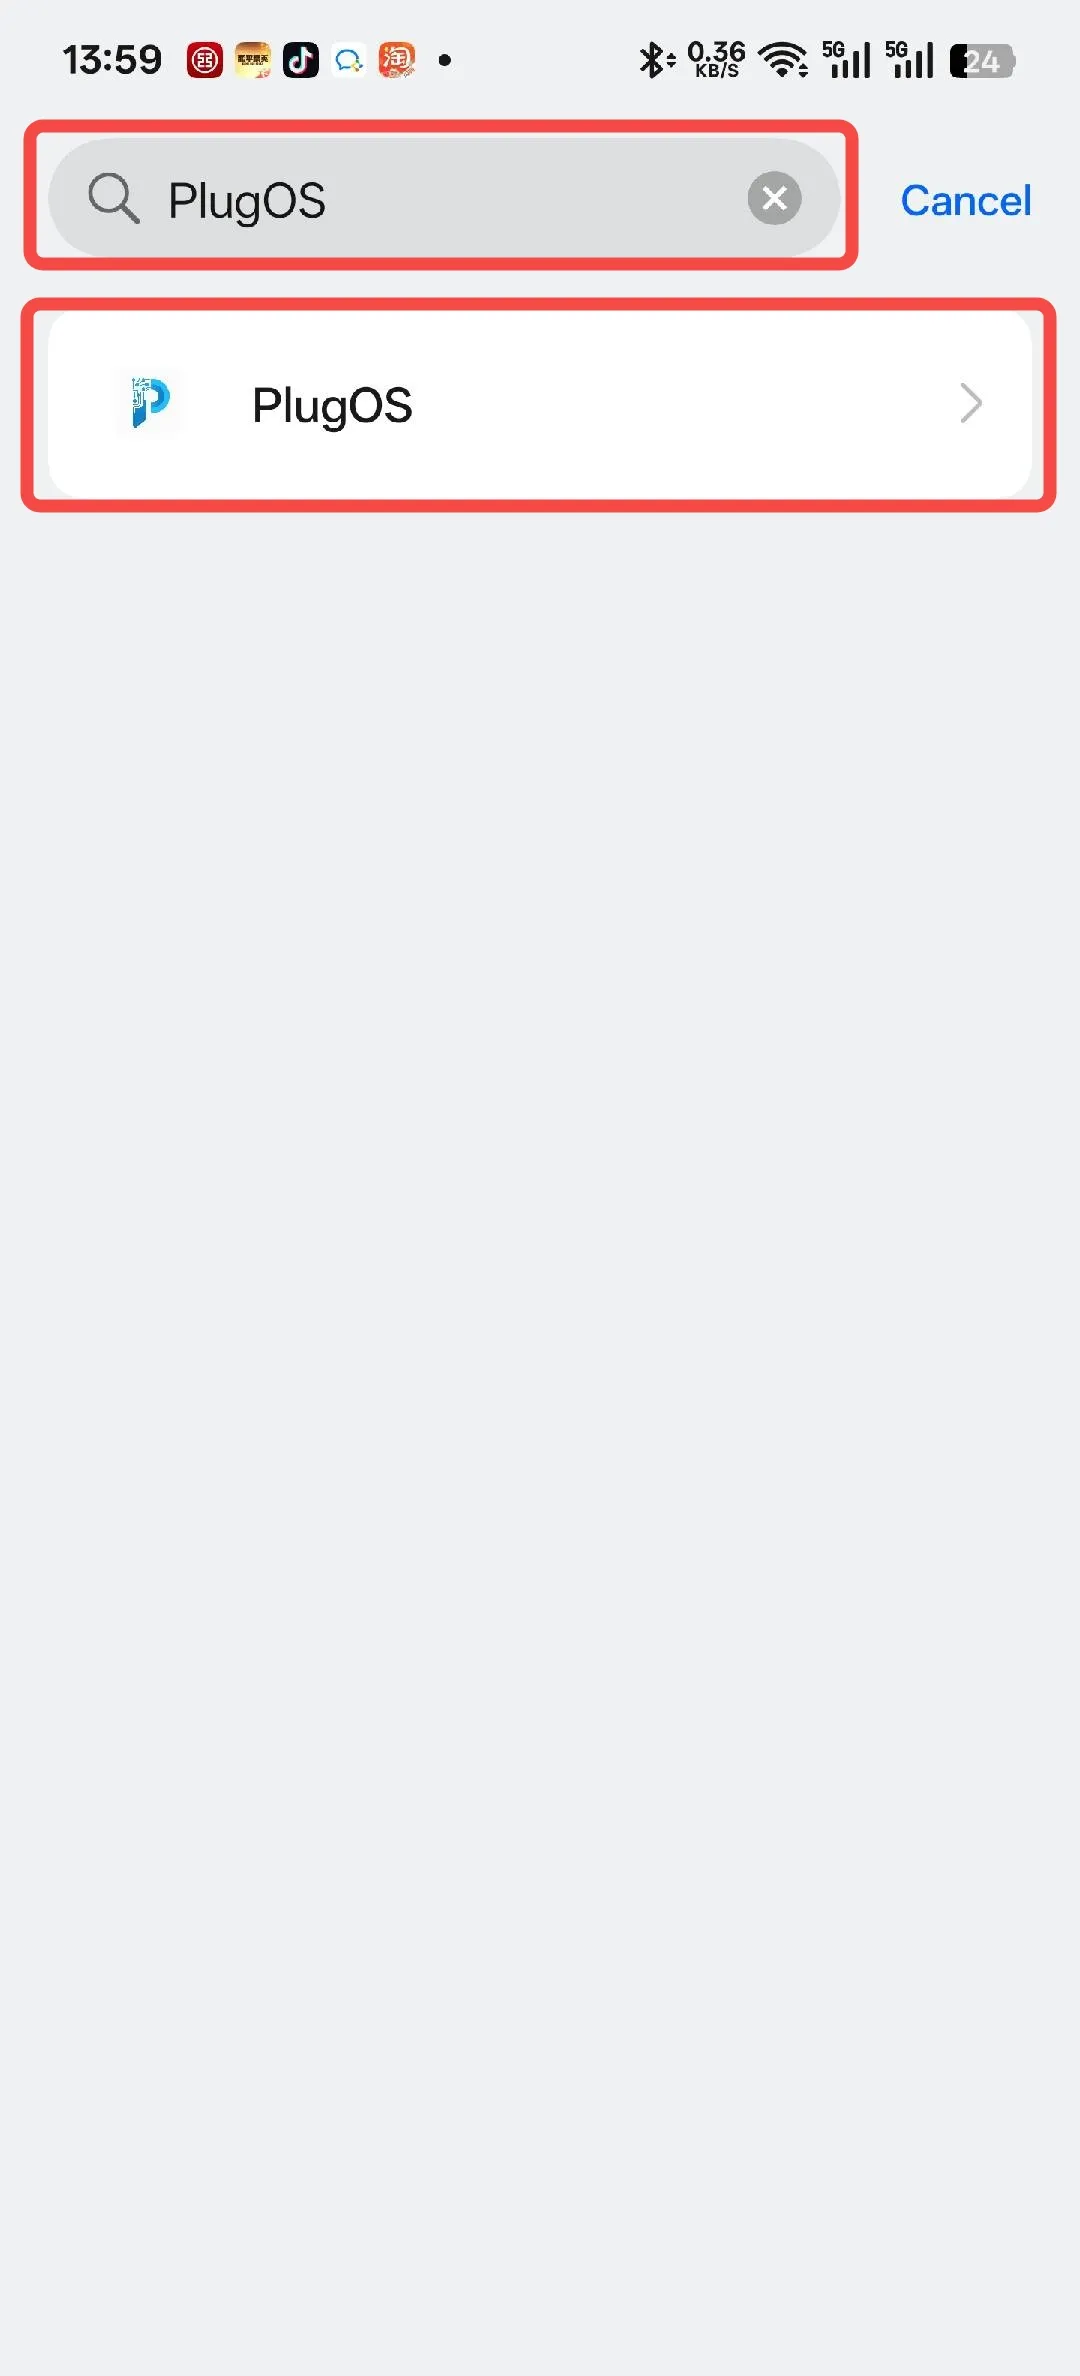
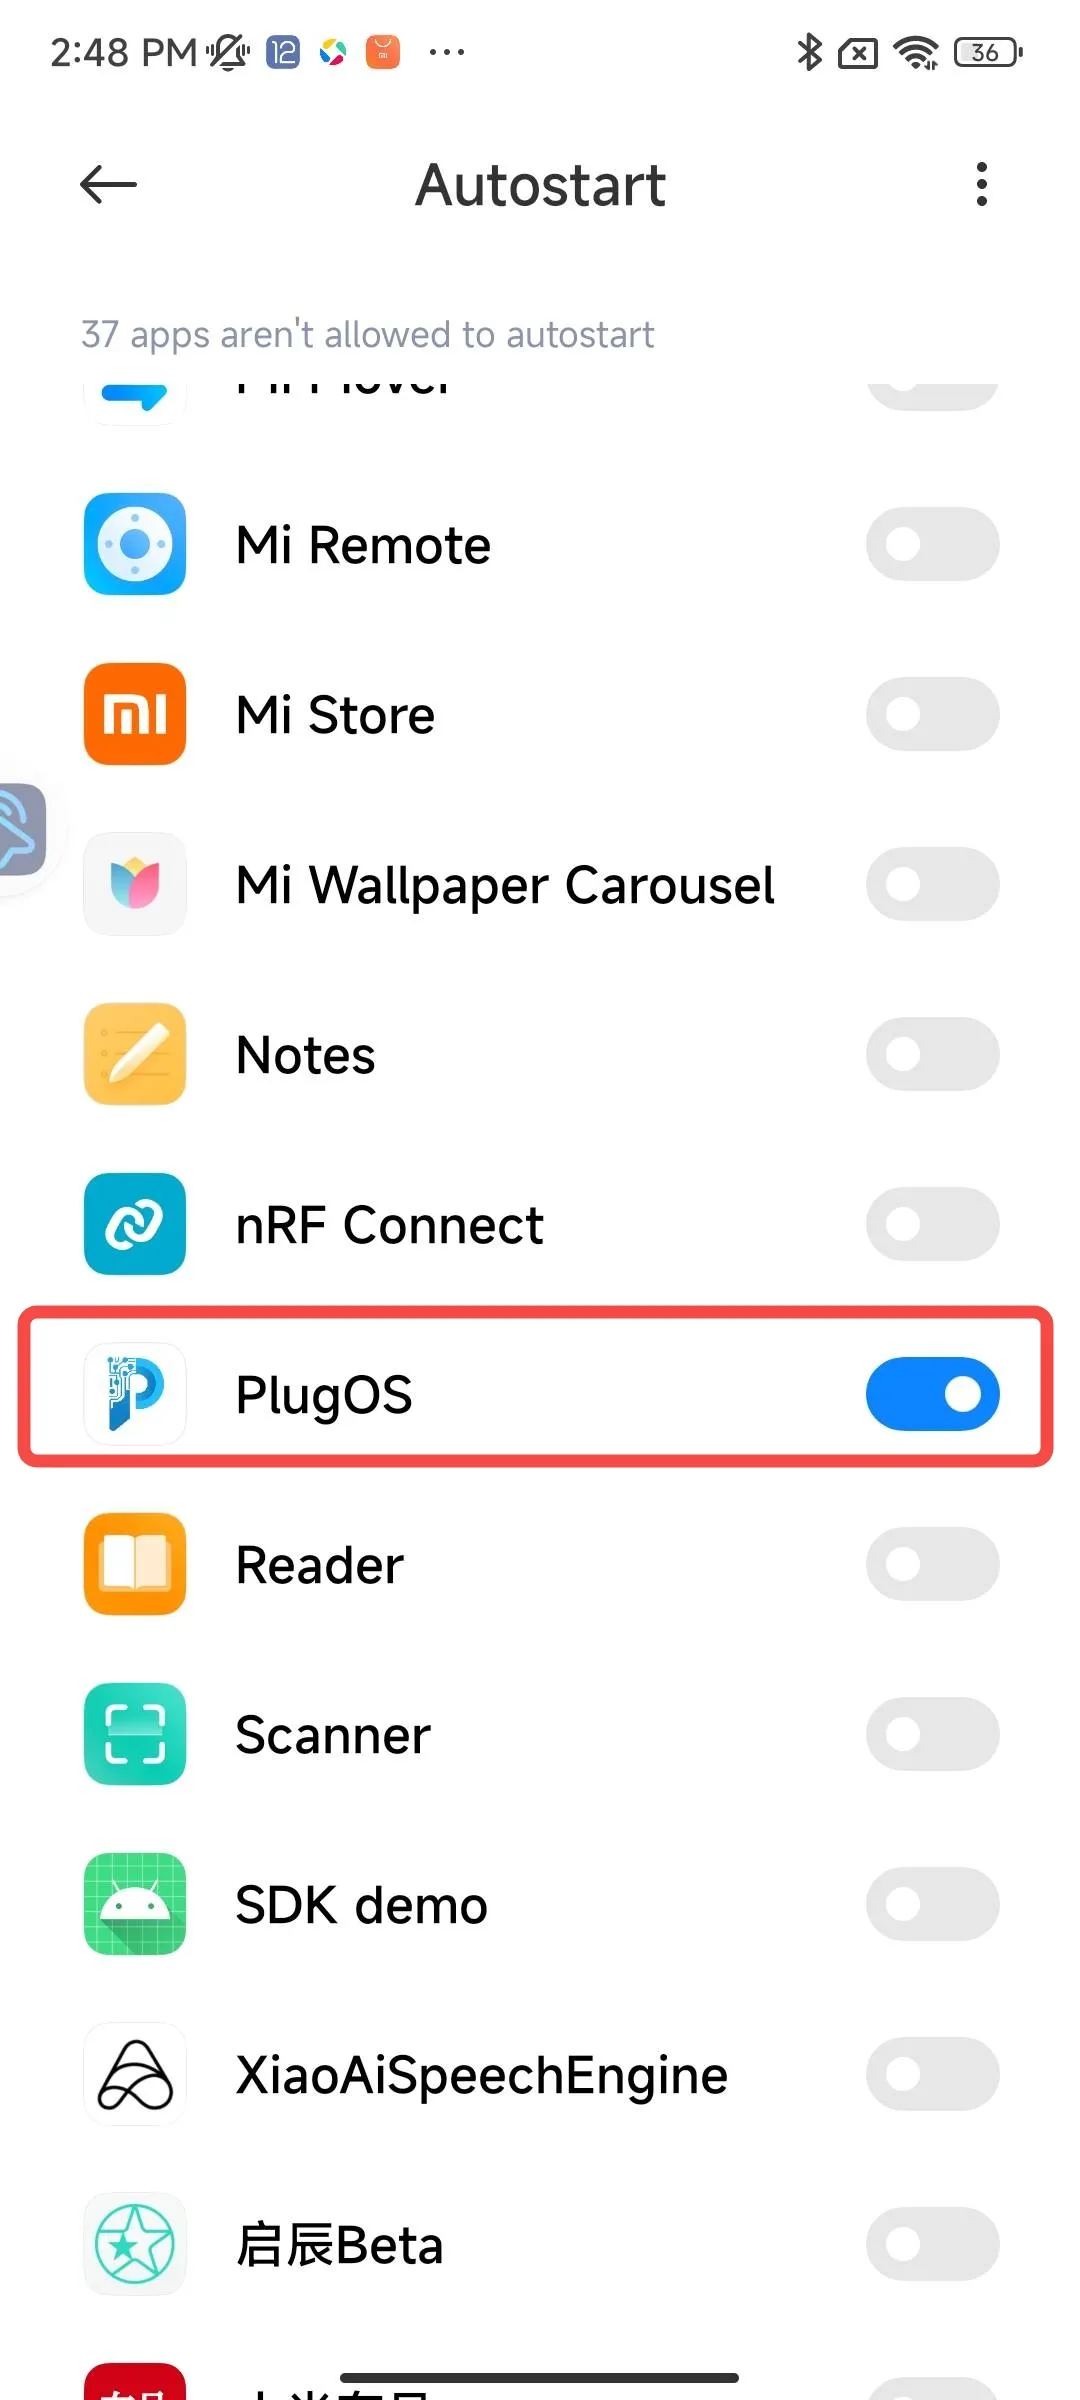
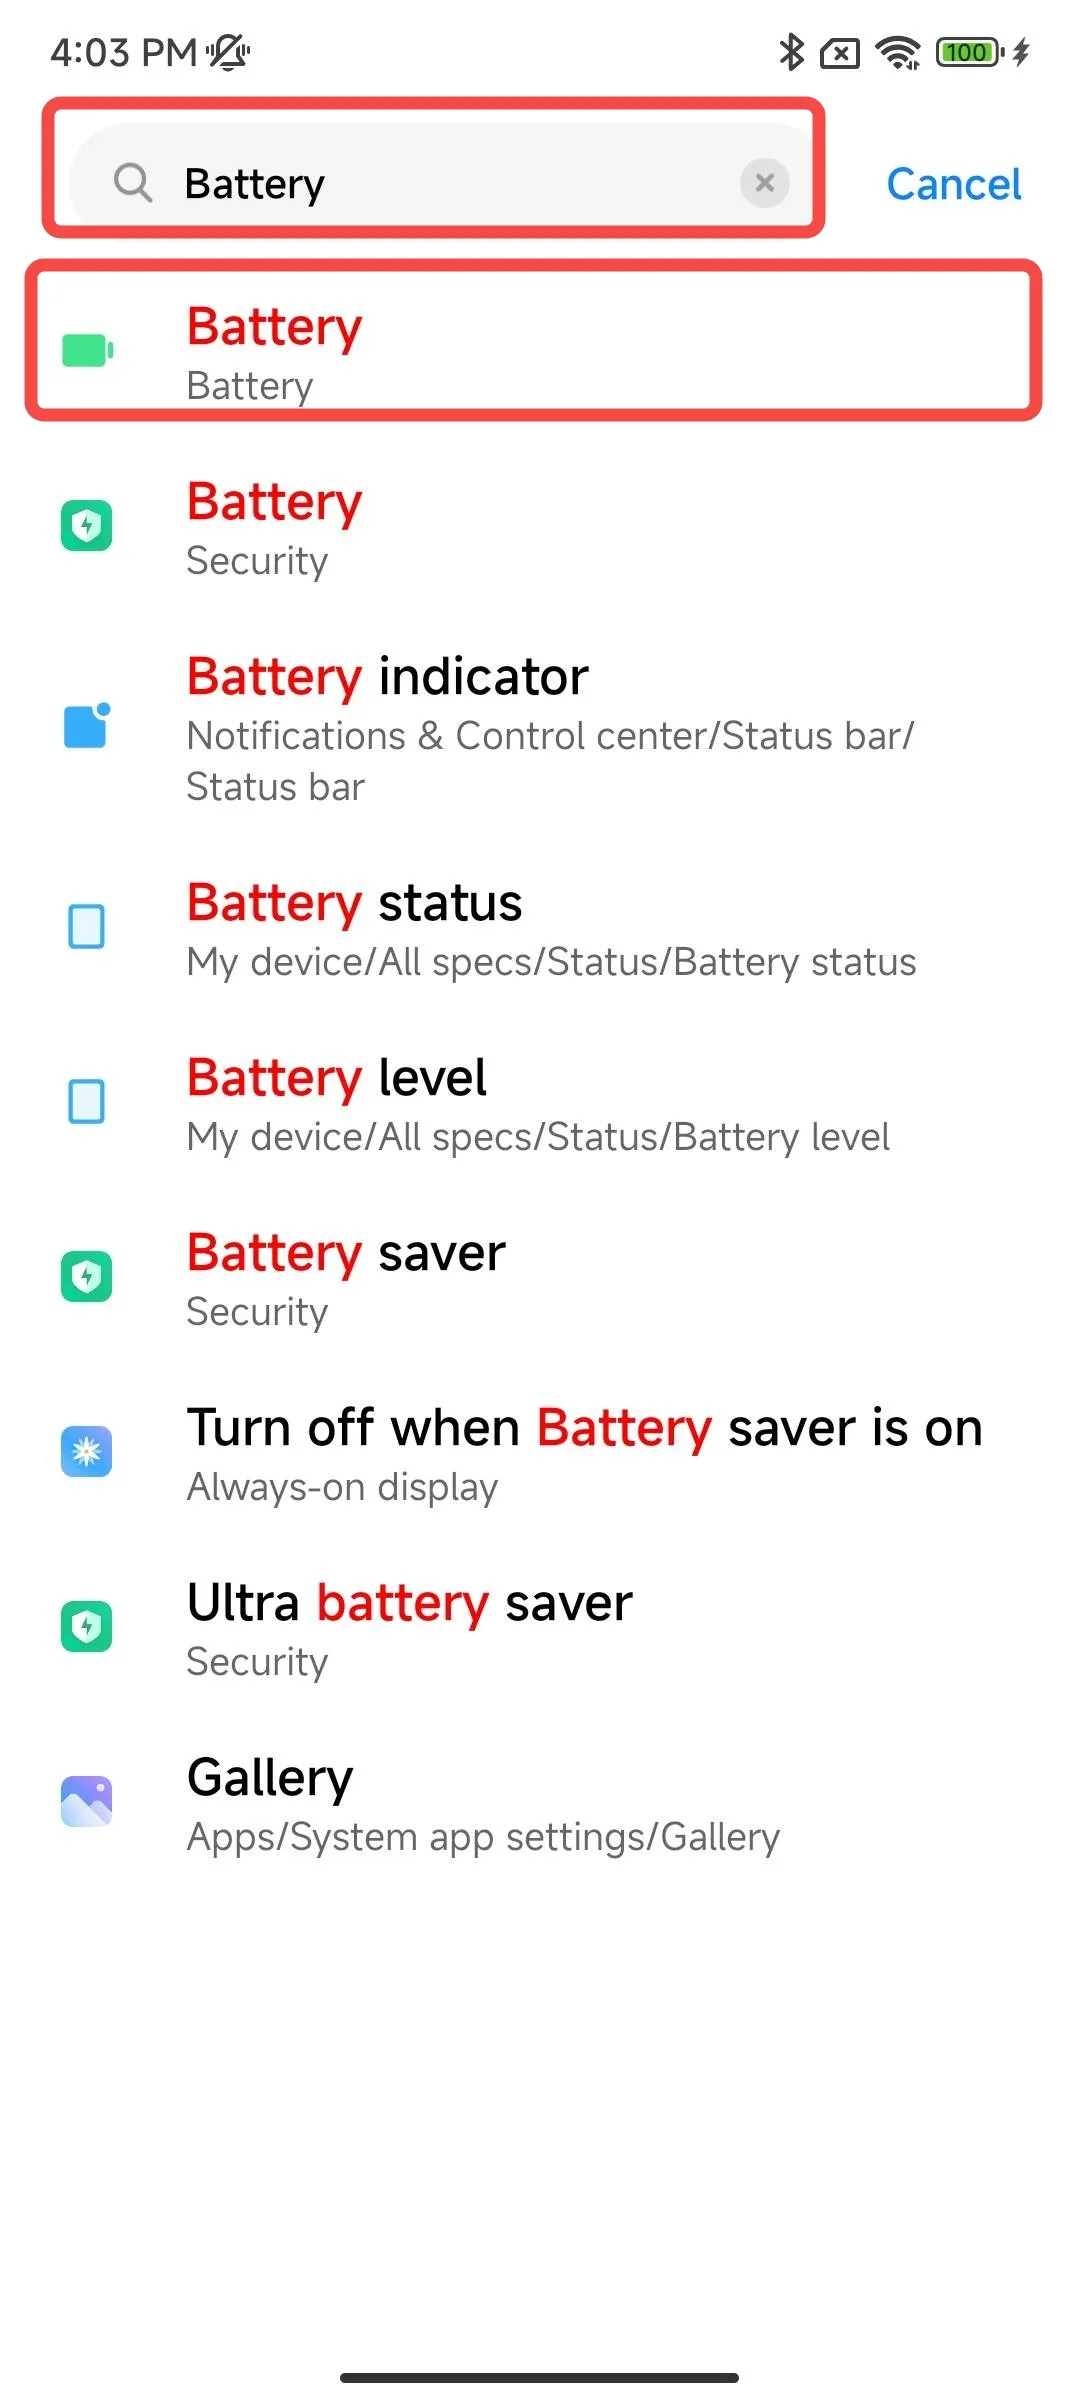
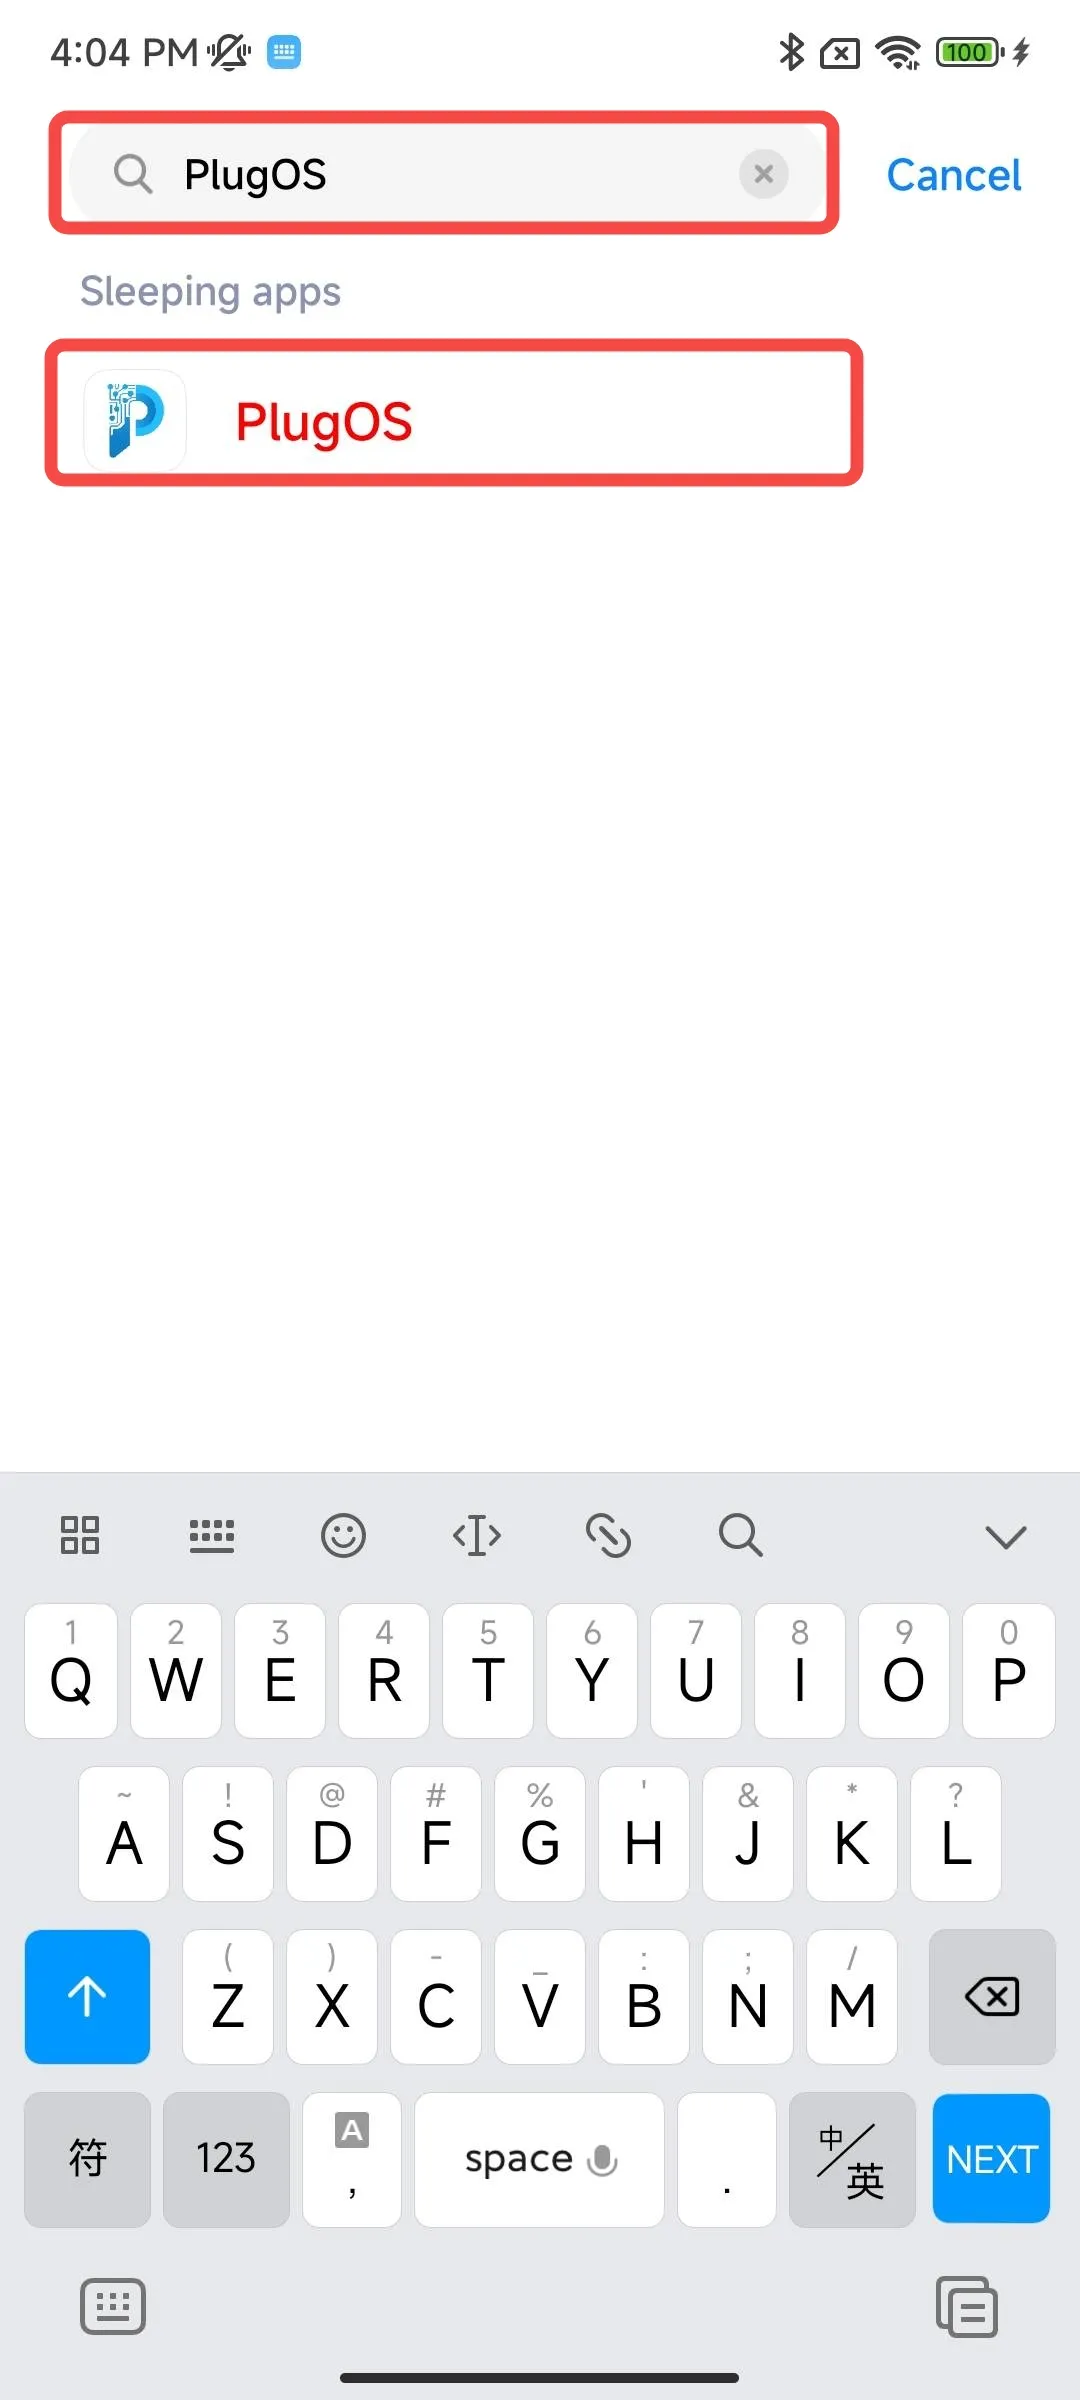
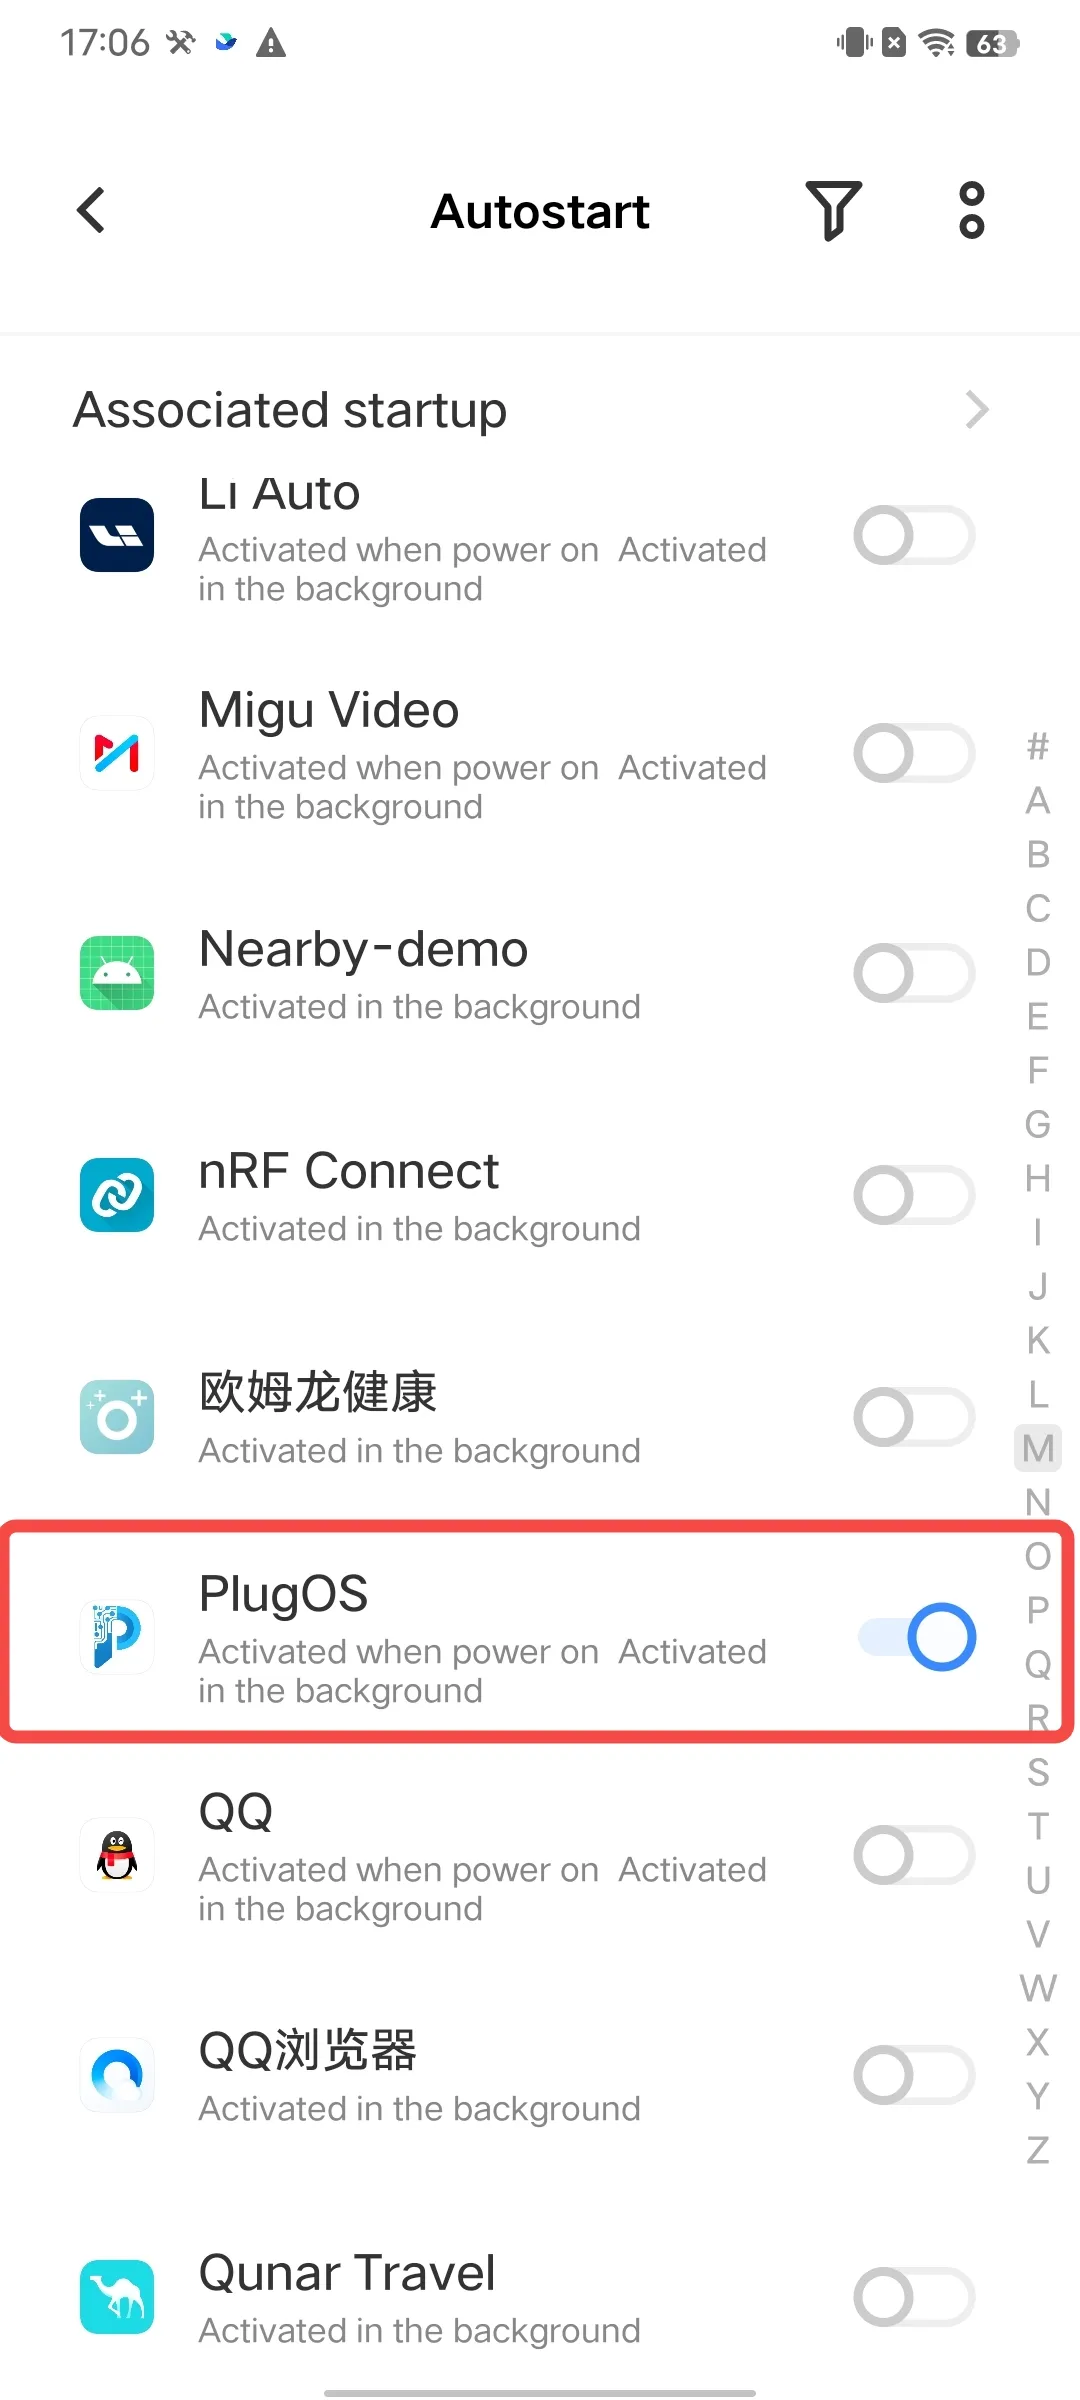
3. Xiaomi/Redmi Phones
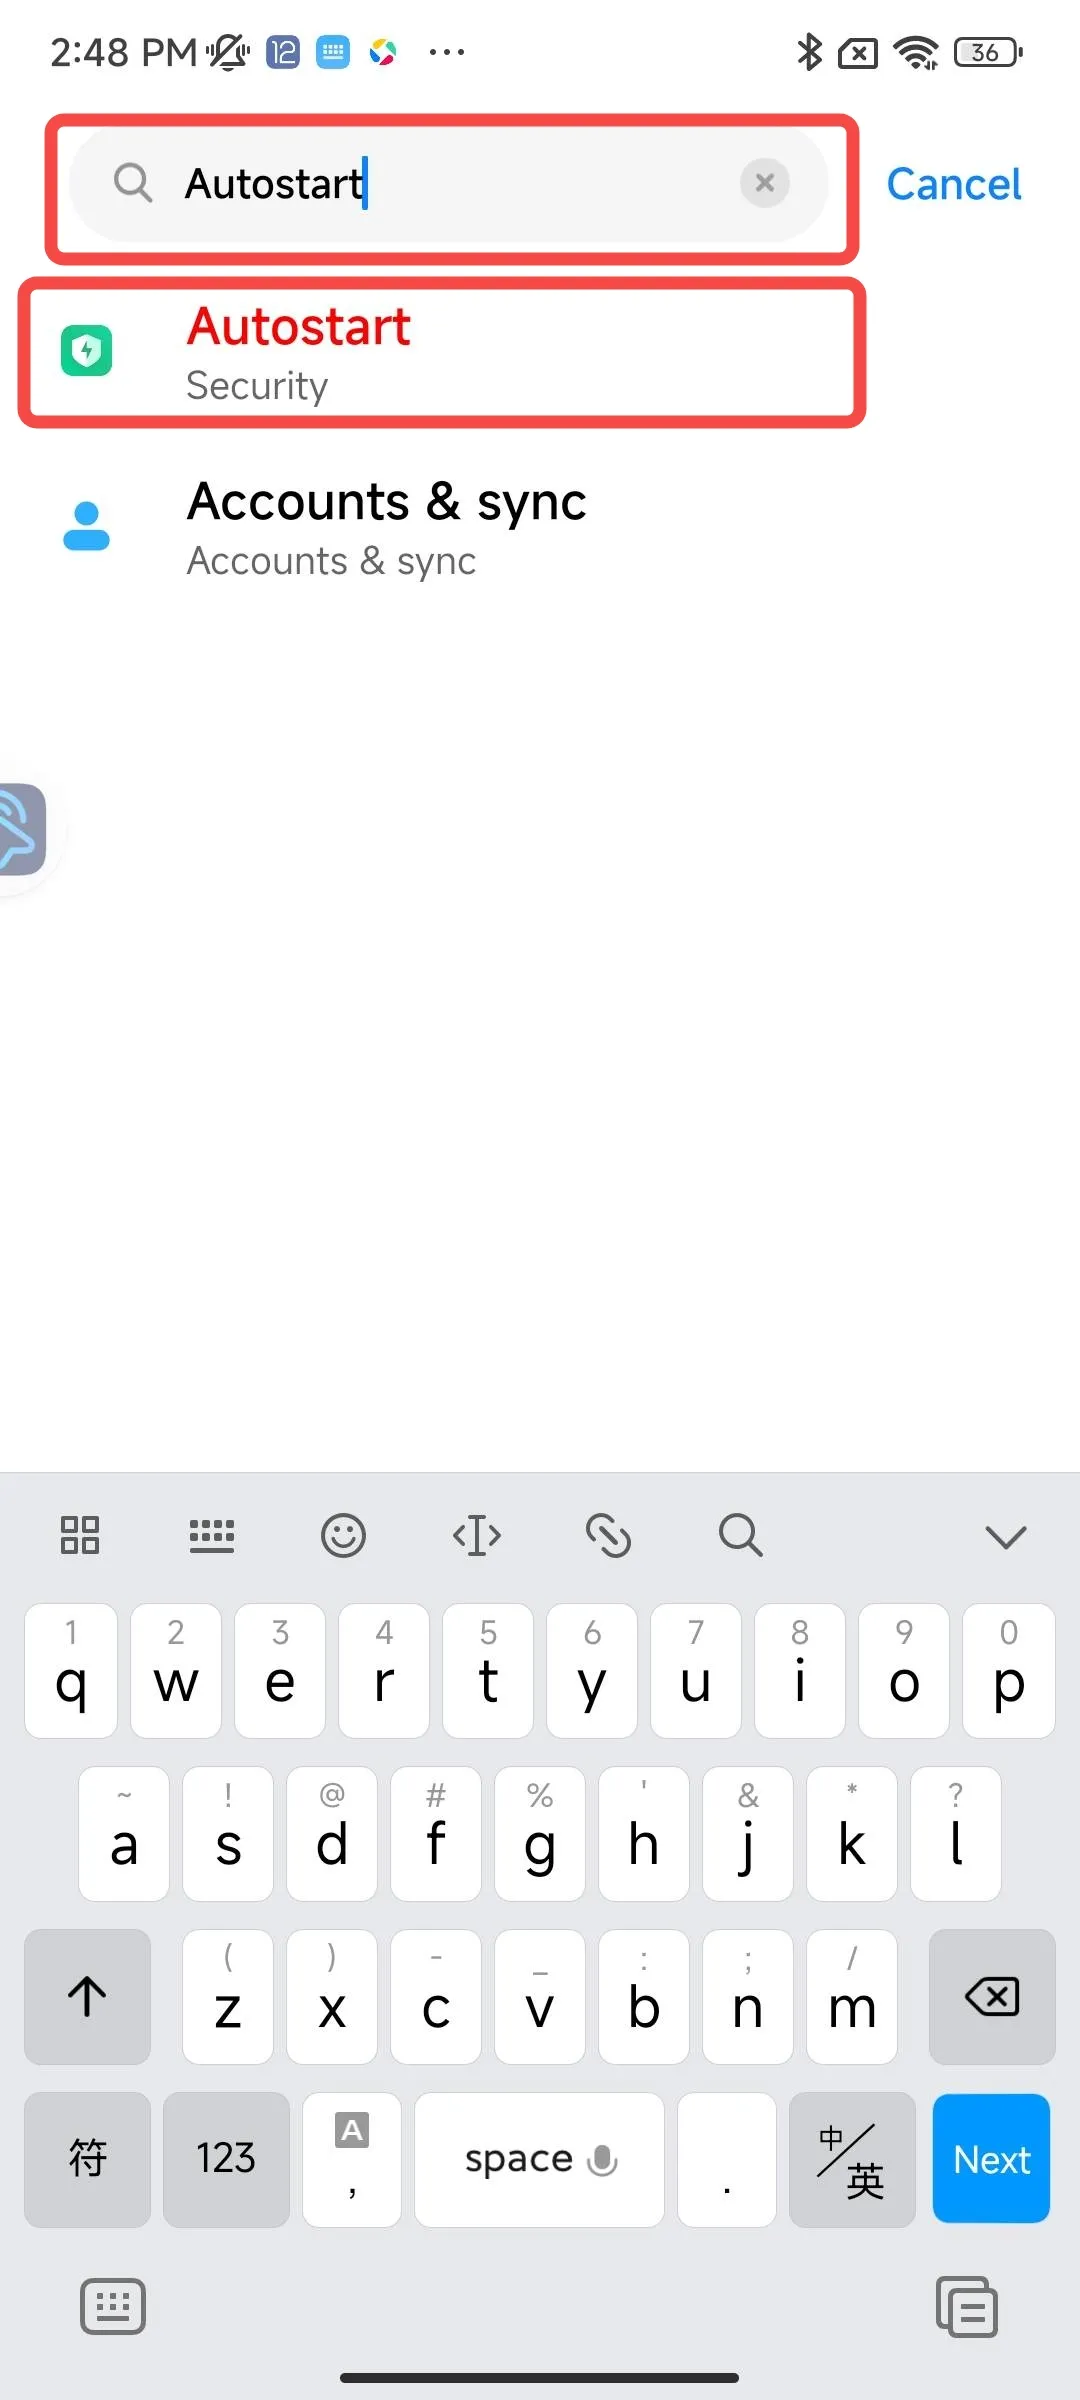
- Enable auto-start permission Open 【Settings】→ Search for “Autostart” → Tap to enter “Autostart” → Find “PlugOS” and toggle the switch to enable
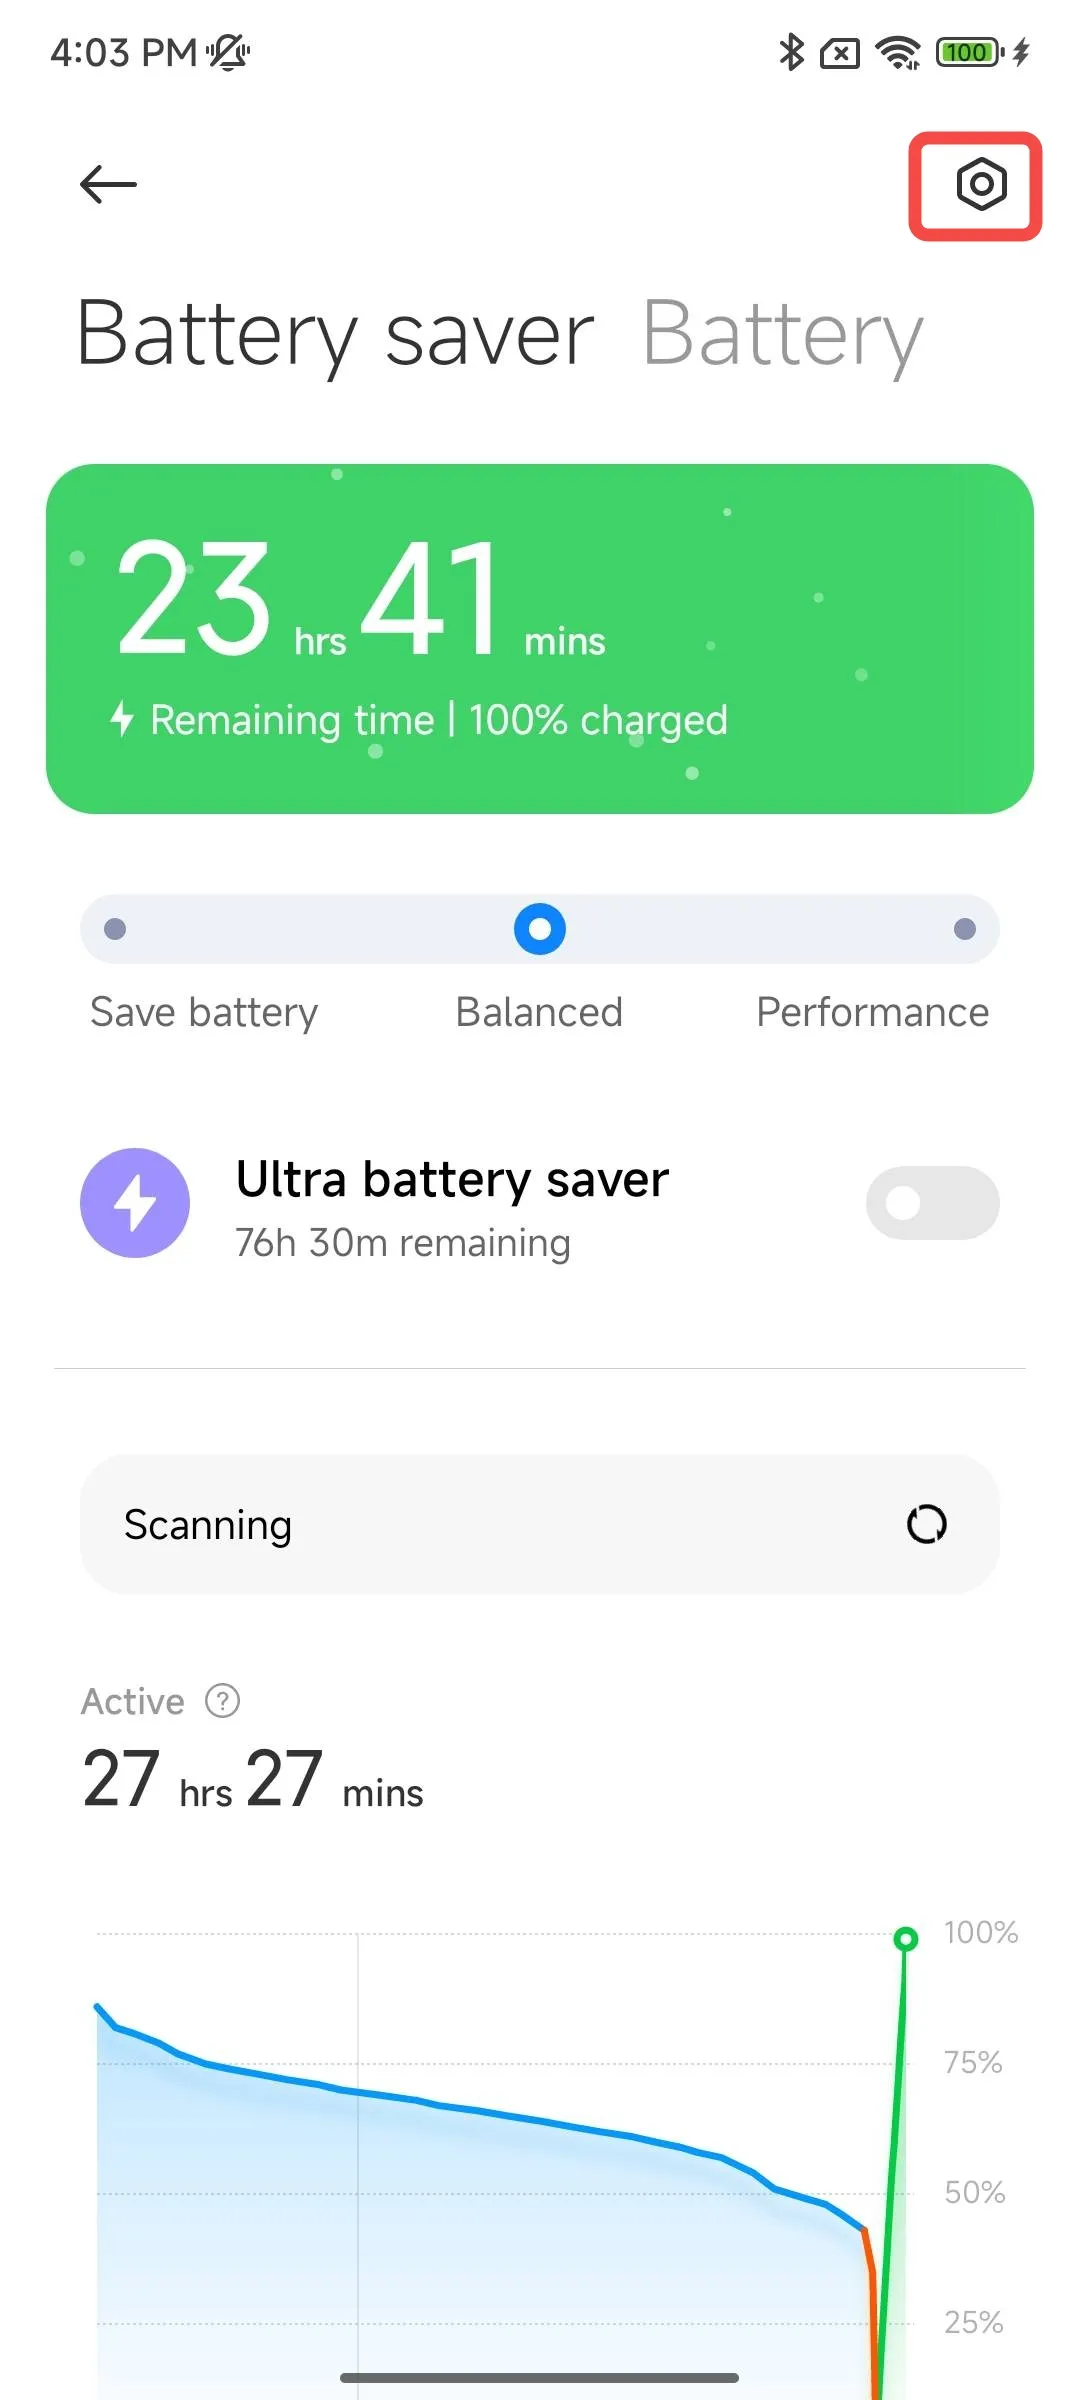
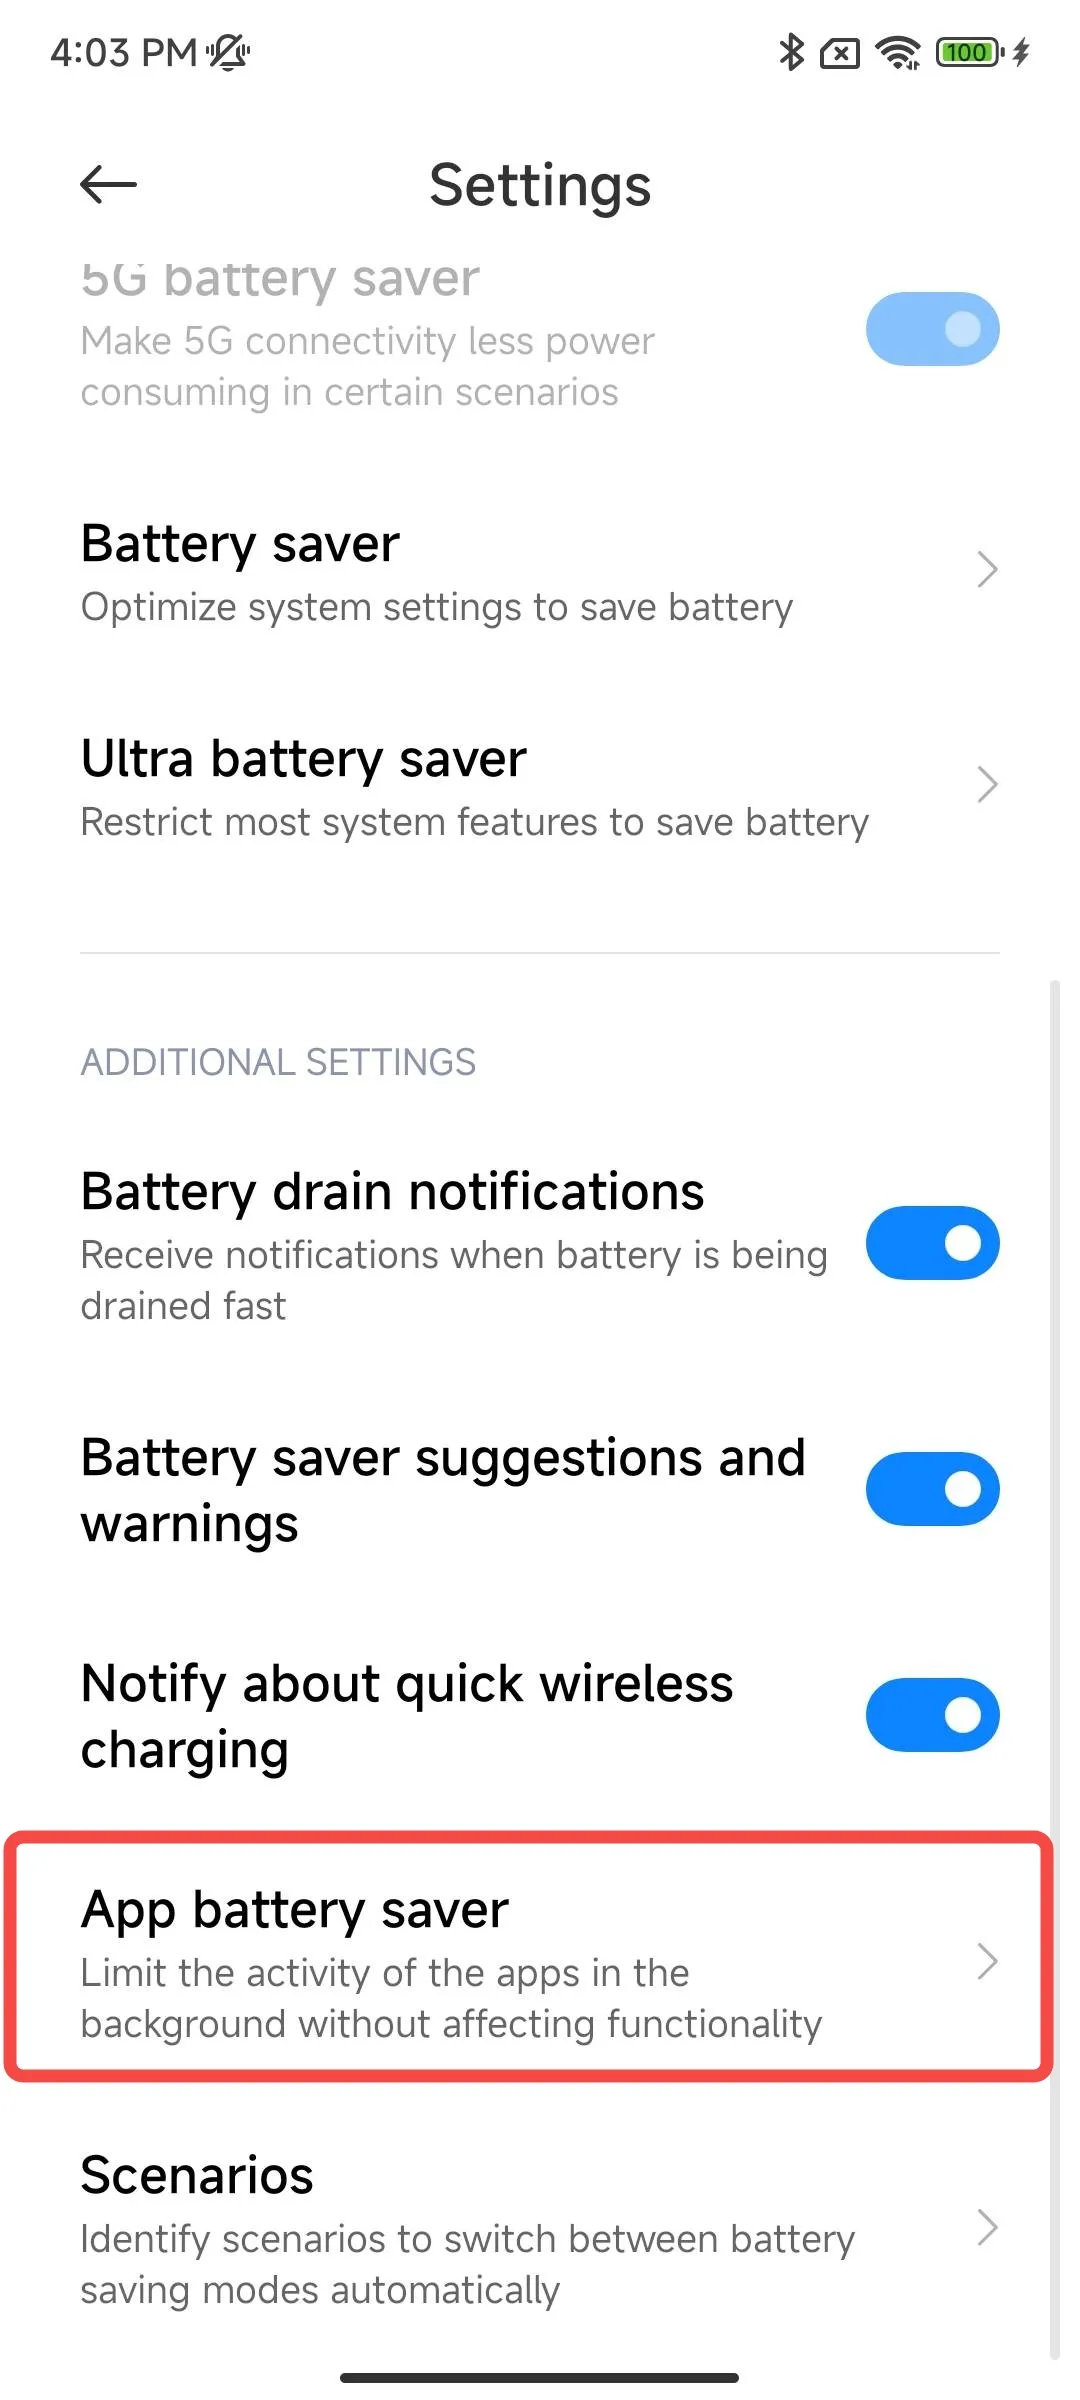
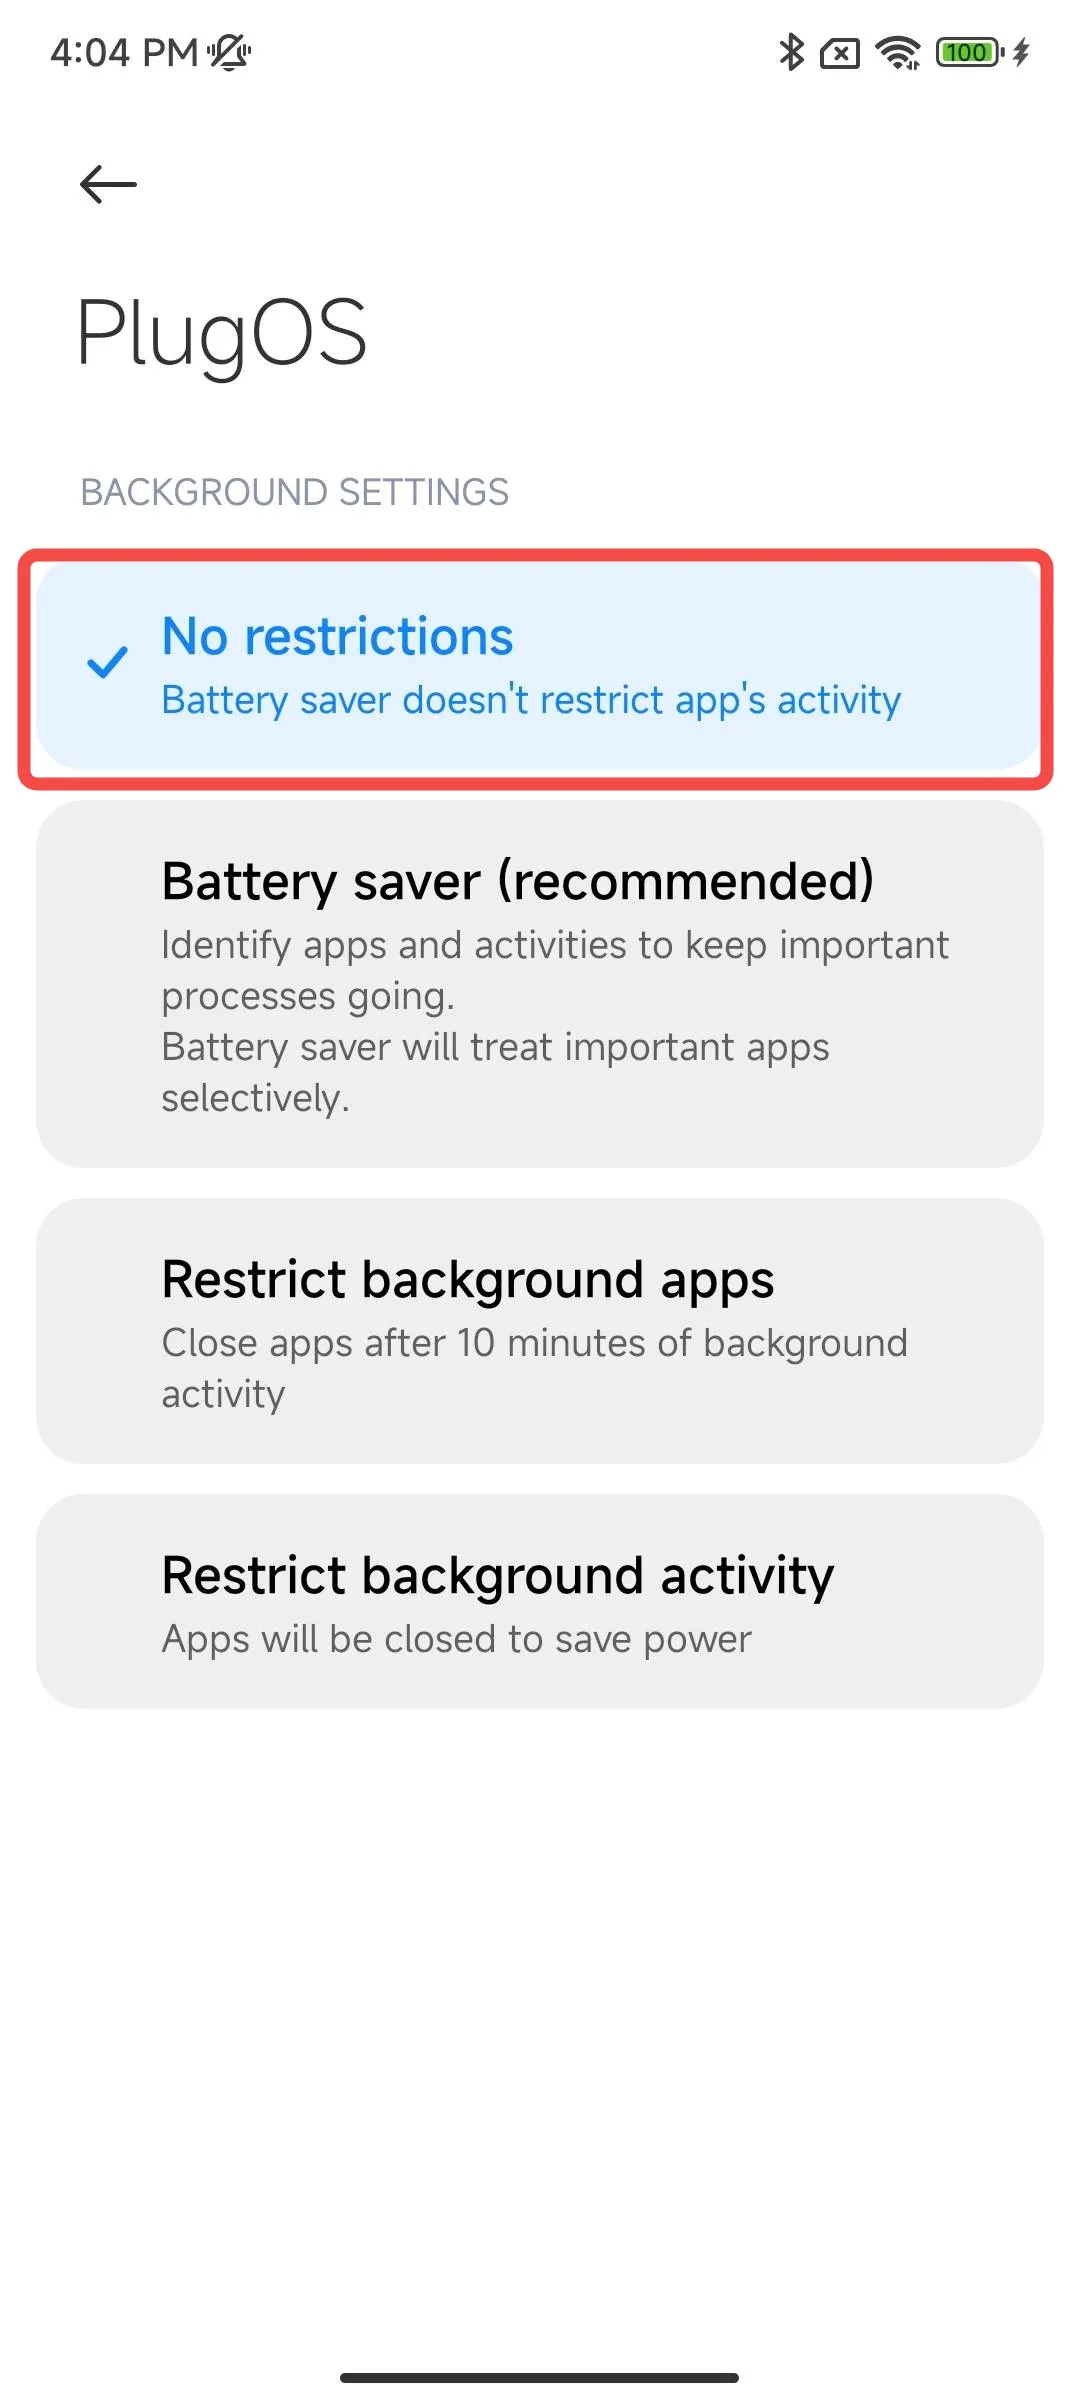
- Set unlimited battery usage Open 【Settings】→ Search for “Battery” → Tap the settings icon in the top right corner → Enter 【APP battery saver】→ Search for “PlugOS” → Select “No restrictions”
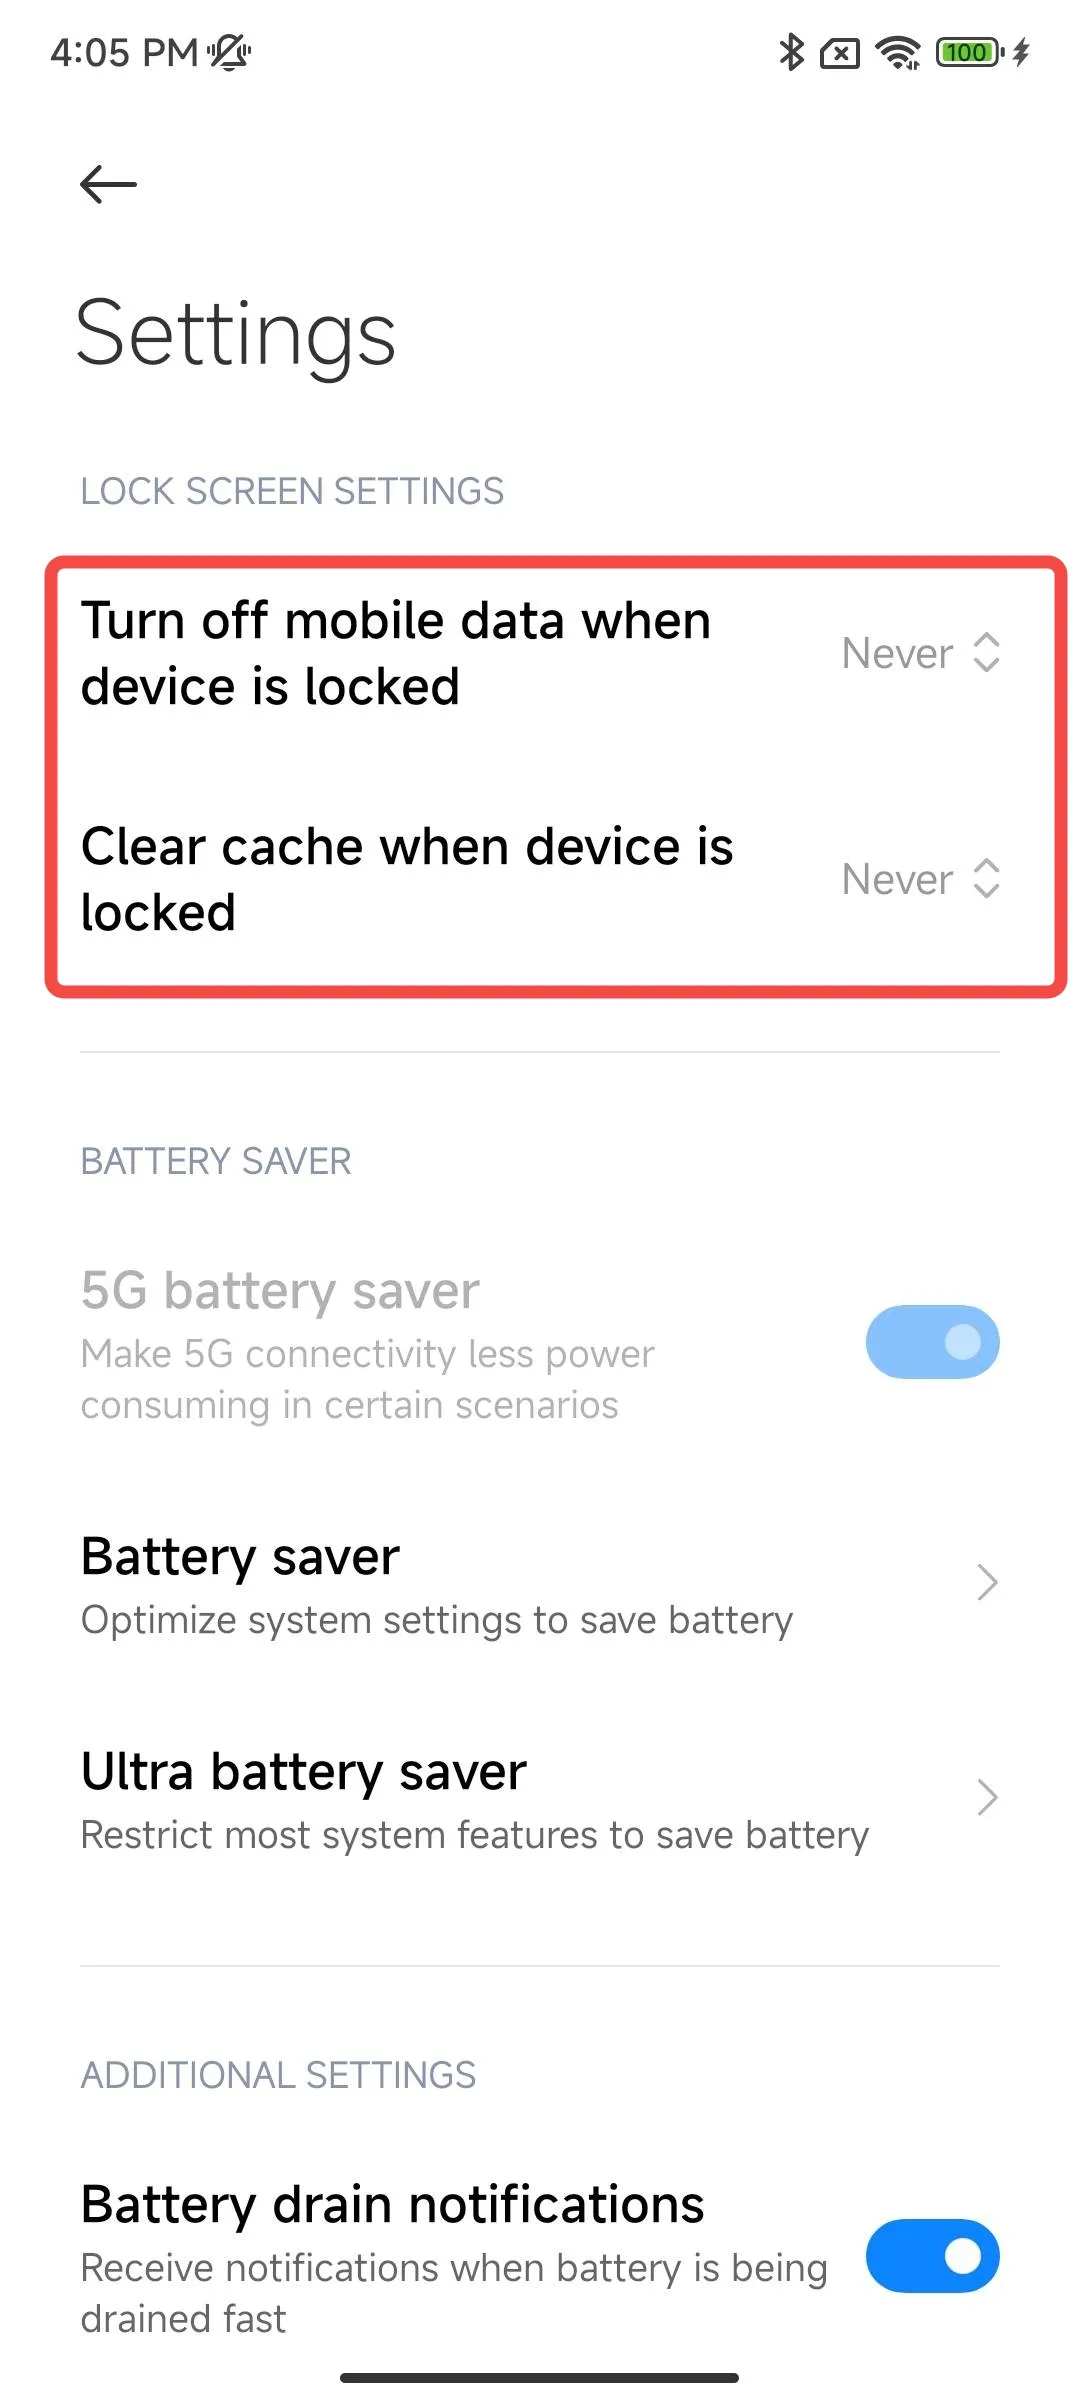
- Set never disconnect data and never clear memory when locked Open 【Settings】→ Search for “Battery” → Tap the settings icon in the top right corner → Find 【Turn off mobile data when device is locked】【Clear cache when device is locked】→ Set to “Never”
- Lock app in background Swipe up from the bottom of the screen to open the recent apps screen → Long press “PlugOS” → Tap “Lock”

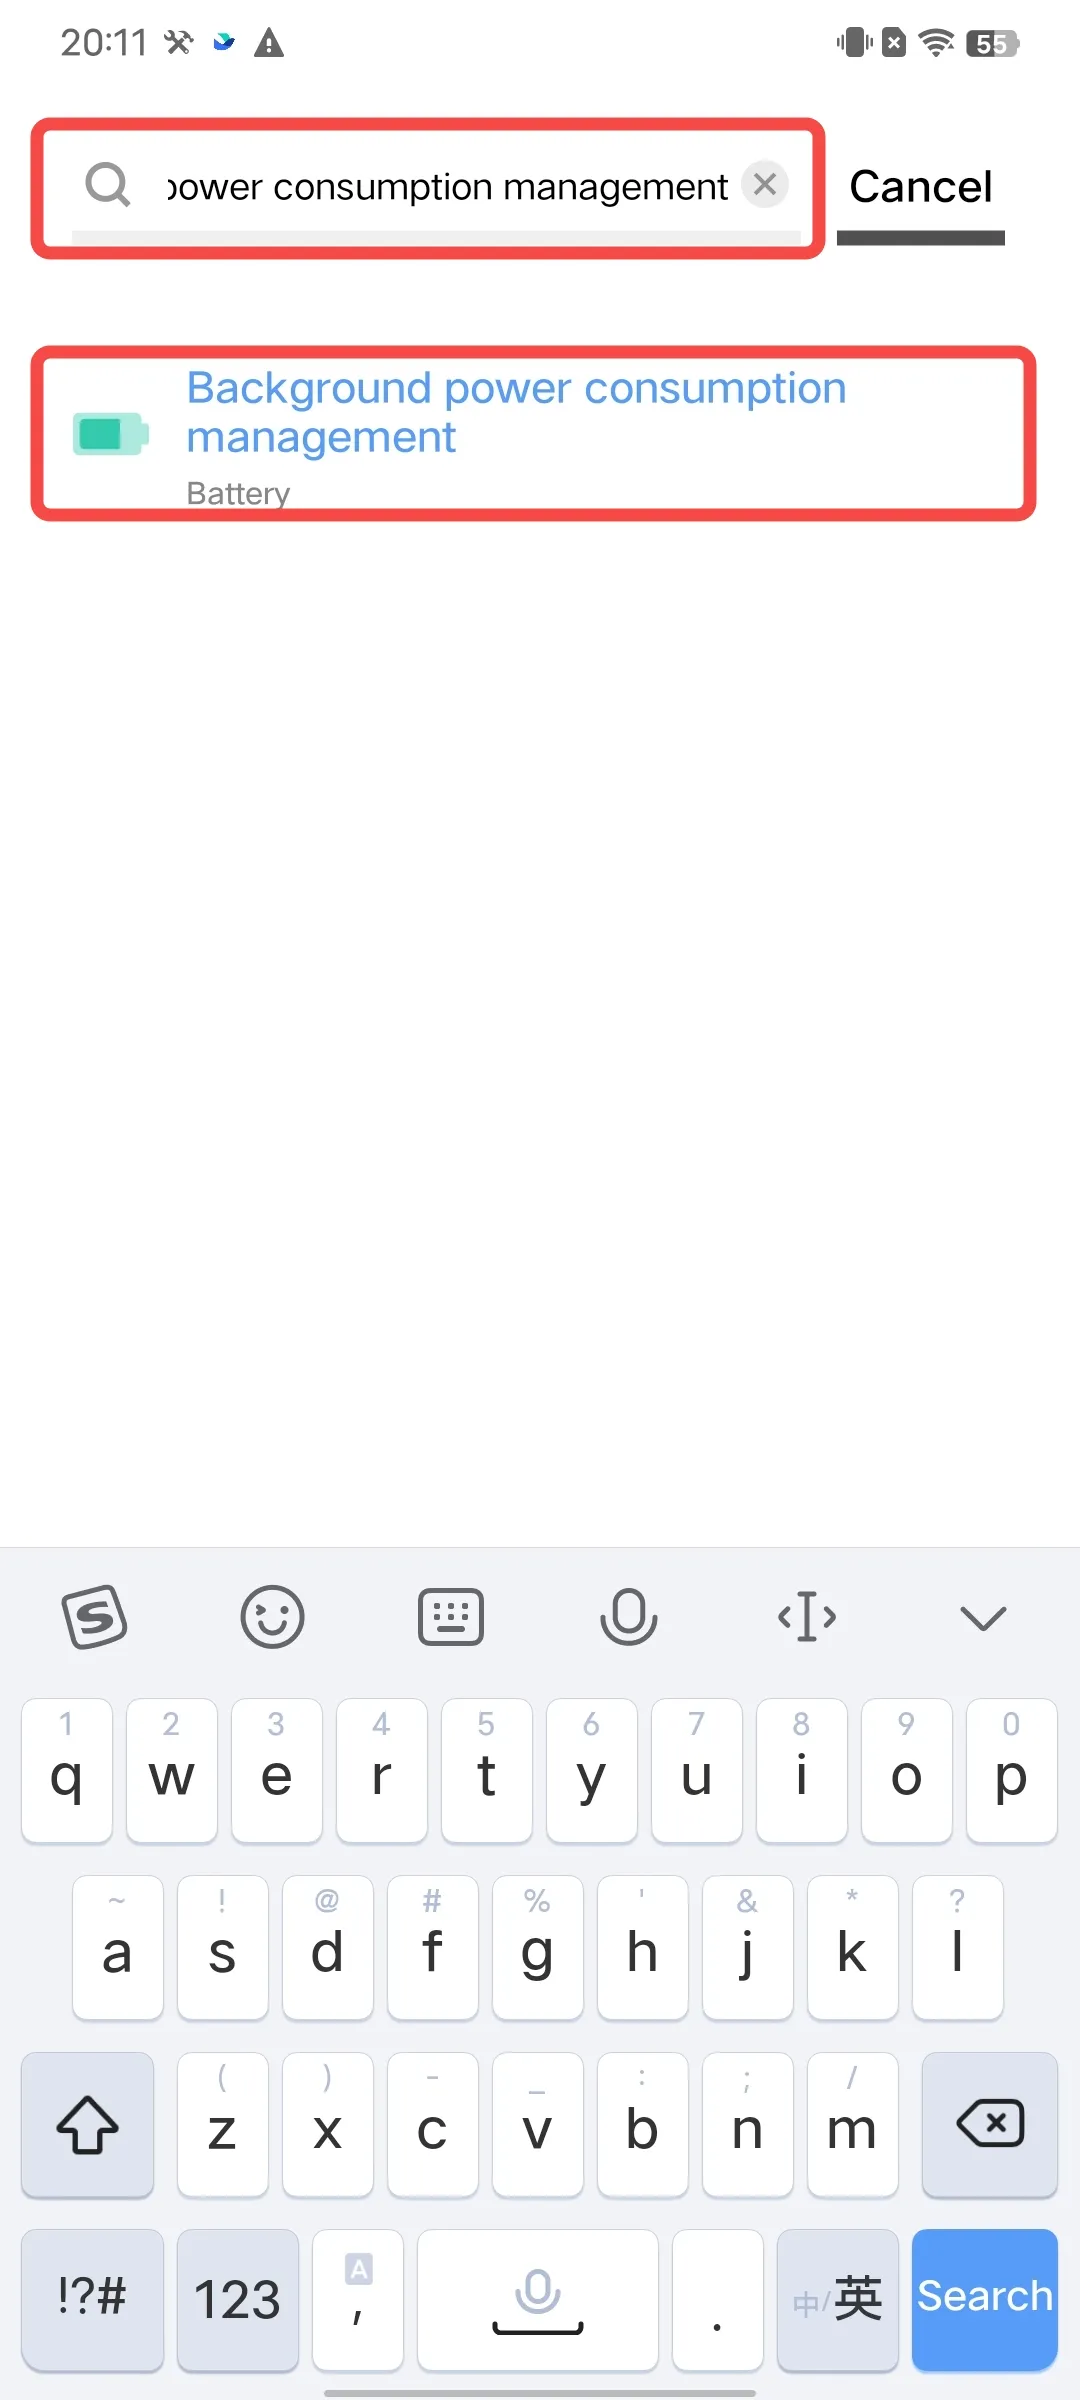
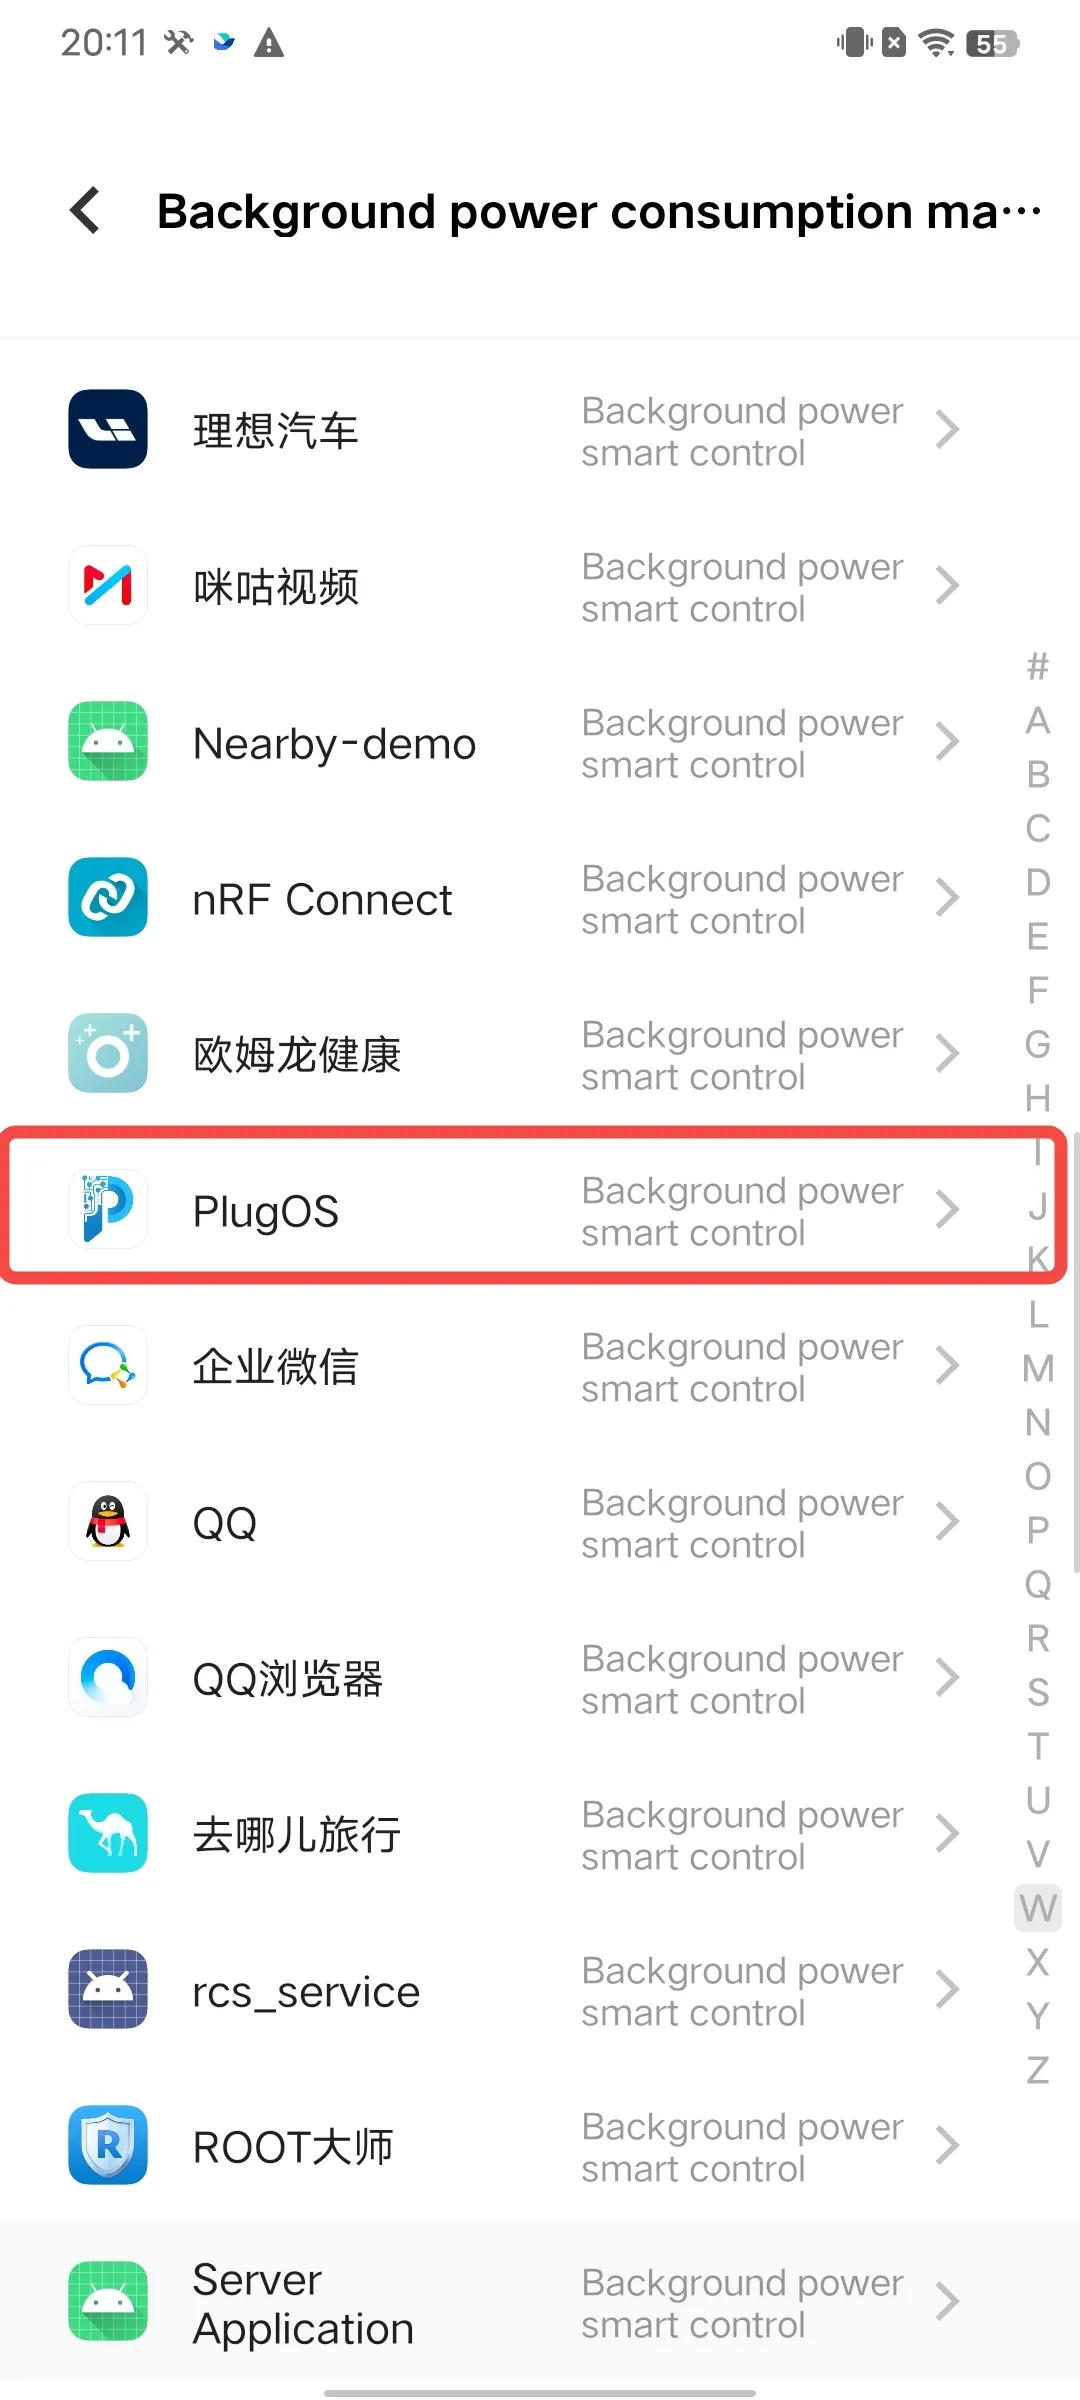
4. vivo/iQOO Phones
- Enable auto-start permission Open 【Settings】→ Search for “Autostart” → Tap to enter “Autostart” → Find “PlugOS” and tap to enter → Toggle the switch to enable

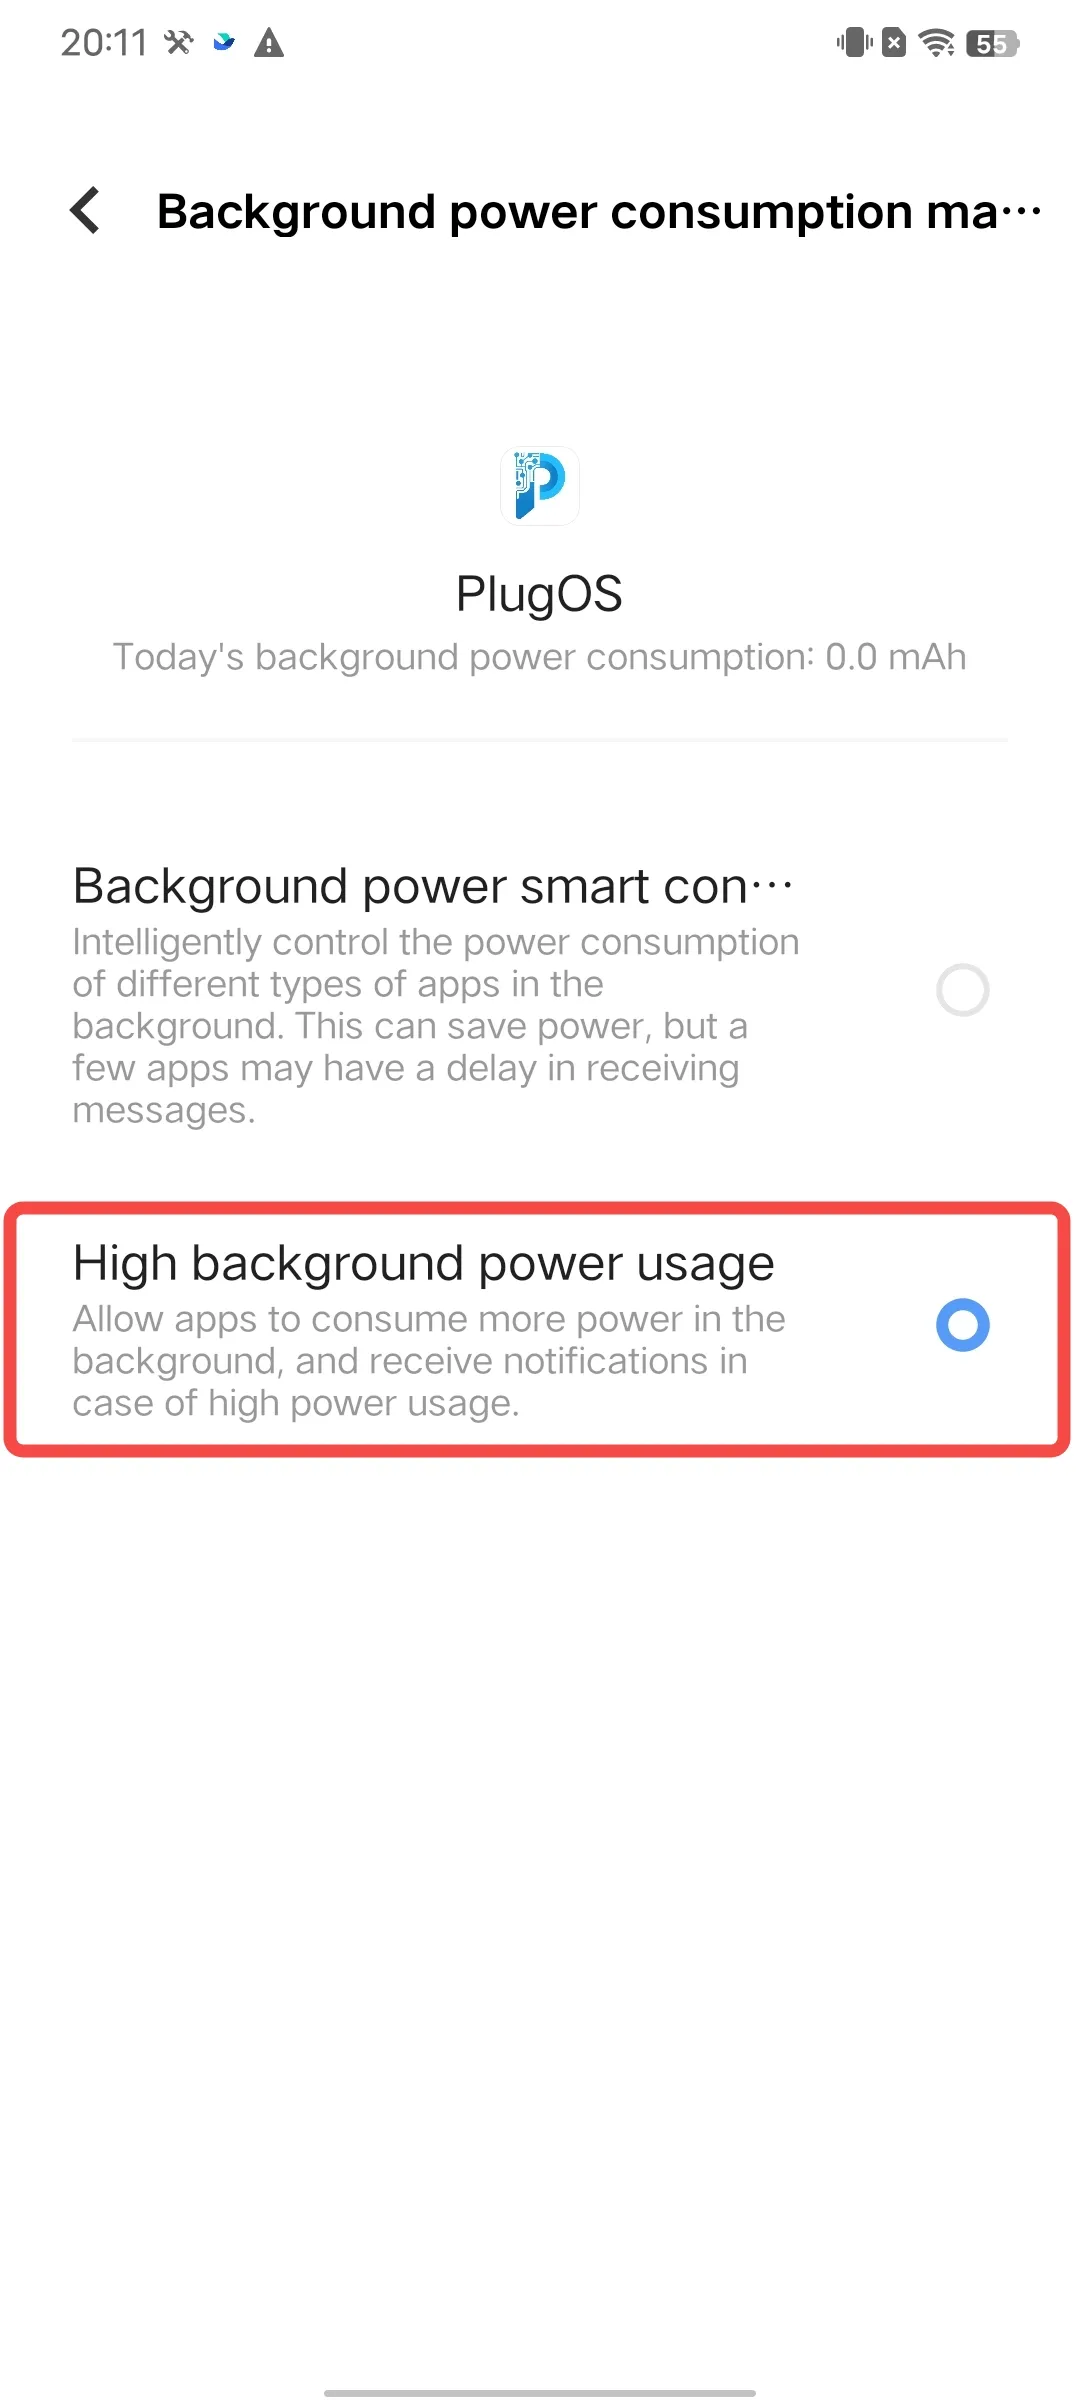
- Allow high background power consumption Open 【Settings】→ Search for “Background power consumption management” → Find “PlugOS” and tap to enter → Select “High background power usage”
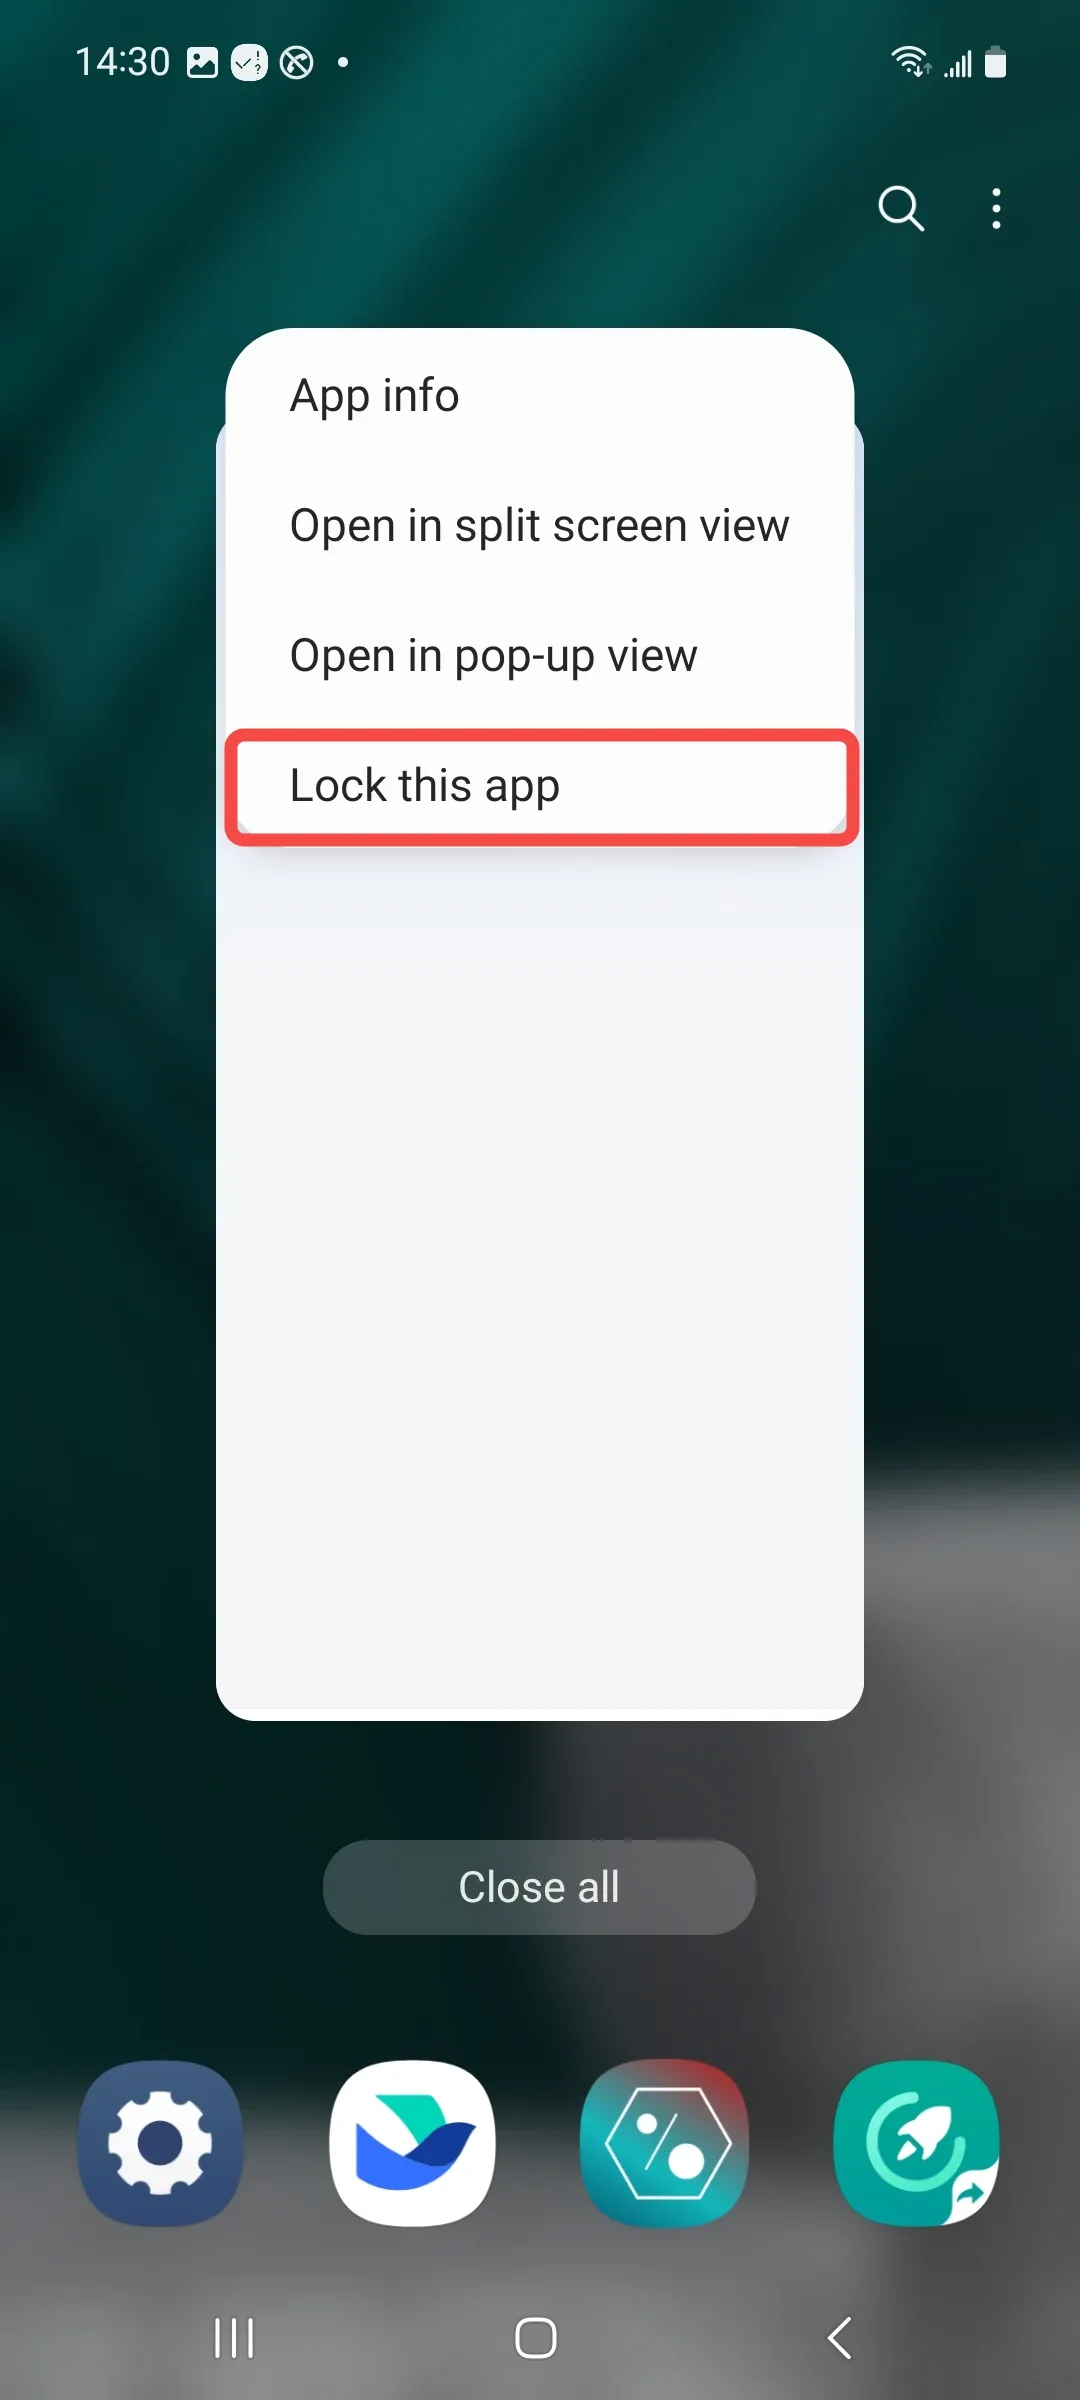
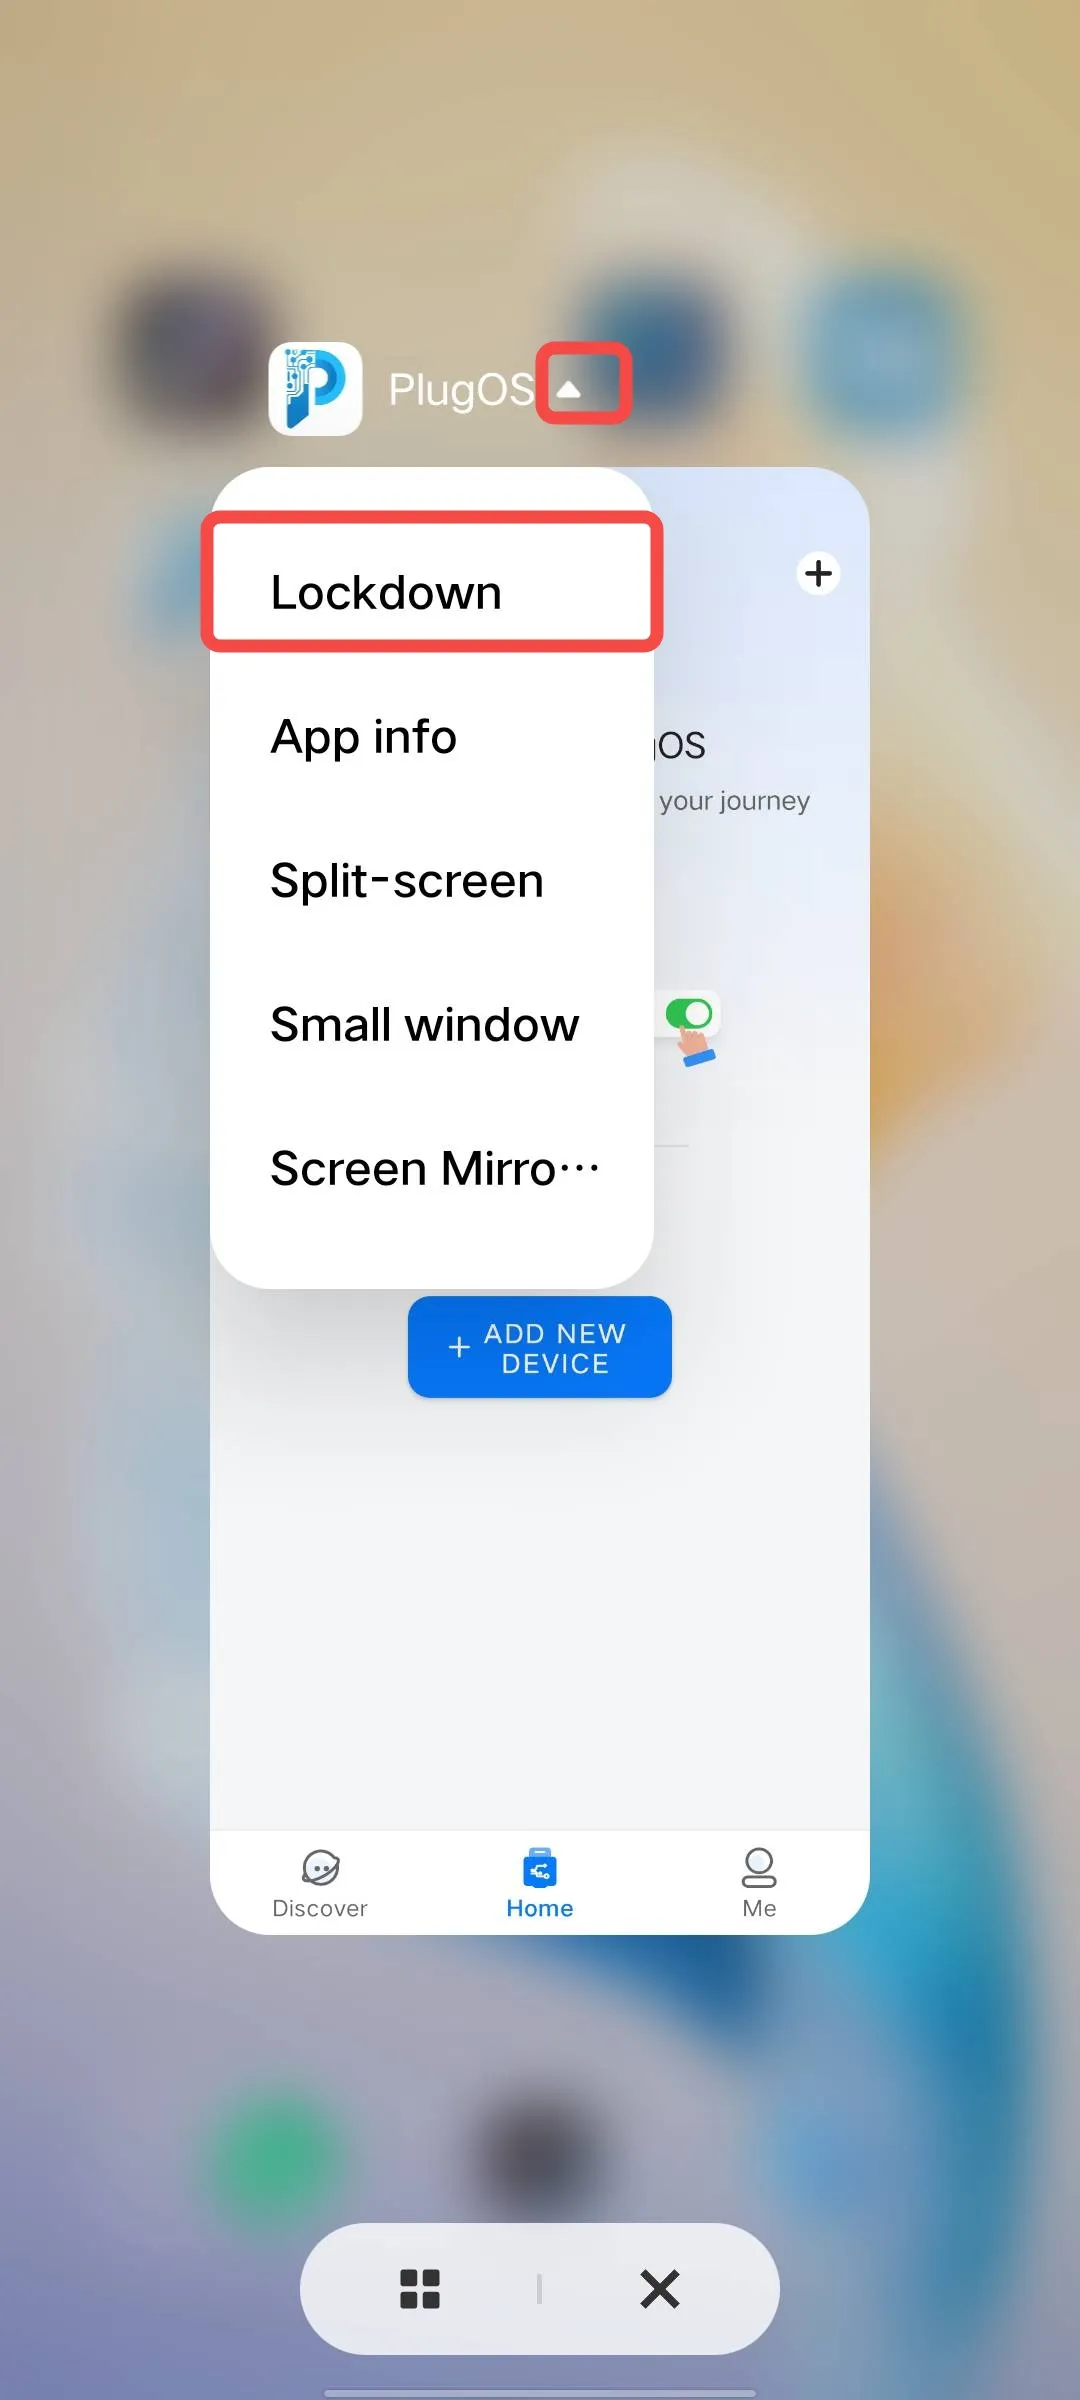
- Lock app in background Swipe up from the bottom of the screen to open the recent apps screen → Tap the “▲” icon in the top right corner of “PlugOS” → Tap “Lockdown”
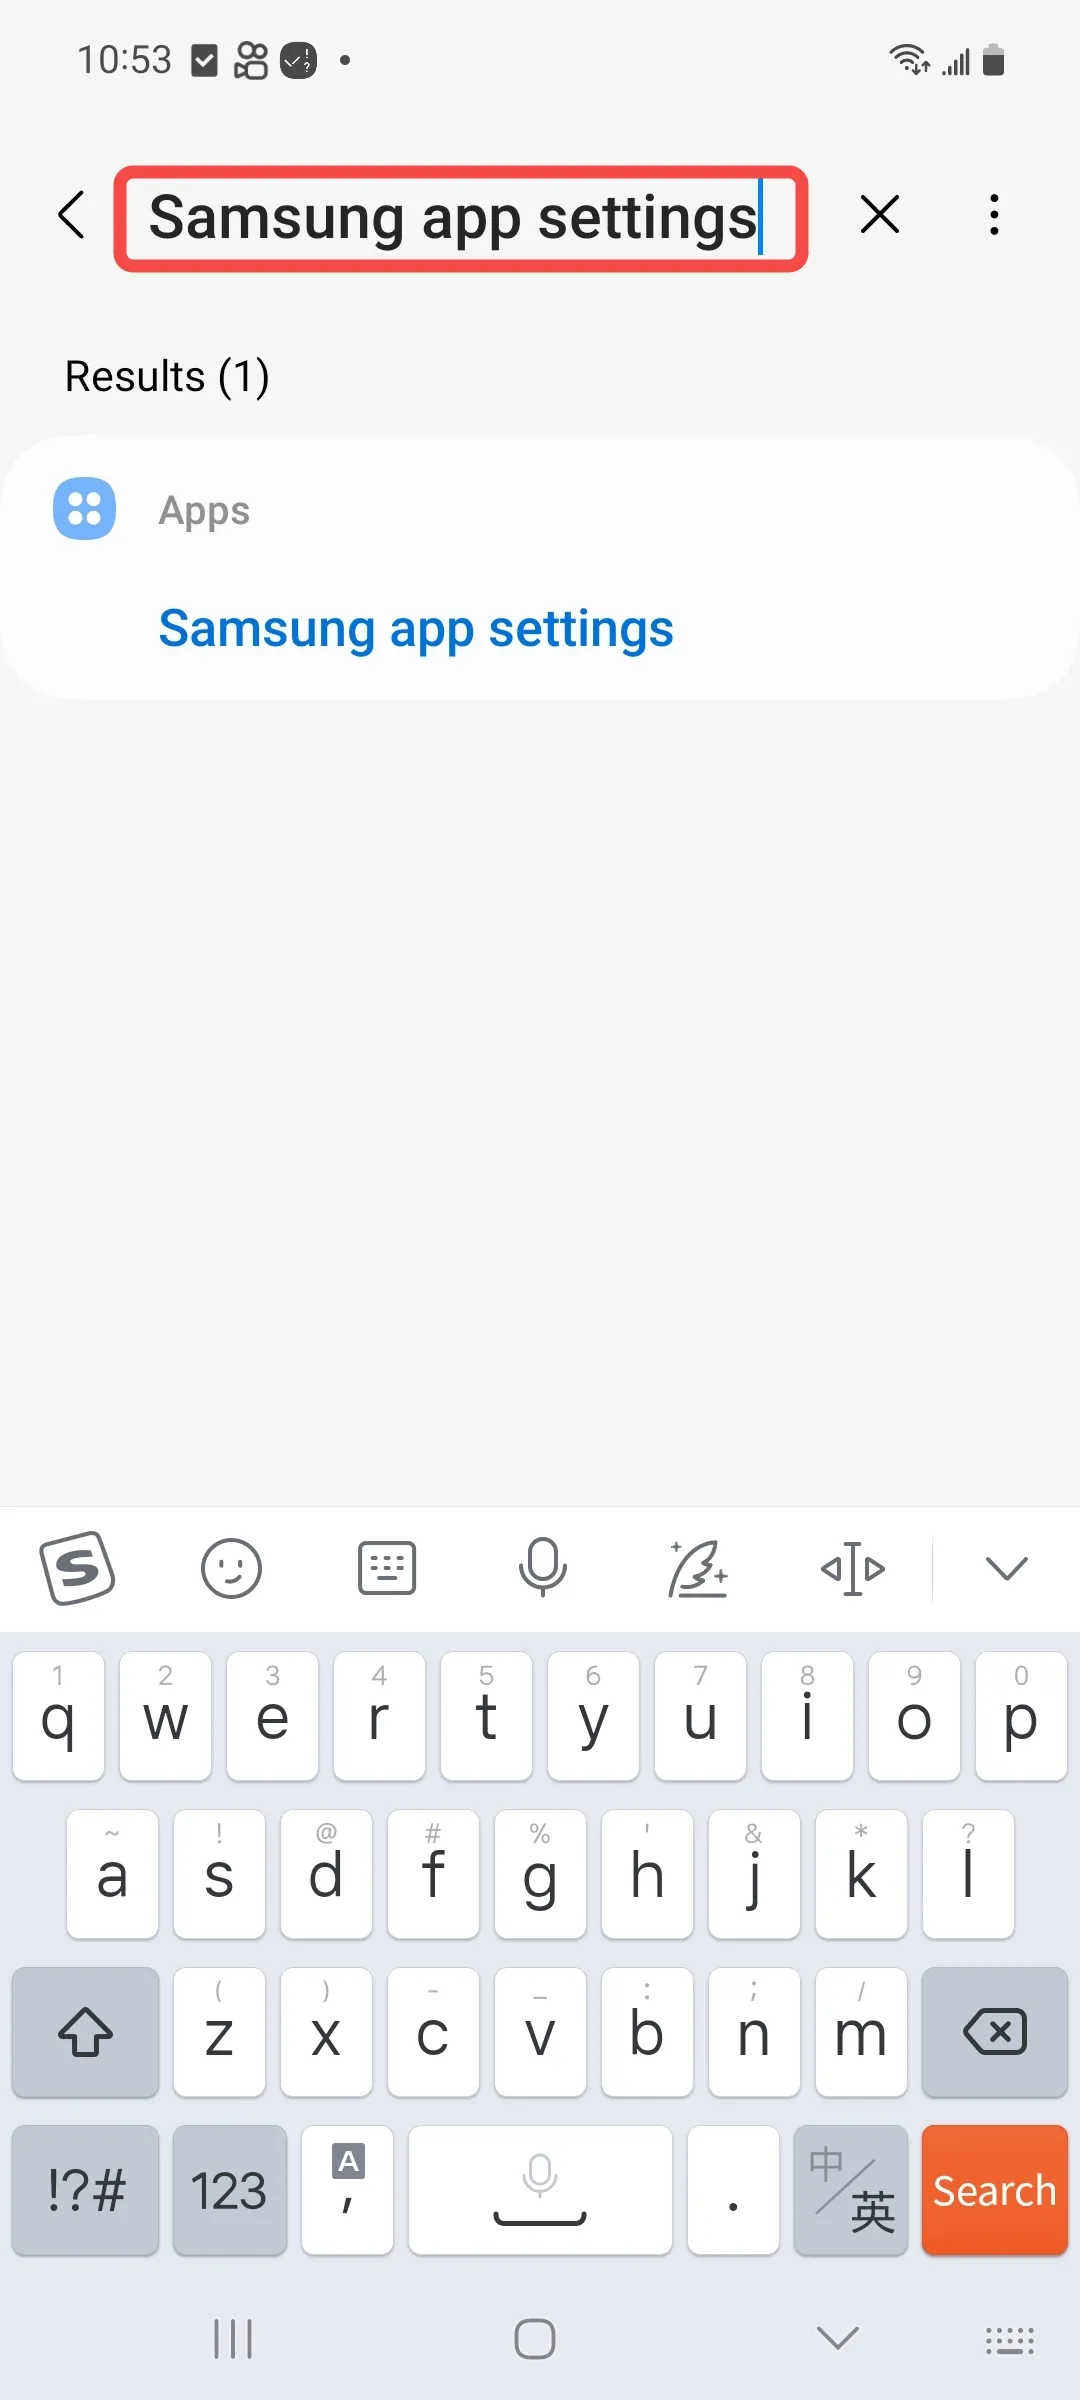
5. Samsung Phones
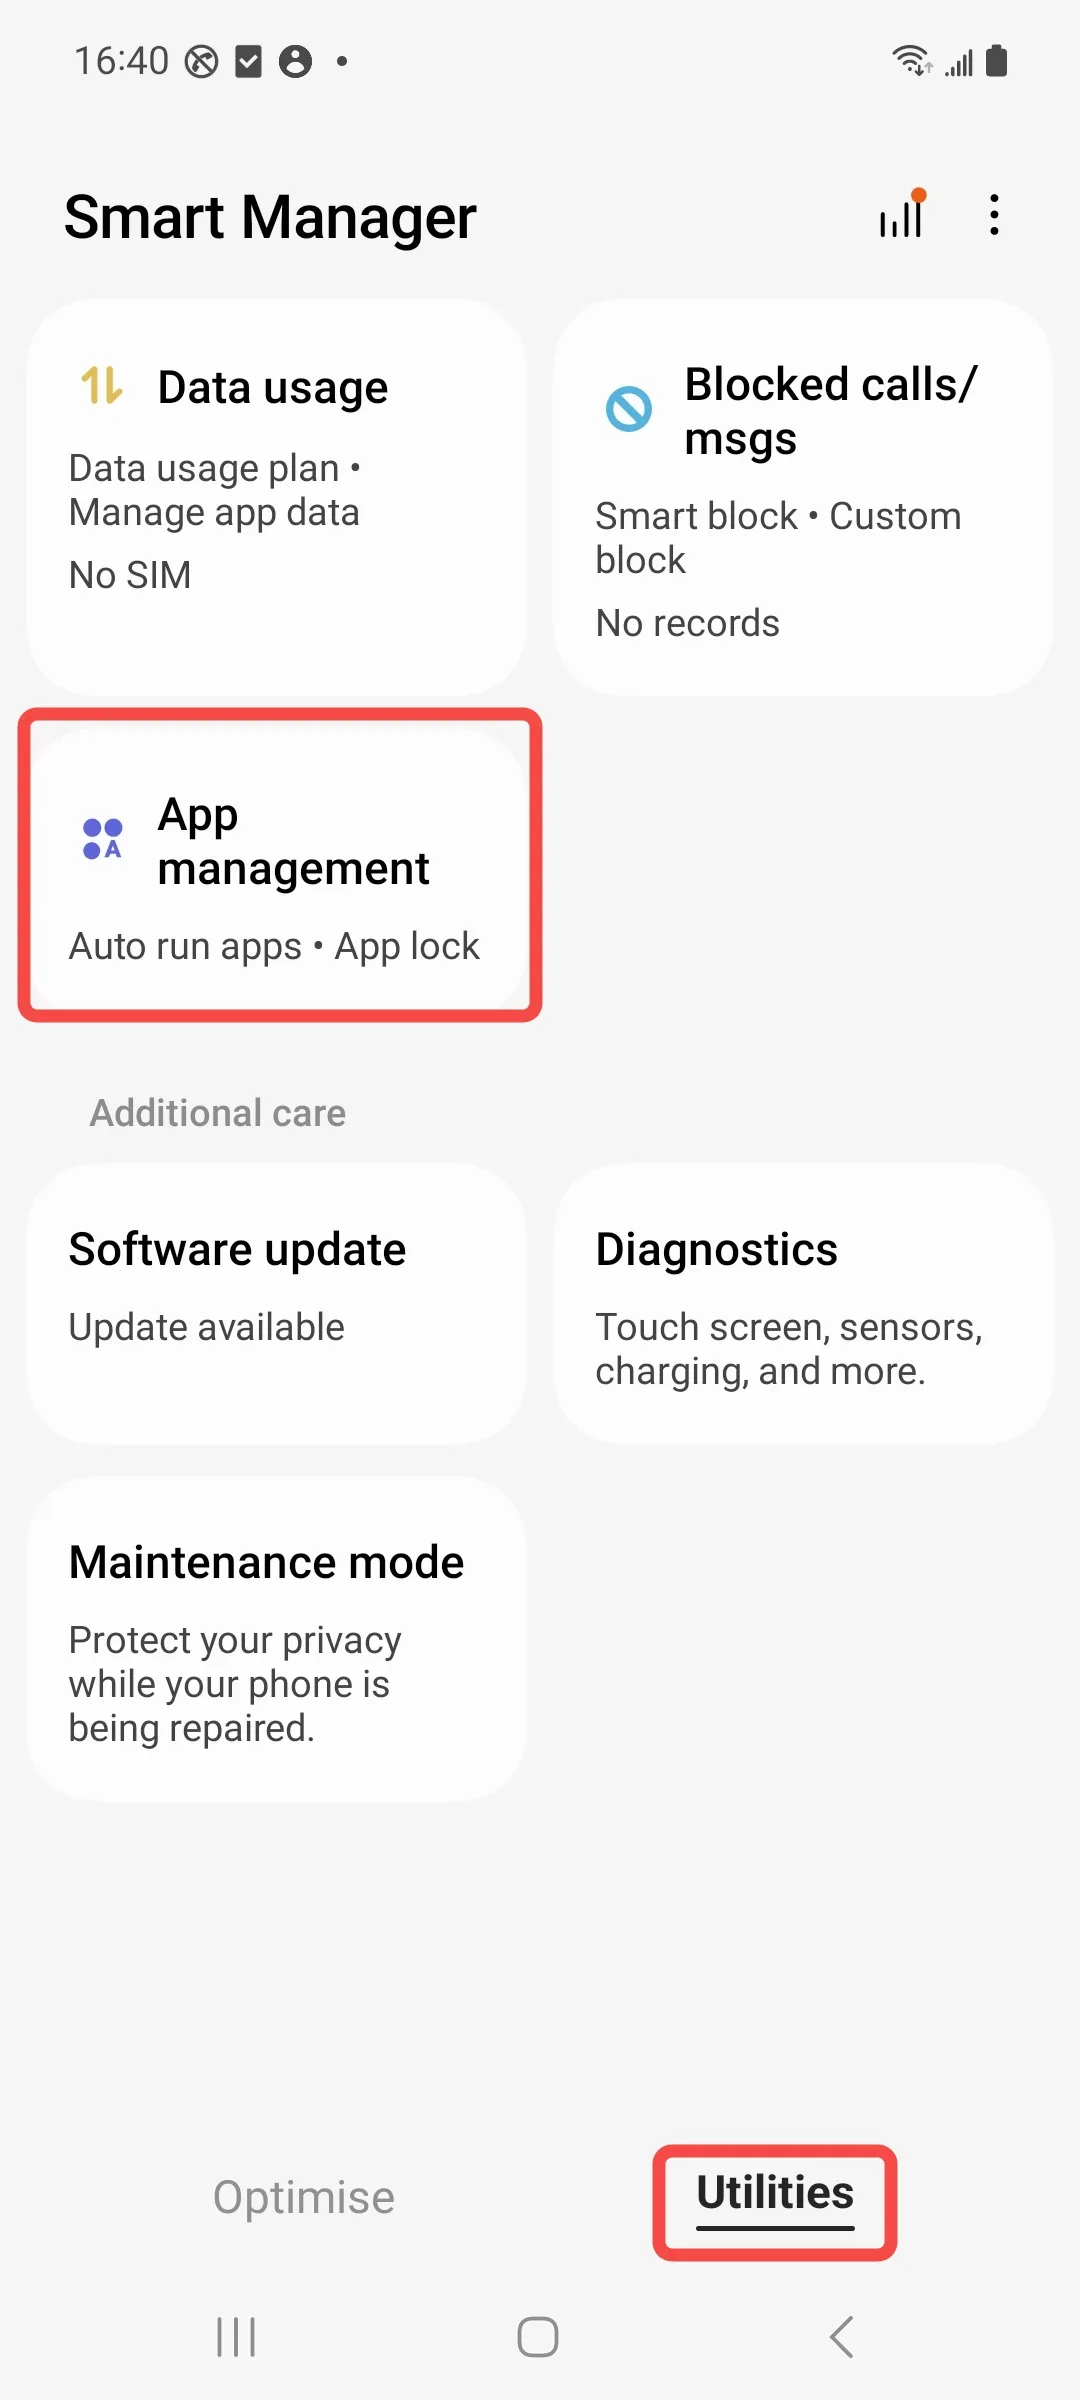
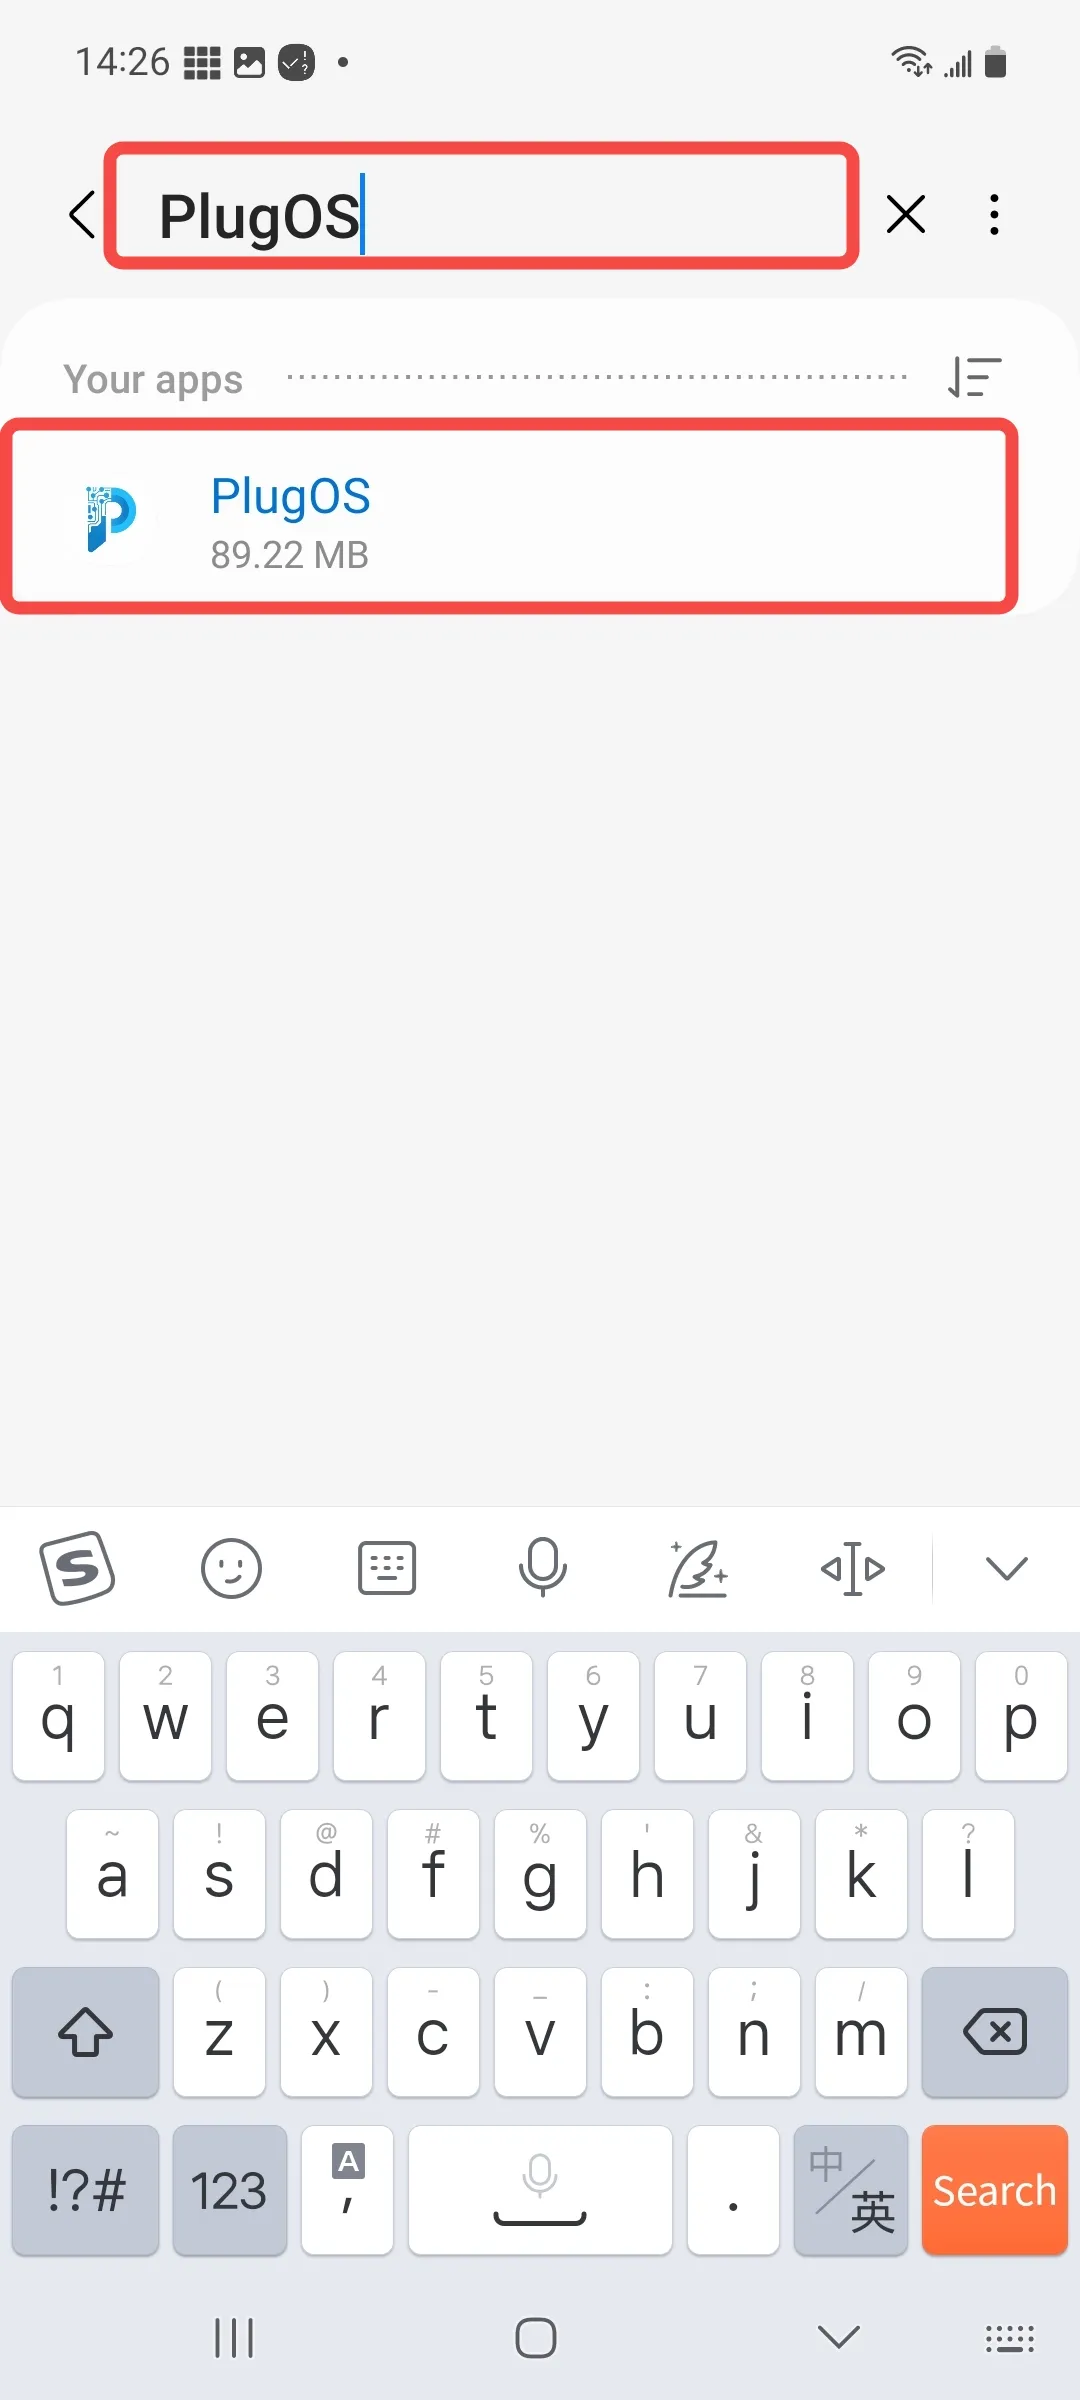
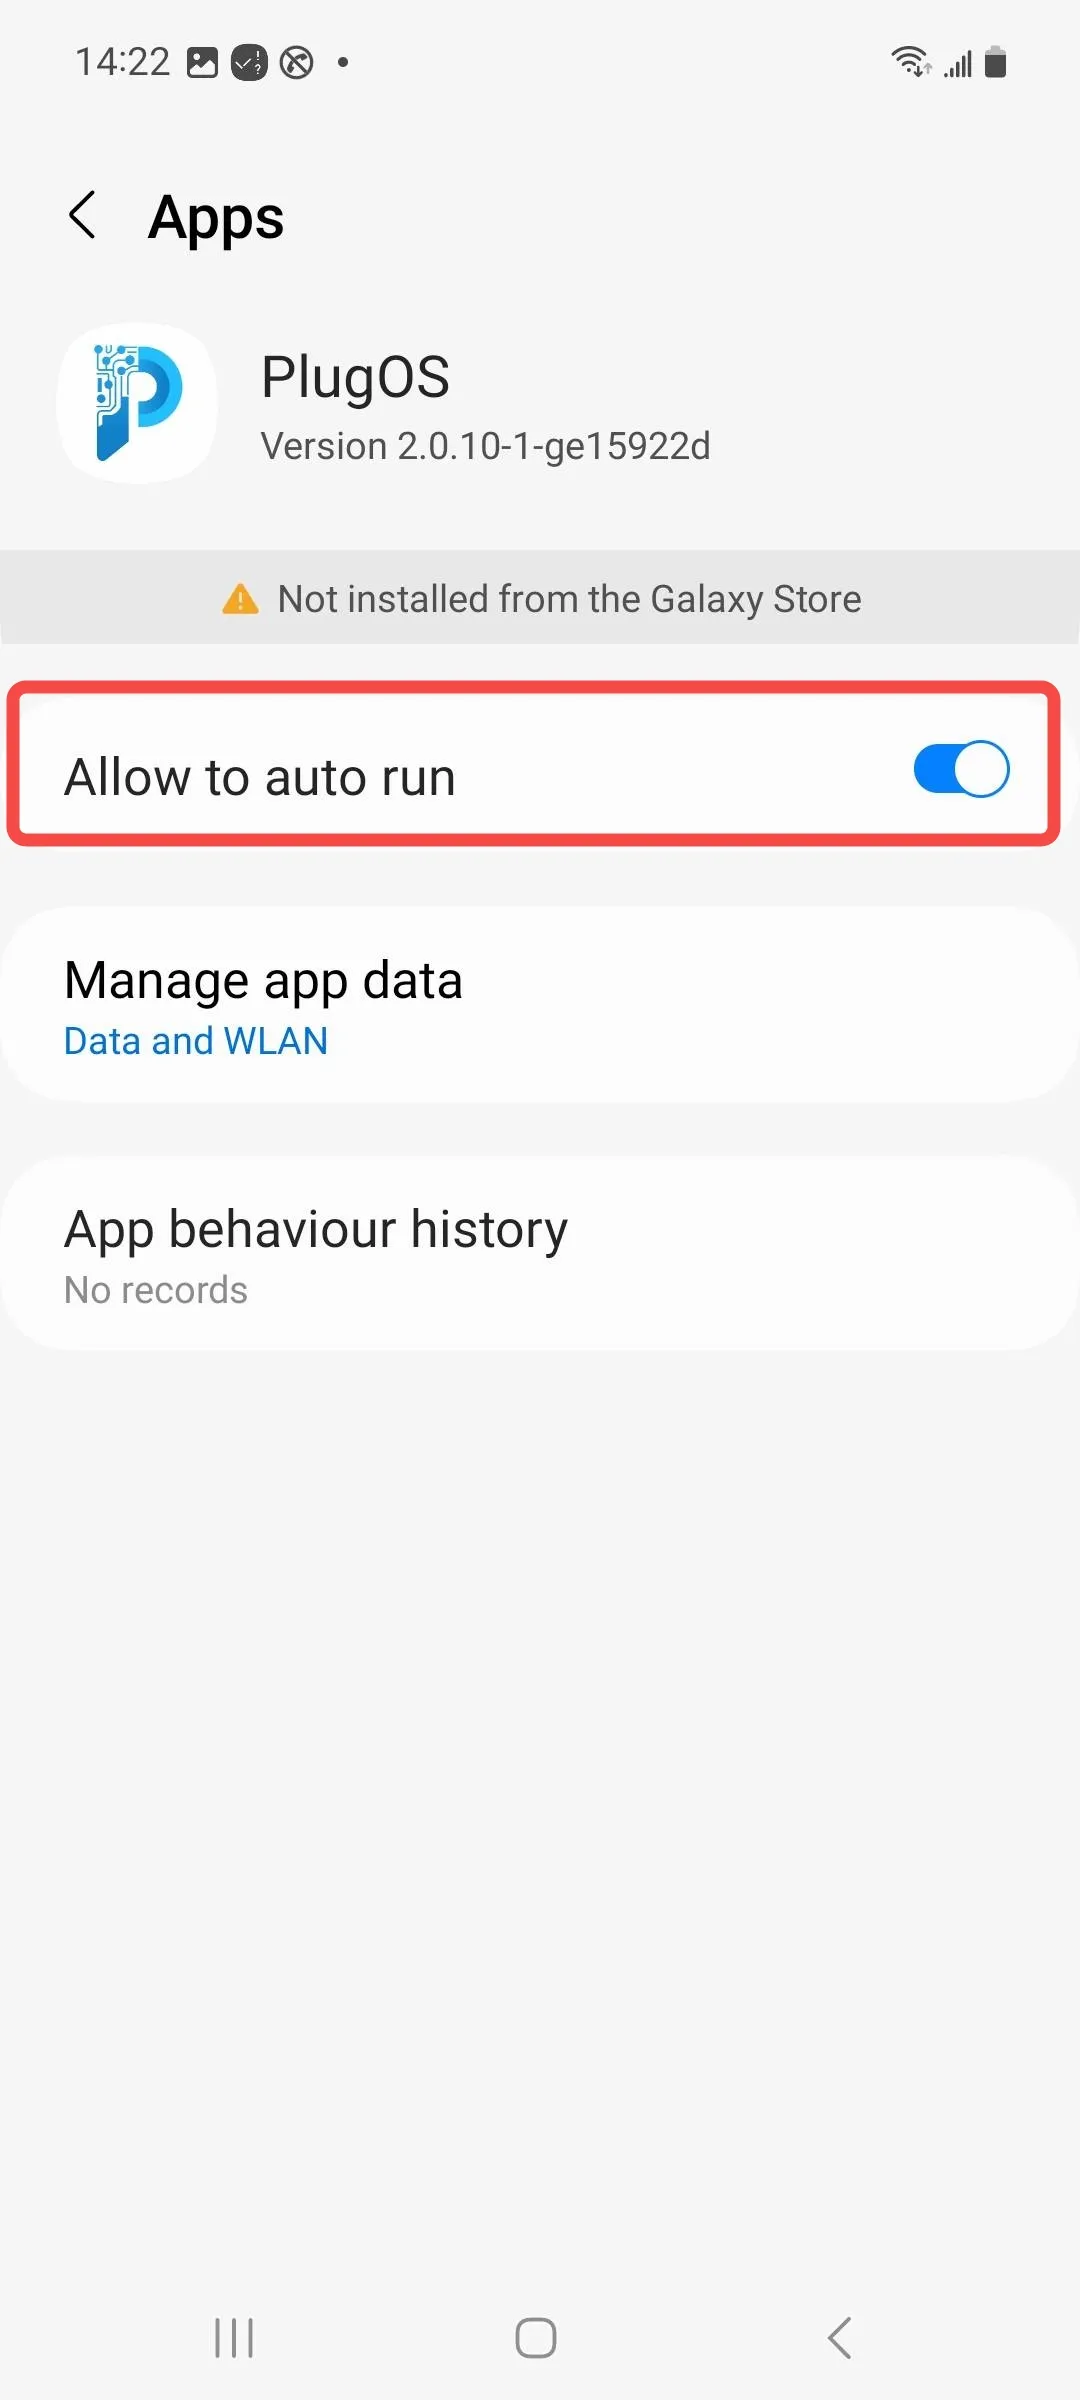
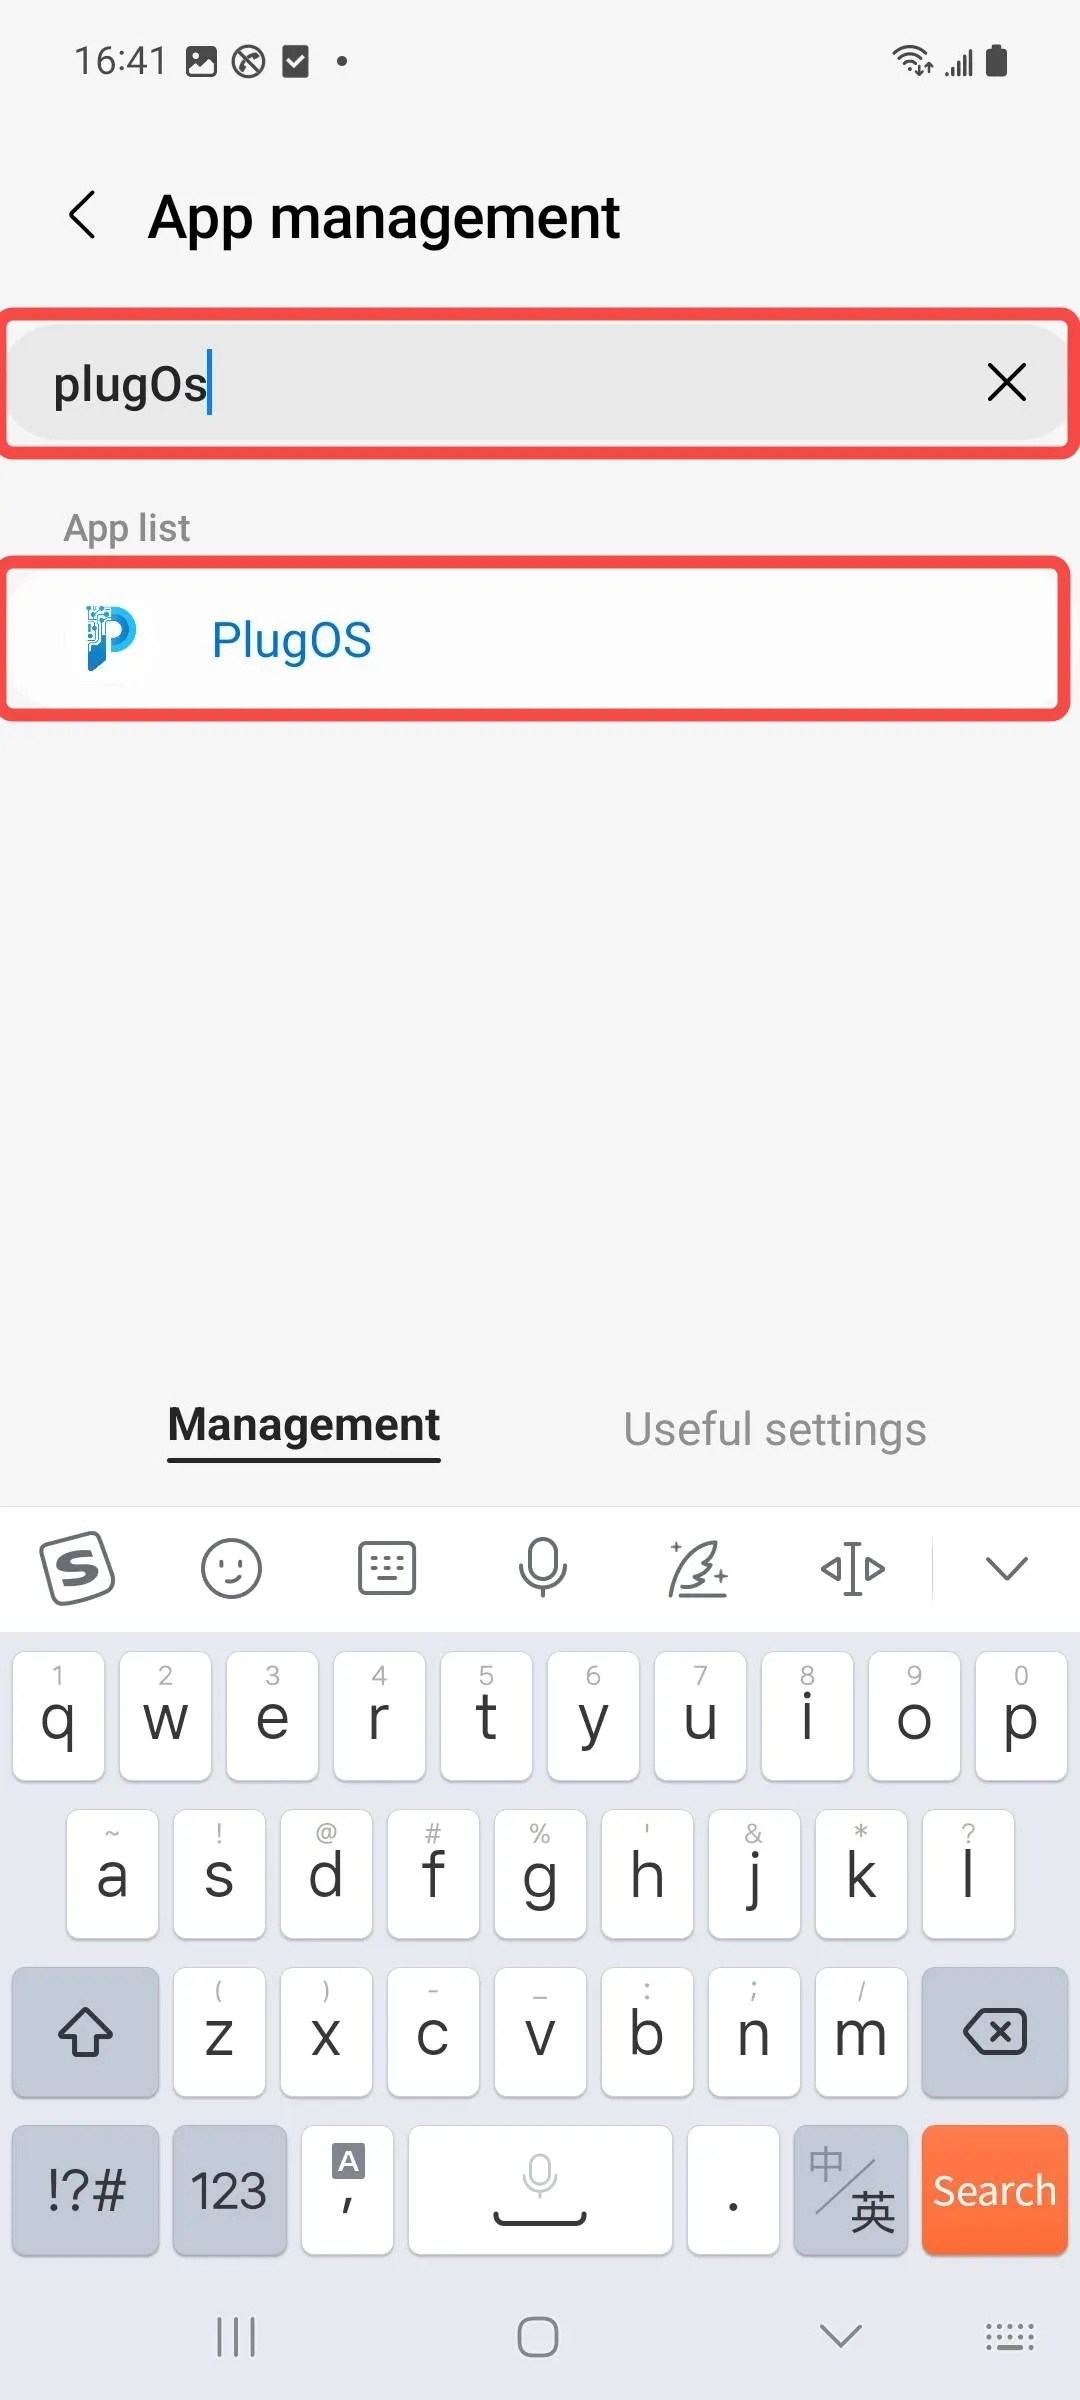
- Enable auto-launch permission Open the “Smart Manager” app → Tap to enter 【Utilities】→ Tap to enter “APP management” → Search and find “PlugOS” and tap to enter → Tap to enable “Allow to auto run”
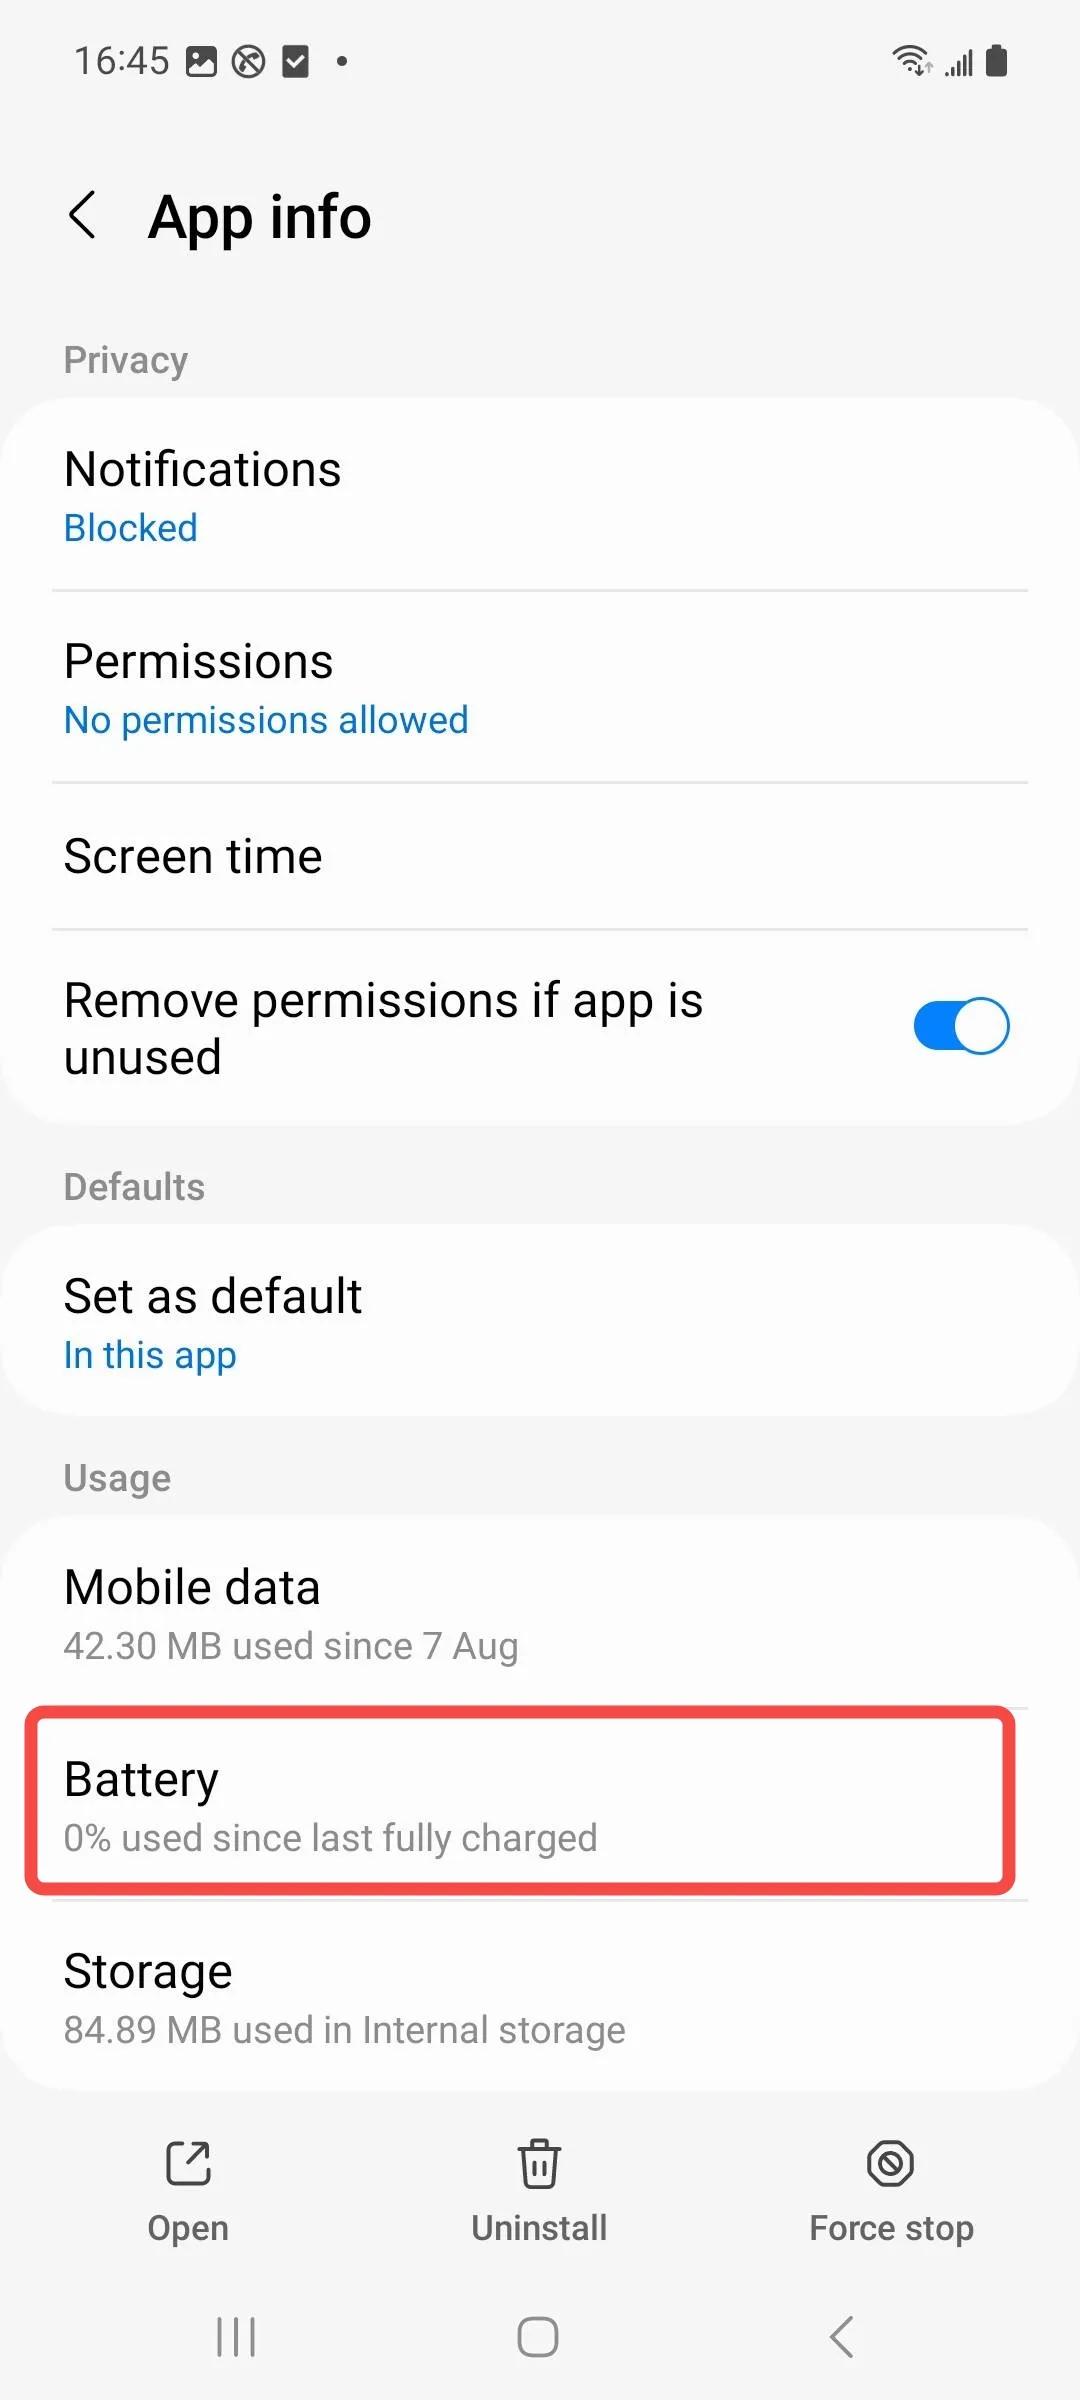
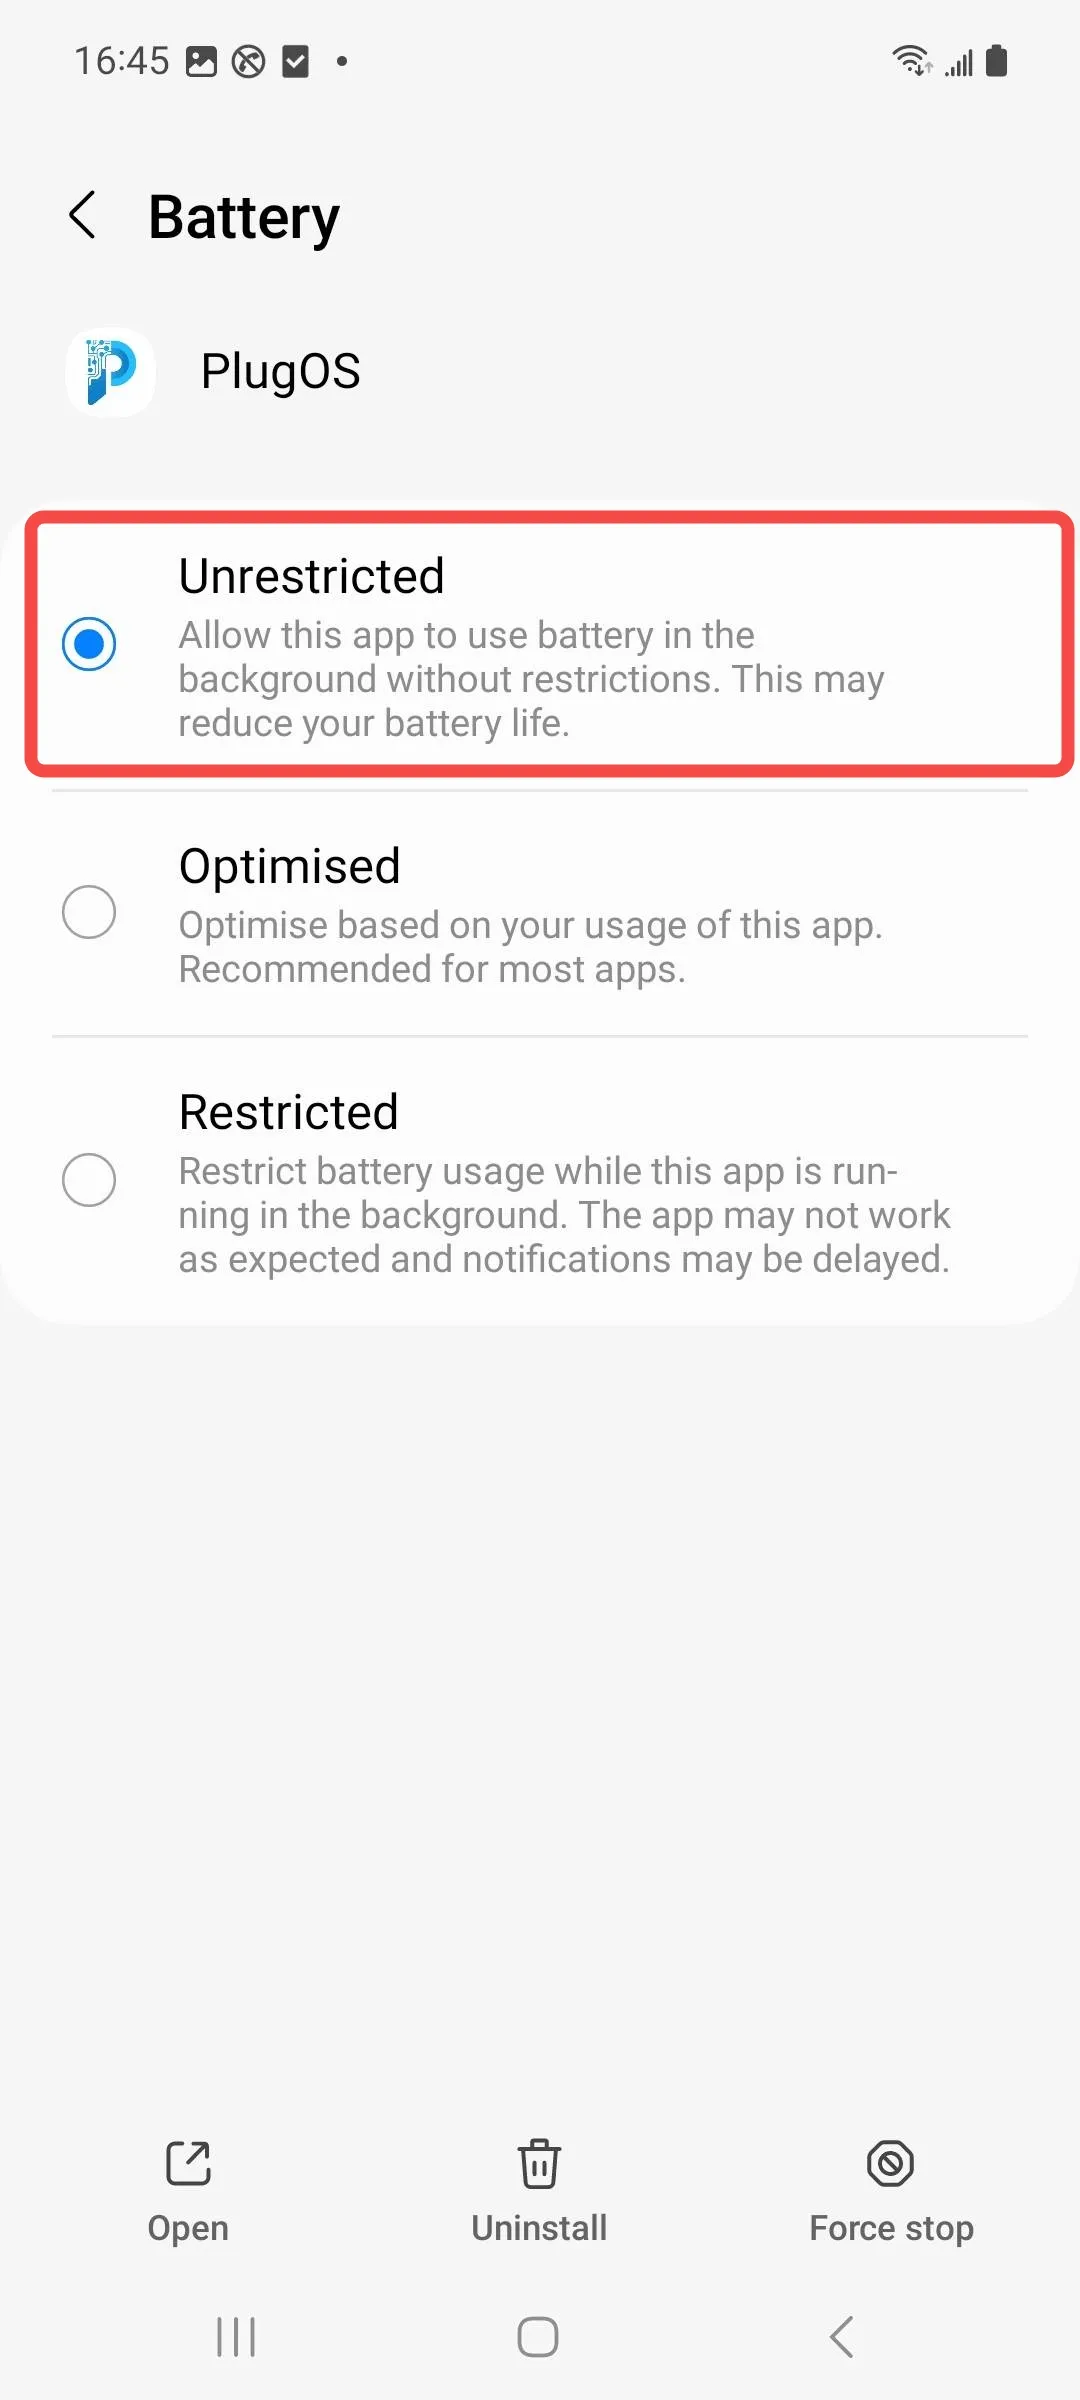
- Disable battery optimization Open 【Settings】→ Search for “Samsung app settings” → Find “PlugOS” and tap to enter → Tap “Battery” → Select “Unrestricted”
- Lock app in background Swipe up from the bottom of the screen to open the recent apps screen → Tap the icon above “PlugOS” → Tap “Lock this app”